The post MinervaDB Webinar – Building MySQL Database Infrastructure for Performance and Reliability appeared first on The WebScale Database Infrastructure Operations Experts.
]]>Recently I did a webinar on ” Building MySQL Database Infrastructure for Performance and Reliability ” , It was big success and thought will share the slides of webinar in this blog. I get lot of emails daily from Database Architects, DBAs, Database Engineers, Technical Managers and Developers worldwide on best practices and checklist to build MySQL for performance, scalability, high availability and database SRE, The objective of this webinar is to share with them a cockpit view of MySQL infrastructure operations from MinervaDB perspective. Database Systems are growing faster than ever, The modern datanomy businesses like Facebook, Uber, Airbnb, LinkedIn etc. are powered by Database Systems, This makes Database Infrastructure operationally complex and we can’t technically scale such systems with eyeballs. Building MySQL operations for web-scale means delivering highly responsive, fault-tolerant and self-healing database infrastructure for business. In this webinar we are discussing following topics:
- Configuring MySQL for performance and reliability
- Troubleshooting MySQL with Linux tools
- Troubleshooting MySQL with slow query log
- Most common tools used in MinervaDB to troubleshoot MySQL performance
- Monitoring MySQL performance
- Building MySQL infrastructure operations for performance, scalability and reliability
- MySQL Replication
You can download PDF of the webinar here

The post MinervaDB Webinar – Building MySQL Database Infrastructure for Performance and Reliability appeared first on The WebScale Database Infrastructure Operations Experts.
]]>The post InnoDB Page Compression – MySQL 8 Compression appeared first on The WebScale Database Infrastructure Operations Experts.
]]>We have several customers with multi-terabyte database infrastructure on SSDs, The SSDs are great investment for performance but they are also expensive with shorter lifespans so storage efficiency management is something we are very cautious about on SSDs, At MinervaDB Labs we spend considerable amount of time doing research on InnoDB page compressions benefits and most common mistakes. The compressed tables were first introduced in 2008 with InnoDB plugin for MySQL 5.1 . Facebook has been a major committer to this project and most of it were later implemented in upstream MySQL code as well. We can implement compression in InnoDB is two ways, Either by using Barracuda InnoDB file format or ROW_FORMAT=COMPRESSED
How InnoDB page compression works ?
When a page is written, It will be compressed applying the specific compression algorithm and written to disk, where the hole punching mechanism ( Several popular Linux file systems already support the hole punching feature. For example: XFS since Linux 2.6.38, ext4 since Linux3.0, tmpfs (/dev/shm ) since Linux 3.5, and Btrfs since Linux 3.7.)releases empty blocks from the end of the page. If compression fails, data is written out as-is. MySQL implements compression with the help of the well-known zlib library, which implements the LZ77 compression algorithm. Some operating systems implement compression at the file system level. Files are typically divided into fixed-size blocks that are compressed into variable-size blocks, which easily leads into fragmentation.if innodb_page_size=16K and the file system block size is 4K, page data must compress to less than or equal to 12K to make hole punching possible so every time something inside a block is modified, the whole block is recompressed before it is written to disk. These properties make InnoDB compression technique unsuitable for use in an update-intensive database system.
InnoDB Page Compression Supported Platforms
InnoDB page compression requires sparse file and hole punching support, You can implement page compression on Windows with NTFS and following are the Linux platforms which support hole punching:
- RHEL 7 and derived distributions that use kernel version 3.10.0-123 or higher
- OEL 5.10 (UEK2) kernel version 2.6.39 or higher
- OEL 6.5 (UEK3) kernel version 3.8.13 or higher
- OEL 7.0 kernel version 3.8.13 or higher
- SLE11 kernel version 3.0-x
- SLE12 kernel version 3.12-x
- OES11 kernel version 3.0-x
- Ubuntu 14.0.4 LTS kernel version 3.13 or higher
- Ubuntu 12.0.4 LTS kernel version 3.2 or higher
- Debian 7 kernel version 3.2 or higher
InnoDB compression on Windows
The way NTFS clustering is designed we hardly get any benefit with InnoDB compression. The hole punch is done on a “compression unit” and this compression unit is derived from the cluster size (see the table below). This means that by default you cannot punch a hole if the cluster size >= 8K. Here’s a breakdown for smaller cluster sizes:
| Cluster Size | Compression Unit |
|---|---|
| 512 Bytes | 8 KB |
| 1 KB | 16 KB |
| 2 KB | 32 KB |
| 4 KB | 64 KB |
i.e. for page compression to work on Windows, the file system must be created with a cluster size smaller than 4K, and the innodb_page_size must be at least twice the size of the compression unit. For example, for page compression to work on Windows, you could build the file system with a cluster size of 512 Bytes (which has a compression unit of 8KB) and initialize InnoDB with an innodb_page_size value of 16K or greater.
How enable InnoDB compression ?
You can enabled page compression by specifying the COMPRESSION attribute in the CREATE TABLE statement, We have explained same below with example:
CREATE TABLE tab11 (col101 INT) COMPRESSION="zlib";
We can also enable page compression with ALTER TABLE statement. But ALTER TABLE … COMPRESSION updates only the tablespace compression attribute. Writes to the tablespace that occur after setting the new compression algorithm use the new setting, To enable the new compression algorithm to existing pages, you must rebuild the table using OPTIMIZE TABLE.
Disabling InnoDB Page Compression
You can disable InnoDB page compression by setting COMPRESSION = None in ALTER TABLE statement. Writes to the tablespace that occur after setting COMPRESSION=None no longer use page compression. To uncompress existing pages, you must rebuild the table using OPTIMIZE TABLE after setting COMPRESSION=None.
Monitoring tables using Page Compression
You can monitor the tables with page compression enabled from INFORMATION_SCHEMA.TABLES CREATE_OPTIONS columns for tables defined with the COMPRESSION attribute:
mysql> SELECT TABLE_NAME, TABLE_SCHEMA, CREATE_OPTIONS FROM INFORMATION_SCHEMA.TABLES WHERE CREATE_OPTIONS LIKE '%COMPRESSION=%';

+------------+--------------+--------------------+
| TABLE_NAME | TABLE_SCHEMA | CREATE_OPTIONS     |
+------------+--------------+--------------------+
| Ad_Clicks  | ADSE         | COMPRESSION="zlib" |
+------------+--------------+--------------------+
InnoDB Page Compression Limitations
- Cross-platform dependency issues – We can copy the page-compressed tablespaces between Linux and Windows servers only if the compression algorithm is available on both servers
- InnoDB page compression doesn’t work always as expected:
- Page compression is not supported for tables that reside in shared tablespaces, which include the system tablespace, temporary tablespaces, and general tablespaces.
- Page compression is not supported for undo log tablespaces.
- Page compression is not supported for redo log pages.
- During recovery, updated pages are written out in an uncompressed form.
- R-tree pages, which are used for spatial indexes, are not compressed.
- Pages that belong to compressed tables (ROW_FORMAT=COMPRESSED) are just left as-is.
- During recovery, updated pages are written out in an uncompressed form.
- Fragmentation issues – Since hole punching releasing blocks back to the file system free list, You can expect severe fragmentation in I/O intensive applications
References
- Percona XtraDB: Compressed Columns with Dictionaries – An Alternative to InnoDB Table Compression by Yura Sorokin – https://www.percona.com/live/e17/sessions/percona-xtradb-compressed-columns-with-dictionaries-an-alternative-to-innodb-table-compression
- InnoDB page compression explained in MySQL documentation – https://dev.mysql.com/doc/refman/8.0/en/innodb-page-compression.html
- InnoDB Page Compression: the Good, the Bad and the Ugly by Vadim Tkachenko – https://www.percona.com/blog/2017/11/20/innodb-page-compression/
- On InnoDB Data Compression in MySQL by Valerii Kravchuk – http://mysqlentomologist.blogspot.com/2018/06/on-innodb-data-compression-in-mysql.html
- InnoDB Transparent Page Compression by Sunny Bains – https://mysqlserverteam.com/innodb-transparent-page-compression/
- MyRocks and InnoDB compression explained by Mark Callaghan – http://smalldatum.blogspot.com/2017/12/myrocks-innodb-and-tokudb-summary.html
- InnoDB compressed columns introduced by Yura – https://www.percona.com/doc/percona-server/LATEST/flexibility/compressed_columns.html
The post InnoDB Page Compression – MySQL 8 Compression appeared first on The WebScale Database Infrastructure Operations Experts.
]]>The post Tuning MyRocks for performance appeared first on The WebScale Database Infrastructure Operations Experts.
]]>We know InnoDB is constrained by a fixed compressed page size. Alignment during fragmentation and compression causes extra unused space because the leaf nodes are not full. Let’s consider a InnoDB table with a compressed page size of 8KB. A 16KB in-memory page compressed to 5KB still uses 8KB on storage. Adding to this, each entry in the primary key index has 13 bytes of metadata (6 byte transaction id + 7 byte rollback pointer), and the metadata is not compressed, making the space overhead significant for small rows. Typically flash devices are limited by the WRITE endurance, In a typical scenario were index values are stored in leaf nodes and sorted by key, the often operational database may not fit in memory and keys get updated in an random platform leading to higher write amplification. In the worst case, updating one row requires a number of page reads, makes several pages dirty, and forces many dirty pages to be written back to storage.
Sow now what I really love about MyRocks?
It’s all about much lower write amplification factor of RocksDB compared to InnoDB is what I am very much impressed about. On pure flash, reducing write volume (write amplification) is important because flash burns out if writing too much data. Reducing write volume also helps to improve overall throughput on flash. InnoDB adopts “update in place” architecture. Even though updating just 1 record, an entire page where the row belongs becomes dirty, and the dirty page has to be written back to storage. On typical OLTP systems, modification unit (row) size is much smaller than I/O unit (page) size. This makes write amplification very high. I have published performance benchmarking of InnoDB, RocksDB and TokuDB, You can read about it here
Things to remember before tuning MyRocks:
- Data loading limitations
- Limitation – Transaction must fit in memory:
- mysql > ALTER TABLE post_master ENGINE = RocksDB;
- Error 2013 (HY000): Lost connection to MySQL server during query.
- Higher memory consumption and eventually get killed by OOM killer
- mysql > ALTER TABLE post_master ENGINE = RocksDB;
- When loading data into MyRocks tables, there are two recommended session variables:
- SET session sql_log_bin=0;
- SET session rocksdb_bulk_load=1;
- Limitation – Transaction must fit in memory:
There are few interesting things to remember before bulk loading MyRocks and tuning the system variable rocksdb_bulk_load:
- Data being bulk loaded can never overlap with existing data in the table. It is always recommended to bulk data load into an empty table. But, The mode will allow loading some data into the table, doing other operations and then returning and bulk loading addition data if there is no overlap between what is loaded and what already exists.
- The data may not be visible until the bulk load mode is ended (i.e. the rocksdb_bulk_load is set to zero again). RocksDB stores data into “SST” (Sorted String Table) files and Until a particular SST has been added the data will not be visible to the rest of the system, thus issuing a SELECT on the table currently being bulk loaded will only show older data and will likely not show the most recently added rows. Ending the bulk load mode will cause the most recent SST file to be added. When bulk loading multiple tables, starting a new table will trigger the code to add the most recent SST file to the system — as a result, it is inadvisable to interleave INSERT statements to two or more tables during bulk load mode.
Configuring MyRocks for performance:
Character Sets:
- MyRocks works more optimal with case sensitive collations (latin1_bin, utf8_bin, binary)
Transaction
- Read Committed isolation level is recommended. MyRocks’s transaction isolation implementation is different from InnoDB, but close to PostgreSQL. Default tx isolation in PostgreSQL is Read Committed.
Compression
- Set kNoCompression (or kLZ4Compression) on L0-1 or L0-2
- In the bottommost level, using stronger compression algorithm (Zlib or ZSTD) is recommended.
- If using zlib compression, set kZlibCompression at the bottommost level (bottommost_compression).
- If using zlib compression, set compression level accordingly. The above example (compression_opts=-14:1:0) uses zlib compression level 1. If your application is not write intensive, setting (compression_opts=-14:6:0) will give better space savings (using zlib compression level 6).
- For other levels, set kLZ4Compression.
Data blocks, files and compactions
- Set level_compaction_dynamic_level_bytes=true
- Set proper rocksdb_block_size (default 4096). Larger block size will reduce space but increase CPU overhead because MyRocks has to uncompress many more bytes. There is a trade-off between space and CPU usage.
- Set rocksdb_max_open_files=-1. If setting greater than 0, RocksDB still uses table_cache, which will lock a mutex every time you access the file. I think you’ll see much greater benefit with -1 because then you will not need to go through LRUCache to get the table you need.
- Set reasonable rocksdb_max_background_jobs
- Set not small target_file_size_base (32MB is generally sufficient). Default is 4MB, which is generally too small and creates too many sst files. Too many sst files makes operations more difficult.
- Set Rate Limiter. Without rate limiter, compaction very often writes 300~500MB/s on pure flash, which may cause short stalls. On 4x MyRocks testing, 40MB/s rate limiter per instance gave pretty stable results (less than 200MB/s peak from iostat).
Bloom Filter
- Configure bloom filter and Prefix Extractor. Full Filter is recommended (Block based filter does not work for Get() + prefix bloom). Prefix extractor can be configured per column family and uses the first prefix_extractor bits as the key. If using one BIGINT column as a primary key, recommended bloom filter size is 12 (first 4 bytes are for internal index id + 8 byte BIGINT).
- Configure Memtable bloom filter. Memtable bloom filter is useful to reduce CPU usage, if you see high CPU usage at rocksdb::MemTable::KeyComparator. Size depends on Memtable size. Set memtable_prefix_bloom_bits=41943040 for 128MB Memtable (30/128M=4M keys * 10 bits per key).
Cache
- Do not set block_cache at rocksdb_default_cf_options (block_based_table_factory). If you do provide a block cache size on a default column family, the same cache is NOT reused for all such column families.
- Consider setting shared write buffer size (db_write_buffer_size)
- Consider using compaction_pri=kMinOverlappingRatio for writing less on compaction.
Reference Source: https://github.com/facebook/mysql-5.6/wiki/my.cnf-tuning
The post Tuning MyRocks for performance appeared first on The WebScale Database Infrastructure Operations Experts.
]]>The post Installation and configuration of Percona XtraDB Cluster on CentOS 7.3 appeared first on The WebScale Database Infrastructure Operations Experts.
]]>This cluster will be assembled of three servers/nodes:
node #1

hostname: PXC1

IP: 138.197.70.35

node #2

hostname: PXC2

IP: 159.203.118.230

node #3

hostname: PXC3

IP: 138.197.8.226
Prerequisites
- All three nodes have a CentOS 7.3 installation.
- Firewall has been set up to allow connecting to ports 3306, 4444, 4567 and 4568
- SELinux is disabled
Installing from Percona Repository on 138.197.70.35
- Install the Percona repository package:
$ sudo yum install http://www.percona.com/downloads/percona-release/redhat/0.1-4/percona-release-0.1-4.noarch.rpm
- You should see the following if successful:
Installed:

 percona-release.noarch 0:0.1-4

Complete!
- Check that the packages are available:
$ sudo yum list | grep Percona-XtraDB-Cluster-57

Percona-XtraDB-Cluster-57.x86_64          5.7.14-26.17.1.el7         percona-release-x86_64

Percona-XtraDB-Cluster-57-debuginfo.x86_64 5.7.14-26.17.1.el7         percona-release-x86_64
- Install the Percona XtraDB Cluster packages:
$ sudo yum install Percona-XtraDB-Cluster-57
- Start the Percona XtraDB Cluster server:
$ sudo service mysql start
- Copy the automatically generated temporary password for the superuser account:
$ sudo grep 'temporary password' /var/log/mysqld.log
- Use this password to login as root:
$ mysql -u root -p
- Change the password for the superuser account and log out. For example:
mysql> ALTER USER 'root'@'localhost' IDENTIFIED BY 'root';

Query OK, 0 rows affected (0.00 sec)

mysql> exit

Bye
- Stop the mysql service:
$ sudo service mysql stop
Repeat the same Percona XtraDB Cluster installation process for 159.203.118.230 and 138.197.8.226
Configuring nodes
We have to configure separately the nodes 138.197.70.35, 159.203.118.230 and 138.197.8.226 for successfully implementing an fully operational Percona XtraDB Cluster ecosystem.
Configuring the node 138.197.70.35
Configuration file /etc/my.cnf for the first node should look like:
[mysqld]

datadir=/var/lib/mysql

user=mysql

# Path to Galera library

wsrep_provider=/usr/lib64/libgalera_smm.so

# Cluster connection URL contains the IPs of node#1, node#2 and node#3

wsrep_cluster_address=gcomm://138.197.70.35,159.203.118.230,138.197.8.226

# In order for Galera to work correctly binlog format should be ROW

binlog_format=ROW

# MyISAM storage engine has only experimental support

default_storage_engine=InnoDB

# This changes how InnoDB autoincrement locks are managed and is a requirement for Galera

innodb_autoinc_lock_mode=2

# Node #1 address

wsrep_node_address=138.197.70.35

# SST method

wsrep_sst_method=xtrabackup-v2

# Cluster name

wsrep_cluster_name=pxc_cluster

# Authentication for SST method

wsrep_sst_auth="sstuser:sstuser"
The first node can be started with the following command:
# /etc/init.d/mysql bootstrap-pxc
We are using CentOS 7.3 so systemd bootstrap service should be used:
# systemctl start mysql@bootstrap.service
This command will start the cluster with initial wsrep_cluster_address set to gcomm://. This way the cluster will be bootstrapped and in case the node or MySQL have to be restarted later, there would be no need to change the configuration file.
After the first node has been started, cluster status can be checked by:
mysql> show status like 'wsrep%';

+------------------------------+------------------------------------------------------------+

| Variable_name               | Value                                                     |

+------------------------------+------------------------------------------------------------+

| wsrep_local_state_uuid      | 5ea977b8-0fc0-11e7-8f73-26f60f083bd5                      |

| wsrep_protocol_version      | 7                                                         |

| wsrep_last_committed        | 8                                                         |

| wsrep_replicated            | 4                                                         |

| wsrep_replicated_bytes      | 906                                                       |

| wsrep_repl_keys             | 4                                                         |

| wsrep_repl_keys_bytes       | 124                                                       |

| wsrep_repl_data_bytes       | 526                                                       |

| wsrep_repl_other_bytes      | 0                                                         |

| wsrep_received              | 9                                                         |

| wsrep_received_bytes        | 1181                                                      |

| wsrep_local_commits         | 0                                                         |

| wsrep_local_cert_failures   | 0                                                         |

| wsrep_local_replays         | 0                                                         |

| wsrep_local_send_queue      | 0                                                         |

| wsrep_local_send_queue_max  | 1                                                         |

| wsrep_local_send_queue_min  | 0                                                         |

| wsrep_local_send_queue_avg  | 0.000000                                                  |

| wsrep_local_recv_queue      | 0                                                         |

| wsrep_local_recv_queue_max  | 2                                                         |

| wsrep_local_recv_queue_min  | 0                                                         |

| wsrep_local_recv_queue_avg  | 0.111111                                                  |

| wsrep_local_cached_downto   | 3                                                         |

| wsrep_flow_control_paused_ns | 0                                                         |

| wsrep_flow_control_paused   | 0.000000                                                  |

| wsrep_flow_control_sent     | 0                                                         |

| wsrep_flow_control_recv     | 0                                                         |

| wsrep_flow_control_interval | [ 28, 28 ]                                                |

| wsrep_cert_deps_distance    | 1.000000                                                  |

| wsrep_apply_oooe            | 0.000000                                                  |

| wsrep_apply_oool            | 0.000000                                                  |

| wsrep_apply_window          | 1.000000                                                  |

| wsrep_commit_oooe           | 0.000000                                                  |

| wsrep_commit_oool           | 0.000000                                                  |

| wsrep_commit_window         | 1.000000                                                  |

| wsrep_local_state           | 4                                                         |

| wsrep_local_state_comment   | Synced                                                    |

| wsrep_cert_index_size       | 2                                                         |

| wsrep_cert_bucket_count     | 22                                                        |

| wsrep_gcache_pool_size      | 3128                                                      |

| wsrep_causal_reads          | 0                                                         |

| wsrep_cert_interval         | 0.000000                                                  |

| wsrep_incoming_addresses    | 159.203.118.230:3306,138.197.8.226:3306,138.197.70.35:3306 |

| wsrep_desync_count          | 0                                                         |

| wsrep_evs_delayed           |                                                           |

| wsrep_evs_evict_list        |                                                           |

| wsrep_evs_repl_latency      | 0/0/0/0/0                                                 |

| wsrep_evs_state             | OPERATIONAL                                               |

| wsrep_gcomm_uuid            | b79d90df-1077-11e7-9922-3a1b217f7371                      |

| wsrep_cluster_conf_id       | 3                                                         |

| wsrep_cluster_size          | 3                                                         |

| wsrep_cluster_state_uuid    | 5ea977b8-0fc0-11e7-8f73-26f60f083bd5                      |

| wsrep_cluster_status        | Primary                                                   |

| wsrep_connected             | ON                                                        |

| wsrep_local_bf_aborts       | 0                                                         |

| wsrep_local_index           | 2                                                         |

| wsrep_provider_name         | Galera                                                    |

| wsrep_provider_vendor       | Codership Oy <info@codership.com>                         |

| wsrep_provider_version      | 3.20(r7e383f7)                                            |

| wsrep_ready                 | ON                                                        |

+------------------------------+------------------------------------------------------------+

60 rows in set (0.01 sec)
This output above shows that the cluster has been successfully bootstrapped.
In order to perform successful State Snapshot Transfer using XtraBackup new user needs to be set up with proper privileges:
mysql@PXC1> CREATE USER 'sstuser'@'localhost' IDENTIFIED BY 'sstuser';

mysql@PXC1> GRANT PROCESS, RELOAD, LOCK TABLES, REPLICATION CLIENT ON *.* TO 'sstuser'@'localhost';

mysql@PXC1> FLUSH PRIVILEGES;
Configuration file /etc/my.cnf on the second node (PXC2) should look like this:
[mysqld]

datadir=/var/lib/mysql

user=mysql

# Path to Galera library

wsrep_provider=/usr/lib64/libgalera_smm.so

# Cluster connection URL contains the IPs of node#1, node#2 and node#3

wsrep_cluster_address=gcomm://138.197.70.35,159.203.118.230,138.197.8.226

# In order for Galera to work correctly binlog format should be ROW

binlog_format=ROW

# MyISAM storage engine has only experimental support

default_storage_engine=InnoDB

# This changes how InnoDB autoincrement locks are managed and is a requirement for Galera

innodb_autoinc_lock_mode=2

# Node #2 address

wsrep_node_address=159.203.118.230

# SST method

wsrep_sst_method=xtrabackup-v2

# Cluster name

wsrep_cluster_name=pxc_cluster

# Authentication for SST method

wsrep_sst_auth="sstuser:sstuser"
Second node can be started with the following command:
# systemctl start mysql
Cluster status can now be checked on both nodes. This is the example from the second node (PXC2):
mysql> show status like 'wsrep%';

+------------------------------+------------------------------------------------------------+

| Variable_name               | Value                                                     |

+------------------------------+------------------------------------------------------------+

| wsrep_local_state_uuid      | 5ea977b8-0fc0-11e7-8f73-26f60f083bd5                      |

| wsrep_protocol_version      | 7                                                         |

| wsrep_last_committed        | 8                                                         |

| wsrep_replicated            | 0                                                         |

| wsrep_replicated_bytes      | 0                                                         |

| wsrep_repl_keys             | 0                                                         |

| wsrep_repl_keys_bytes       | 0                                                         |

| wsrep_repl_data_bytes       | 0                                                         |

| wsrep_repl_other_bytes      | 0                                                         |

| wsrep_received              | 10                                                        |

| wsrep_received_bytes        | 1238                                                      |

| wsrep_local_commits         | 0                                                         |

| wsrep_local_cert_failures   | 0                                                         |

| wsrep_local_replays         | 0                                                         |

| wsrep_local_send_queue      | 0                                                         |

| wsrep_local_send_queue_max  | 1                                                         |

| wsrep_local_send_queue_min  | 0                                                         |

| wsrep_local_send_queue_avg  | 0.000000                                                  |

| wsrep_local_recv_queue      | 0                                                         |

| wsrep_local_recv_queue_max  | 1                                                         |

| wsrep_local_recv_queue_min  | 0                                                         |

| wsrep_local_recv_queue_avg  | 0.000000                                                  |

| wsrep_local_cached_downto   | 6                                                         |

| wsrep_flow_control_paused_ns | 0                                                         |

| wsrep_flow_control_paused   | 0.000000                                                  |

| wsrep_flow_control_sent     | 0                                                         |

| wsrep_flow_control_recv     | 0                                                         |

| wsrep_flow_control_interval | [ 28, 28 ]                                                |

| wsrep_cert_deps_distance    | 1.000000                                                  |

| wsrep_apply_oooe            | 0.000000                                                  |

| wsrep_apply_oool            | 0.000000                                                  |

| wsrep_apply_window          | 1.000000                                                  |

| wsrep_commit_oooe           | 0.000000                                                  |

| wsrep_commit_oool           | 0.000000                                                  |

| wsrep_commit_window         | 1.000000                                                  |

| wsrep_local_state           | 4                                                         |

| wsrep_local_state_comment   | Synced                                                    |

| wsrep_cert_index_size       | 2                                                         |

| wsrep_cert_bucket_count     | 22                                                        |

| wsrep_gcache_pool_size      | 2300                                                      |

| wsrep_causal_reads          | 0                                                         |

| wsrep_cert_interval         | 0.000000                                                  |

| wsrep_incoming_addresses    | 159.203.118.230:3306,138.197.8.226:3306,138.197.70.35:3306 |

| wsrep_desync_count          | 0                                                         |

| wsrep_evs_delayed           |                                                           |

| wsrep_evs_evict_list        |                                                           |

| wsrep_evs_repl_latency      | 0/0/0/0/0                                                 |

| wsrep_evs_state             | OPERATIONAL                                               |

| wsrep_gcomm_uuid            | 248e2782-1078-11e7-a269-4a3ec033a606                      |

| wsrep_cluster_conf_id       | 3                                                         |

| wsrep_cluster_size          | 3                                                         |

| wsrep_cluster_state_uuid    | 5ea977b8-0fc0-11e7-8f73-26f60f083bd5                      |

| wsrep_cluster_status        | Primary                                                   |

| wsrep_connected             | ON                                                        |

| wsrep_local_bf_aborts       | 0                                                         |

| wsrep_local_index           | 0                                                         |

| wsrep_provider_name         | Galera                                                    |

| wsrep_provider_vendor       | Codership Oy <info@codership.com>                         |

| wsrep_provider_version      | 3.20(r7e383f7)                                            |

| wsrep_ready                 | ON                                                        |

+------------------------------+------------------------------------------------------------+

60 rows in set (0.00 sec)
This output shows that the new node has been successfully added to the cluster.
MySQL configuration file /etc/my.cnf on the third node (PXC3) should look like this:
[mysqld]

datadir=/var/lib/mysql

user=mysql

# Path to Galera library

wsrep_provider=/usr/lib64/libgalera_smm.so

# Cluster connection URL contains the IPs of node#1, node#2 and node#3

wsrep_cluster_address=gcomm://138.197.70.35,159.203.118.230,138.197.8.226

# In order for Galera to work correctly binlog format should be ROW

binlog_format=ROW

# MyISAM storage engine has only experimental support

default_storage_engine=InnoDB

# This changes how InnoDB autoincrement locks are managed and is a requirement for Galera

innodb_autoinc_lock_mode=2

# Node #3 address

wsrep_node_address=138.197.8.226

# SST method

wsrep_sst_method=xtrabackup-v2

# Cluster name

wsrep_cluster_name=pxc_cluster

# Authentication for SST method

wsrep_sst_auth="sstuser:sstuser"
Third node can now be started with the following command:
# systemctl start mysql
Percona XtraDB Cluster status can now be checked from the third node (PXC3):
mysql> show status like 'wsrep%';

+------------------------------+------------------------------------------------------------+

| Variable_name               | Value                                                     |

+------------------------------+------------------------------------------------------------+

| wsrep_local_state_uuid      | 5ea977b8-0fc0-11e7-8f73-26f60f083bd5                      |

| wsrep_protocol_version      | 7                                                         |

| wsrep_last_committed        | 8                                                         |

| wsrep_replicated            | 2                                                         |

| wsrep_replicated_bytes      | 396                                                       |

| wsrep_repl_keys             | 2                                                         |

| wsrep_repl_keys_bytes       | 62                                                        |

| wsrep_repl_data_bytes       | 206                                                       |

| wsrep_repl_other_bytes      | 0                                                         |

| wsrep_received              | 4                                                         |

| wsrep_received_bytes        | 529                                                       |

| wsrep_local_commits         | 0                                                         |

| wsrep_local_cert_failures   | 0                                                         |

| wsrep_local_replays         | 0                                                         |

| wsrep_local_send_queue      | 0                                                         |

| wsrep_local_send_queue_max  | 1                                                         |

| wsrep_local_send_queue_min  | 0                                                         |

| wsrep_local_send_queue_avg  | 0.000000                                                  |

| wsrep_local_recv_queue      | 0                                                         |

| wsrep_local_recv_queue_max  | 1                                                         |

| wsrep_local_recv_queue_min  | 0                                                         |

| wsrep_local_recv_queue_avg  | 0.000000                                                  |

| wsrep_local_cached_downto   | 6                                                         |

| wsrep_flow_control_paused_ns | 0                                                         |

| wsrep_flow_control_paused   | 0.000000                                                  |

| wsrep_flow_control_sent     | 0                                                         |

| wsrep_flow_control_recv     | 0                                                         |

| wsrep_flow_control_interval | [ 28, 28 ]                                                |

| wsrep_cert_deps_distance    | 1.000000                                                  |

| wsrep_apply_oooe            | 0.000000                                                  |

| wsrep_apply_oool            | 0.000000                                                  |

| wsrep_apply_window          | 1.000000                                                  |

| wsrep_commit_oooe           | 0.000000                                                  |

| wsrep_commit_oool           | 0.000000                                                  |

| wsrep_commit_window         | 1.000000                                                  |

| wsrep_local_state           | 4                                                         |

| wsrep_local_state_comment   | Synced                                                    |

| wsrep_cert_index_size       | 2                                                         |

| wsrep_cert_bucket_count     | 22                                                        |

| wsrep_gcache_pool_size      | 2166                                                      |

| wsrep_causal_reads          | 0                                                         |

| wsrep_cert_interval         | 0.000000                                                  |

| wsrep_incoming_addresses    | 159.203.118.230:3306,138.197.8.226:3306,138.197.70.35:3306 |

| wsrep_desync_count          | 0                                                         |

| wsrep_evs_delayed           |                                                           |

| wsrep_evs_evict_list        |                                                           |

| wsrep_evs_repl_latency      | 0/0/0/0/0                                                 |

| wsrep_evs_state             | OPERATIONAL                                               |

| wsrep_gcomm_uuid            | 3f51b20e-1078-11e7-8405-8e9b37a37cb1                      |

| wsrep_cluster_conf_id       | 3                                                         |

| wsrep_cluster_size          | 3                                                         |

| wsrep_cluster_state_uuid    | 5ea977b8-0fc0-11e7-8f73-26f60f083bd5                      |

| wsrep_cluster_status        | Primary                                                   |

| wsrep_connected             | ON                                                        |

| wsrep_local_bf_aborts       | 0                                                         |

| wsrep_local_index           | 1                                                         |

| wsrep_provider_name         | Galera                                                    |

| wsrep_provider_vendor       | Codership Oy <info@codership.com>                         |

| wsrep_provider_version      | 3.20(r7e383f7)                                            |

| wsrep_ready                 | ON                                                        |

+------------------------------+------------------------------------------------------------+

60 rows in set (0.03 sec)
This output confirms that the third node has joined the cluster.
Testing Replication
Creating the new database on the PXC1 node:
mysql> create database minervadb;

Query OK, 1 row affected (0.01 sec)
Creating the example table on the PXC2 node:
mysql> use minervadb;

Database changed

mysql> CREATE TABLE example (node_id INT PRIMARY KEY, node_name VARCHAR(30));

Query OK, 0 rows affected (0.01 sec)
Inserting records on the PXC3 node:
mysql> INSERT INTO minervadb.example VALUES (1, 'MinervaDB');

Query OK, 1 row affected (0.07 sec)
Retrieving all the rows from that table on the PXC1 node:
mysql> select * from minervadb.example;

+---------+-----------+

| node_id | node_name |

+---------+-----------+

|      1 | MinervaDB |

+---------+-----------+

1 row in set (0.00 sec)
The post Installation and configuration of Percona XtraDB Cluster on CentOS 7.3 appeared first on The WebScale Database Infrastructure Operations Experts.
]]>The post Auditing MariaDB for Secured Database Infrastructure Operations appeared first on The WebScale Database Infrastructure Operations Experts.
]]>MariaDB Audit Plugin installation
The MariaDB Audit Plugin is provided as a dynamic library: server_audit.so (server_audit.dll for Windows). The file path of the plugin library is stored in the plugin_dir system variable:
MariaDB [(none)]> select @@plugin_dir;
+--------------------------+
| @@plugin_dir             |
+--------------------------+
| /usr/lib64/mysql/plugin/ |
+--------------------------+
1 row in set (0.000 sec)
One way to install this plug-in is to execute the INSTALL SONAME statement while logged into MariaDB. You must use an administrative account with INSERT privilege for the mysql.plugin table:
MariaDB [(none)]> INSTALL SONAME 'server_audit';
Loading Plugin at Start-Up
You can also load the plugin from the command-line as a startup parameter by configuring my.cnf or my.ini in /etc/my.cnf or /etc/mysql/my.cnf , We have copied below the configuration of my.cnf for enabling MariaDB Audit Plugin (please add these variables after [mysqld] or [mariadb] ):
plugin_load=server_audit=server_audit.so

server_audit_events=CONNECT,QUERY,TABLE

server_audit_logging=ON

server_audit=FORCE_PLUS_PERMANENT
We don’t want somebody uninstall MariaDB Audit Plugin so enabled system variable, server_audit=FORCE_PLUS_PERMANENT , The example below explains this scenario much better:
MariaDB [(none)]> UNINSTALL PLUGIN server_audit;
ERROR 1702 (HY000): Plugin 'server_audit' is force_plus_permanent and can not be unloaded
To see the list of audit plugin-related variables in your MariaDB server, execute the command below:
MariaDB [(none)]> SHOW GLOBAL VARIABLES LIKE 'server_audit%';
+-------------------------------+-----------------------+
| Variable_name                 | Value                 |
+-------------------------------+-----------------------+
| server_audit_events           | CONNECT,QUERY,TABLE   |
| server_audit_excl_users       |                       |
| server_audit_file_path        | server_audit.log      |
| server_audit_file_rotate_now  | OFF                   |
| server_audit_file_rotate_size | 1000000               |
| server_audit_file_rotations   | 9                     |
| server_audit_incl_users       |                       |
| server_audit_logging          | ON                    |
| server_audit_mode             | 0                     |
| server_audit_output_type      | file                  |
| server_audit_query_log_limit  | 1024                  |
| server_audit_syslog_facility  | LOG_USER              |
| server_audit_syslog_ident     | mysql-server_auditing |
| server_audit_syslog_info      |                       |
| server_audit_syslog_priority  | LOG_INFO              |
+-------------------------------+-----------------------+
15 rows in set (0.002 sec)
Uncontrolled MariaDB Audit Plugins are major concerns in any MariaDB database infrastructure operations, I strongly recommend our customers to consider log rotate “server_audit.log” file, You can force a rotation by enabling the server_audit_file_rotate_now :
MariaDB [(none)]> SET GLOBAL server_audit_file_rotate_now = ON;
Query OK, 0 rows affected (0.015 sec)
You can configure the size limit of MariaDB Audit Plugin by setting variable, server_audit_file_rotate_size . To limit the number of log files created, set the variable, server_audit_file_rotations. To force log file rotations you can set the variable, server_audit_file_rotate_now to ON:
[mariadb]
..
server_audit_file_rotate_now=ON
server_audit_file_rotate_size=1000000
server_audit_file_rotations=10
...
MariaDB Audit Plugin report:
[root@localhost mysql]# tail -f server_audit.log
20180720 20:39:22,localhost.localdomain,root,localhost,13,1501,QUERY,,'SELECT DATABASE()',0
20180720 20:39:22,localhost.localdomain,root,localhost,13,1503,QUERY,sakila,'show databases',0
20180720 20:39:22,localhost.localdomain,root,localhost,13,1504,QUERY,sakila,'show tables',0
20180720 20:39:27,localhost.localdomain,root,localhost,13,1528,QUERY,sakila,'show tables',0
20180720 20:39:43,localhost.localdomain,root,localhost,13,1529,READ,sakila,customer,
20180720 20:39:43,localhost.localdomain,root,localhost,13,1529,QUERY,sakila,'select * from customer limit 100',0
20180720 20:39:52,localhost.localdomain,root,localhost,13,1530,QUERY,sakila,'show tables',0
20180720 20:40:07,localhost.localdomain,root,localhost,13,1531,READ,sakila,actor,
20180720 20:40:07,localhost.localdomain,root,localhost,13,1531,QUERY,sakila,'select * from actor limit 100',0
20180720 20:40:30,localhost.localdomain,root,localhost,13,0,DISCONNECT,sakila,,0
Conclusion
We recommend most of our customers (using MariaDB) to enable MariaDB Audit Plugin to closely monitor what is happening to their database infrastructure, This really helps to proactively troubleshoot if anything going wrong with their MariaDB operations. Reliable and secured database operations is equally important like performance and scalability.
The post Auditing MariaDB for Secured Database Infrastructure Operations appeared first on The WebScale Database Infrastructure Operations Experts.
]]>The post What is MySQL partitioning ? appeared first on The WebScale Database Infrastructure Operations Experts.
]]>CREATE TABLE tab1 (
col1 VARCHAR(30) NOT NULL,
col2 VARCHAR(30) NOT NULL,
col3 TINYINT UNSIGNED NOT NULL,
col4 DATE NOT NULL
)
PARTITION BY RANGE( col3 ) (
PARTITION p0 VALUES LESS THAN (100),
PARTITION p1 VALUES LESS THAN (200),
PARTITION p2 VALUES LESS THAN (300),
PARTITION p3 VALUES LESS THAN MAXVALUE
);
Write a SELECT query benefitting partition pruning:
SELECT col1, col2, col3, col4
FROM tab1
WHERE col3 > 200 AND col3 < 250;
What is explicit partitioning in MySQL and how is it different from partition pruning ?
In MySQL we can explicitly select partition and sub-partitions when executing a statement matching a given WHERE condition, This sounds very much similar to partition pruning, but there is a difference:
- Partition to be checked are explicitly mentioned in the query statement, In partition pruning it is automatic.
- In explicit partition, the explicit selection of partitions is supported for both queries and DML statements, partition pruning applies only to queries.
- SQL statements supported in explicit partitioning – SELECT, INSERT, UPDATE, DELETE, LOAD DATA, LOAD XML and REPLACE
Explicit partition example:
CREATE TABLE customer  (
    cust_id INT NOT NULL AUTO_INCREMENT PRIMARY KEY,
    cust_fname VARCHAR(25) NOT NULL,
    cust_lname VARCHAR(25) NOT NULL,
    cust_phone INT NOT NULL,
    cust_fax INT NOT NULL
)
    PARTITION BY RANGE(cust_id)  (
        PARTITION p0 VALUES LESS THAN (100),
        PARTITION p1 VALUES LESS THAN (200),
        PARTITION p2 VALUES LESS THAN (300),
        PARTITION p3 VALUES LESS THAN MAXVALUE
);
Query explicitly mentioning partition:
mysql> SELECT * FROM customer PARTITION (p1);
RANGE partitioning
In RANGE partitioning you can partition values within a given range, Ranges should be contiguous but not overlapping, usually defined by VALUES LESS THAN operator, The following examples explain how to create and use RANGE partitioning for MySQL performance:
CREATE TABLE customer_contract(
    cust_id INT NOT NULL,
    cust_fname VARCHAR(30),
    cust_lname VARCHAR(30),
    st_dt DATE NOT NULL DEFAULT '1970-01-01',
    end_dt DATE NOT NULL DEFAULT '9999-12-31',
    contract_code INT NOT NULL,
    contract_id INT NOT NULL
)
PARTITION BY RANGE (contract_id) (
    PARTITION p0 VALUES LESS THAN (50),
    PARTITION p1 VALUES LESS THAN (100),
    PARTITION p2 VALUES LESS THAN (150),
    PARTITION p3 VALUES LESS THAN (200)
);
For example, let us suppose that you wish to partition based on the year contract ended:
CREATE TABLE customer_contract(
    cust_id INT NOT NULL,
    cust_fname VARCHAR(30),
    cust_lname VARCHAR(30),
    st_dt DATE NOT NULL DEFAULT '1970-01-01',
    end_dt DATE NOT NULL DEFAULT '9999-12-31',
    contract_code INT NOT NULL,
    contract_id INT NOT NULL
)
PARTITION BY RANGE (year(end_dt)) (
    PARTITION p0 VALUES LESS THAN (2001),
    PARTITION p1 VALUES LESS THAN (2002),
    PARTITION p2 VALUES LESS THAN (2003),
    PARTITION p3 VALUES LESS THAN (2004)
);
It is also possible to partition a table by RANGE, based on the value of a TIMESTAMP column, using the UNIX_TIMESTAMP() function, as shown in this example:
CREATE TABLE sales_forecast (
    sales_forecast_id INT NOT NULL,
    sales_forecast_status VARCHAR(20) NOT NULL,
    sales_forecast_updated TIMESTAMP NOT NULL DEFAULT CURRENT_TIMESTAMP ON UPDATE CURRENT_TIMESTAMP
)
PARTITION BY RANGE ( UNIX_TIMESTAMP(sales_forecast_updated) ) (
    PARTITION p0 VALUES LESS THAN ( UNIX_TIMESTAMP('2008-01-01 00:00:00') ),
    PARTITION p1 VALUES LESS THAN ( UNIX_TIMESTAMP('2008-04-01 00:00:00') ),
    PARTITION p2 VALUES LESS THAN ( UNIX_TIMESTAMP('2008-07-01 00:00:00') ),
    PARTITION p3 VALUES LESS THAN ( UNIX_TIMESTAMP('2008-10-01 00:00:00') ),
    PARTITION p4 VALUES LESS THAN ( UNIX_TIMESTAMP('2009-01-01 00:00:00') ),
    PARTITION p5 VALUES LESS THAN ( UNIX_TIMESTAMP('2009-04-01 00:00:00') ),
    PARTITION p6 VALUES LESS THAN ( UNIX_TIMESTAMP('2009-07-01 00:00:00') ),
    PARTITION p7 VALUES LESS THAN ( UNIX_TIMESTAMP('2009-10-01 00:00:00') ),
    PARTITION p8 VALUES LESS THAN ( UNIX_TIMESTAMP('2010-01-01 00:00:00') ),
    PARTITION p9 VALUES LESS THAN (MAXVALUE)
);
LIST partitioning
The difference between RANGE and LIST partitioning is: In LIST partitioning, each partition is grouped on the selected list of values of a specific column. You can do it by PARTITION BY LIST (EXPR) where EXPR is the selected column for list partition, We have explained LIST partitioning with example below:
CREATE TABLE students (
    student_id INT NOT NULL,
    student_fname VARCHAR(30),
    student_lname VARCHAR(30),
    student_joined DATE NOT NULL DEFAULT '1970-01-01',
    student_separated DATE NOT NULL DEFAULT '9999-12-31',
    student_house INT,
    student_grade_id INT
)
PARTITION BY LIST(student_grade_id) (
    PARTITION P1 VALUES IN (1,2,3,4),
    PARTITION P2 VALUES IN (5,6,7),
    PARTITION P3 VALUES IN (8,9,10),
    PARTITION P4 VALUES IN (11,12)
);
HASH partitioning
HASH partitioning makes an even distribution of data among predetermined number of partitions, In RANGE and LIST partitioning you must explicitly define the partitioning logic and which partition given column value or set of column values are stored. In HASH partitioning MySQL take care of this, The following example explains HASH partitioning better:
CREATE TABLE store (
    store_id INT NOT NULL,
    store_name VARCHAR(30),
    store_location VARCHAR(30),
    store_started DATE NOT NULL DEFAULT '1997-01-01',
    store_code INT
)
PARTITION BY HASH(store_id)
PARTITIONS 4;
P.S. : If you do not include a PARTITIONS clause, the number of partitions defaults to 1.
LINEAR HASH partitioning
The LINEAR HASH partitioning utilizes a linear powers-of-two algorithm, Where HASH partitioning employs the modulus of the hashing function’s value. Please find below LINEAR HASH partitioning example:
CREATE TABLE store (
    store_id INT NOT NULL,
    store_name VARCHAR(30),
    store_location VARCHAR(30),
    store_started DATE NOT NULL DEFAULT '1997-01-01',
    store_code INT
)
PARTITION BY LINEAR HASH( YEAR(store_started) )
PARTITIONS 4;
KEY partitioning
KEY partitioning is very much similar to HASH, the only difference is, the hashing function for the KEY partitioning is supplied by MySQL, In case of MySQL NDB Cluster, MD5() is used, For tables using other storage engines, the MySQL server uses the storage engine specific hashing function which is based on the same algorithm as PASSWORD().
CREATE TABLE contact(
    id INT NOT NULL,
    name VARCHAR(20),
    contact_number INT,
    email  VARCHAR(50),
    UNIQUE KEY (id)
)
PARTITION BY KEY()
PARTITIONS 5;
P.S. – if the unique key column were not defined as NOT NULL, then the previous statement would fail.
Subpartitioning
SUBPARTITIONING is also known as composite partitioning, You can partition table combining RANGE and HASH for better results, The example below explains SUBPARTITIONING better:
CREATE TABLE purchase (id INT, item VARCHAR(30), purchase_date DATE)
    PARTITION BY RANGE( YEAR(purchase_date) )
    SUBPARTITION BY HASH( TO_DAYS(purchase_date) )
    SUBPARTITIONS 2 (
        PARTITION p0 VALUES LESS THAN (2000),
        PARTITION p1 VALUES LESS THAN (2010),
        PARTITION p2 VALUES LESS THAN MAXVALUE
    );
It is also possible to define subpartitions explicitly using SUBPARTITION clauses to specify options for individual subpartitions:
CREATE TABLE purchase (id INT, item VARCHAR(30), purchase_date DATE)
    PARTITION BY RANGE( YEAR(purchase_date) )
    SUBPARTITION BY HASH( TO_DAYS(purchase_date) ) (
        PARTITION p0 VALUES LESS THAN (2000) (
            SUBPARTITION s0,
            SUBPARTITION s1
        ),
        PARTITION p1 VALUES LESS THAN (2010) (
            SUBPARTITION s2,
            SUBPARTITION s3
        ),
        PARTITION p2 VALUES LESS THAN MAXVALUE (
            SUBPARTITION s4,
            SUBPARTITION s5
        )
    );
Things to remember:
- Each partition must have the same number of subpartitions.
- Each SUBPARTITION clause must include (at a minimum) a name for the subpartition. Otherwise, you may set any desired option for the subpartition or allow it to assume its default setting for that option.
- Subpartition names must be unique across the entire table. For example, the following CREATE TABLE statement is valid in MySQL 5.7:
CREATE TABLE purchase (id INT, item VARCHAR(30), purchase_date DATE)
    PARTITION BY RANGE( YEAR(purchase_date) )
    SUBPARTITION BY HASH( TO_DAYS(purchase_date) ) (
        PARTITION p0 VALUES LESS THAN (1990) (
            SUBPARTITION s0,
            SUBPARTITION s1
        ),
        PARTITION p1 VALUES LESS THAN (2000) (
            SUBPARTITION s2,
            SUBPARTITION s3
        ),
        PARTITION p2 VALUES LESS THAN MAXVALUE (
            SUBPARTITION s4,
            SUBPARTITION s5
        )
    );
MySQL partitioning limitations
MySQL partitioning also has limitations, We are listing down below the limitations of MySQL partitioning:
A PRIMARY KEY must include all columns in the table’s partitioning function:
CREATE TABLE tab3 (
column1 INT NOT NULL,
column2 DATE NOT NULL,
column3 INT NOT NULL,
column4 INT NOT NULL,
UNIQUE KEY (column1, column2),
UNIQUE KEY (column3)
)
PARTITION BY HASH(column1 + column3)
PARTITIONS 4;
Expect this error after running above script – ERROR 1503 (HY000): A PRIMARY KEY must include all columns in the table’s partitioning function
The right way of doing it:
CREATE TABLE table12 (
    column1 INT NOT NULL,
    column2 DATE NOT NULL,
    column3 INT NOT NULL,
    column4 INT NOT NULL,
    UNIQUE KEY (column1, column2, column3)
)
PARTITION BY HASH(column3)
PARTITIONS 5;
CREATE TABLE table25 (
    column11 INT NOT NULL,
    column12 DATE NOT NULL,
    column13 INT NOT NULL,
    column14 INT NOT NULL,
    UNIQUE KEY (column11, column13)
)
PARTITION BY HASH(column11 + column13)
PARTITIONS 5;
Most popular limitation of MySQL – Primary key is by definition a unique key, this restriction also includes the table’s primary key, if it has one. The example below explains this limitation better:
CREATE TABLE table55 (
    column11 INT NOT NULL,
    column12 DATE NOT NULL,
    column13 INT NOT NULL,
    column14 INT NOT NULL,
    PRIMARY KEY(column11, column12)
)
PARTITION BY HASH(column13)
PARTITIONS 4;
CREATE TABLE table65 (
    column20 INT NOT NULL,
    column25 DATE NOT NULL,
    column30 INT NOT NULL,
    column35 INT NOT NULL,
    PRIMARY KEY(column20, column30),
    UNIQUE KEY(column25)
)
PARTITION BY HASH( YEAR(column25) )
PARTITIONS 5;
Both of the above scripts will return this error – ERROR 1503 (HY000): A PRIMARY KEY must include all columns in the table’s partitioning function
The right way of doing it:
CREATE TABLE t45 (
    column50 INT NOT NULL,
    column55 DATE NOT NULL,
    column60 INT NOT NULL,
    column65 INT NOT NULL,
    PRIMARY KEY(column50, column55)
)
PARTITION BY HASH(column50 + YEAR(column55))
PARTITIONS 5;
CREATE TABLE table88 (
    column80 INT NOT NULL,
    column81 DATE NOT NULL,
    column82 INT NOT NULL,
    column83 INT NOT NULL,
    PRIMARY KEY(column80, column81, column82),
    UNIQUE KEY(column81, column82)
);
In above example, the primary key does not include all columns referenced in the partitioning expression. However, both of the statements are valid !
You can still successfully partition a MySQL table without unique keys – this also includes having no primary key and you may use any column or columns in the partitioning expression as long as the column type is compatible with the partitioning type, The example below shows partitioning a table with no unique / primary keys:
CREATE TABLE table_has_no_pk (column10 INT, column11 INT, column12 varchar(20))
PARTITION BY RANGE(column10) (
PARTITION p0 VALUES LESS THAN (500),
PARTITION p1 VALUES LESS THAN (600),
PARTITION p2 VALUES LESS THAN (700),
PARTITION p3 VALUES LESS THAN (800)
);
You cannot later add a unique key to a partitioned table unless the key includes all columns used by the table’s partitioning expression, The example below explains this much better:
ALTER TABLE table_has_no_pk ADD PRIMARY KEY(column10);
ALTER TABLE table_has_no_pk drop primary key;
ALTER TABLE table_has_no_pk ADD PRIMARY KEY(column10,column11);
ALTER TABLE table_has_no_pk drop primary key;
However, the next statement fails, because column10 is part of the partitioning key, but is not part of the proposed primary key:
mysql> ALTER TABLE table_has_no_pk ADD PRIMARY KEY(column11);
ERROR 1503 (HY000): A PRIMARY KEY must include all columns in the table's partitioning function
mysql>
MySQL partitioning limitations (at storage engine level)
InnoDB
- InnoDB foreign keys and MySQL partitioning are not compatible, Partitioned InnoDB tables cannot have foreign key references, nor can they have columns referenced by foreign keys, So you cannot partition InnoDB tables which have or referenced by foreign keys.
- InnoDB does not support use of multiple disks for subpartition (MyISAM supports this feature)
- Use ALTER TABLE … REBUILD PARTITION and ALTER TABLE … ANALYZE PARTITION than using ALTER TABLE … OPTIMIZE PARTITION
NDB storage engine
- We can only partition by KEY (including LINEAR KEY) in NDB storage engine.
FEDERATED storage engine
- Partitioning not supported in FEDERATED storage engine.
CSV storage engine
- Partitioning not supported in CSV storage engine.
MERGE storage engine
- Tables using the MERGE storage engine cannot be partitioned. Partitioned tables cannot be merged.
MySQL functions shown in the following list are allowed in partitioning expressions:
- ABS()
- CEILING()
- DATEDIFF()
- DAY()
- DAYOFMONTH()
- DAYOFWEEK()
- DAYOFYEAR()
- EXTRACT()
- FLOOR()
- HOUR()
- MICROSECOND()
- MINUTE()
- MOD()
- MONTH()
- QUARTER()
- SECOND()
- TIME_TO_SEC()
- TO_DAYS()
- TO_SECONDS()
- UNIX_TIMESTAMP()
- WEEKDAY()
- YEAR()
- YEARWEEK()
MySQL partitioning and locks
Effect on DML statements
- In MySQL 5.7, updating a partitioned MyISAM table cause only the affected partitioned to be locked.
- SELECT statements (including those containing unions or joins) lock only those partitions that actually need to be read. This also applies to SELECT …PARTITION.
- An UPDATE prunes locks only for tables on which no partitioning columns are updated.
- REPLACE and INSERT lock only those partitions having rows to be inserted or replaced. However, if an AUTO_INCREMENT value is generated for any partitioning column then all partitions are locked.
- INSERT … ON DUPLICATE KEY UPDATE is pruned as long as no partitioning column is updated.
- INSERT … SELECT locks only those partitions in the source table that need to be read, although all partitions in the target table are locked.
- Locks imposed by LOAD DATA statements on partitioned tables cannot be pruned.
Effect on DML statements
- CREATE VIEW does not cause any locks.
- ALTER TABLE … EXCHANGE PARTITION prunes locks; only the exchanged table and the exchanged partition are locked.
- ALTER TABLE … TRUNCATE PARTITION prunes locks; only the partitions to be emptied are locked.
- In addition, ALTER TABLE statements take metadata locks on the table level.
Effect on other statements
- LOCK TABLES cannot prune partition locks.
- CALL stored_procedure(expr) supports lock pruning, but evaluating expr does not.
- DO and SET statements do not support partitioning lock pruning.
The post What is MySQL partitioning ? appeared first on The WebScale Database Infrastructure Operations Experts.
]]>The post How to use mysqlpump for faster MySQL logical backup ? appeared first on The WebScale Database Infrastructure Operations Experts.
]]>- Supports parallel MySQL logical backup, The resource usage efficiency and high performance backups (we love it !)
- Much better orchestration possible – You can backup selected databases, tables, stored programs and user accounts etc.
- By default mysqlpump will not backup performance_schema, sys schema, ndbinfo by default, You have to name them with –databases or –include-databases option
- mysqlpump does not dump INFORMATION_SCHEMA schema.
- Faster secondary indexes creation, The indexes created only after inserting rows !
mysqlpump examples
Plain simple backup using mysqlpump:
[root@localhost mysqlpump2018-06-23-25-49]# mysqlpump -u root -p employees > employeebakup$(date '+%Y-%m-%H-%M-%S').sql
Enter password:
Dump progress: 1/4 tables, 0/630999 rows
Dump progress: 2/6 tables, 541250/3919384 rows
Dump progress: 4/6 tables, 1306627/3919384 rows
Dump progress: 5/6 tables, 2128435/3919384 rows
Dump progress: 5/6 tables, 3081685/3919384 rows
Dump completed in 5309 milliseconds
[root@localhost mysqlpump2018-06-23-25-49]#
Using mysqlpump based backup with 6 threads:
[root@localhost mysqlpump2018-06-23-25-49]# mysqlpump -u root -p employees --default-parallelism=6  > employeebakup$(date '+%Y-%m-%H-%M-%S').sql
Enter password:
Dump progress: 0/5 tables, 250/3477363 rows
Dump progress: 2/6 tables, 606250/3919384 rows
Dump progress: 3/6 tables, 1272103/3919384 rows
Dump progress: 5/6 tables, 2028185/3919384 rows
Dump progress: 5/6 tables, 2932185/3919384 rows
Dump progress: 5/6 tables, 3864185/3919384 rows
Dump completed in 5503 milliseconds
[root@localhost mysqlpump2018-06-23-25-49]#
Using mysqlpump to backup only selected databases, spawned 5 threads to backup employee and sakila database:
[root@localhost mysqlpump2018-06-23-25-49]# mysqlpump -u root -p employees --parallel-schemas=5:employees,sakila --default-parallelism=6  > bakup$(date '+%Y-%m-%H-%M-%S').sql
Enter password:
Dump progress: 1/6 tables, 0/3919384 rows
Dump progress: 2/6 tables, 635250/3919384 rows
Dump progress: 3/6 tables, 1354353/3919384 rows
Dump progress: 5/6 tables, 2219935/3919384 rows
Dump progress: 5/6 tables, 3066185/3919384 rows
Dump completed in 5279 milliseconds
[root@localhost mysqlpump2018-06-23-25-49]#
Using mysqlpump to backup selected database and schema:
[root@localhost mysqlpump2018-06-23-25-49]# mysqlpump -u root -p --databases employees.titles > emp.titles$(date '+%Y-%m-%H-%M-%S').sql
Enter password:
Dump completed in 437 milliseconds
[root@localhost mysqlpump2018-06-23-25-49]#
Restore backup from mysqlpump
Both mysqldump and mysqlpump generate MySQL logical backup in .SQL file so restoration is quiet an straightforward process:
mysql -u root -p < backup.SQL
The post How to use mysqlpump for faster MySQL logical backup ? appeared first on The WebScale Database Infrastructure Operations Experts.
]]>The post Things to remember when you migrate from MyISAM to InnoDB appeared first on The WebScale Database Infrastructure Operations Experts.
]]>- Data of InnoDB tables is stored in *.ibd files, deleting those files will permanently corrupt your database
- InnoDB tables consumes more storage space than MyISAM tables .
- Unlike MyISAM, InnoDB is a transactional database engine. In any typical MyISAM environment, MySQL DBAs don’t worry much about COMMIT (to finalize the changes) and ROLLBACK (to undo the changes) statements.
- By default, InnoDB tables use setting autocommit=0 and this avoids unnecessary I/O when you are issuing long transactions with consecutive INSERT, UPDATE or DELETE statements, This allows you to issue a ROLLBACK statement to recover lost or garbled data if you make a mistake on the mysql command line or in an exception handler in your application .
- The reliability and scalability features of InnoDB require more disk storage than equivalent MyISAM tables. You might change the column and index definitions slightly, for better space utilization, reduced I/O and memory consumption when processing result sets, and better query optimization plans making efficient use of index lookups.
- InnoDB tables build your data on disk to optimize queries based on primary keys, Each InnoDB table has primary key index called clustered index that organizes the data to minimize disk I/O for primary key lookups.
Convert existing MyISAM to InnoDB table (quick and direct)
ALTER TABLE table_name ENGINE = InnoDB;
Transfer Data from MyISAM to InnoDB table
INSERT INTO innodb_table SELECT * FROM misaim_table ORDER BY primary_key_columns
We recommend indexes creation for InnoDB tables after loading data, loading data on indexed table will seriously impact performance. The same principle applies if you have UNIQUE constraints on secondary keys. Increase size of system variable innodb_buffer_pool_size to 80% of available physical memory for optimal performance.
The post Things to remember when you migrate from MyISAM to InnoDB appeared first on The WebScale Database Infrastructure Operations Experts.
]]>The post MariaDB 10.3 support Oracle mode sequences appeared first on The WebScale Database Infrastructure Operations Experts.
]]>Simple steps to create a sequence in MariaDB 10.3 onwards, a create statement is used:
MariaDB [MDB101]> CREATE SEQUENCE Seq1_100
    -> START WITH 100
    -> INCREMENT BY 1;
Query OK, 0 rows affected (0.015 sec)
This creates a sequence that starts at 100 and is incremented with 1 every time a value is requested from the sequence. The sequence will be visible among the tables in the database, i.e. if you run SHOW TABLES it will be there. You can use DESCRIBE on the sequence to see what columns it has.
To test out the usage of sequences let’s create a table:
MariaDB [MDB101]> CREATE TABLE TAB1 (
    -> Col1 int(10) NOT NULL,
    -> Col2 varchar(30) NOT NULL,
    -> Col3 int(10) NOT NULL,
    ->  PRIMARY KEY (Col1)
    -> );
Query OK, 0 rows affected (0.018 sec)
Since we want to use sequences this time, we did not put AUTO_INCREMENT on the Col1 column. Instead we will ask for the next value from the sequence in the INSERT statements:
MariaDB [MDB101]> INSERT INTO TAB1 (Col1, Col2, Col3) VALUES (NEXT VALUE FOR Seq1_100, 'India', 10);
Query OK, 1 row affected (0.011 sec)

MariaDB [MDB101]> INSERT INTO TAB1 (Col1, Col2, Col3) VALUES (NEXT VALUE FOR Seq1_100, 'Jakarta', 20);
Query OK, 1 row affected (0.008 sec)

MariaDB [MDB101]> INSERT INTO TAB1 (Col1, Col2, Col3) VALUES (NEXT VALUE FOR Seq1_100, 'Singapore', 20);
Query OK, 1 row affected (0.016 sec)

MariaDB [MDB101]> INSERT INTO TAB1 (Col1, Col2, Col3) VALUES (NEXT VALUE FOR Seq1_100, 'Japan', 30);
Query OK, 1 row affected (0.007 sec)
Instead of having the NEXT VALUE FOR in each INSERT statement, it could have been the default value of the column in this way:
MariaDB [MDB101]> ALTER TABLE TAB1 MODIFY Col1 int(10) NOT NULL DEFAULT NEXT VALUE FOR Seq1_100;
Query OK, 0 rows affected (0.007 sec)
Records: 0  Duplicates: 0  Warnings: 0
Running a SELECT over the TAB1 table will look like this:
MariaDB [MDB101]> SELECT * FROM TAB1;;
+------+-----------+------+
| Col1 | Col2      | Col3 |
+------+-----------+------+
|  100 | India     |   10 |
|  101 | Jakarta   |   20 |
|  102 | Singapore |   20 |
|  103 | Japan     |   30 |
+------+-----------+------+
4 rows in set (0.000 sec)
As we can see the Col1 column has been populated with numbers that start from 100 and are incremented with 1 as defined in the sequence’s CREATE statement. To get the last retrieved number from the sequence PREVIOUS VALUE is used:
MariaDB [MDB101]> SELECT PREVIOUS VALUE FOR Seq1_100;
+-----------------------------+
| PREVIOUS VALUE FOR Seq1_100 |
+-----------------------------+
|                         103 |
+-----------------------------+
1 row in set (0.000 sec)
MariaDB 10.3 shipped another very useful option for sequences is CYCLE, which means that we start again from the beginning after reaching a certain value. For example, if there are 5 phases in a process that are done sequentially and then start again from the beginning, we could easily create a sequence to always be able to retrieve the number of the next phase:
MariaDB [MDB101]> CREATE SEQUENCE Seq1_100_c5
    ->   START WITH 100
    ->   INCREMENT BY 1
    -> MAXVALUE = 200
    -> CYCLE;
Query OK, 0 rows affected (0.012 sec)
The sequence above starts at 100 and is incremented with 1 every time the next value is requested. But when it reaches 200 (MAXVALUE) it will restart from 100 (CYCLE).
We can also set the next value of a sequence, to ALTER a sequence or using sequences in Oracle mode with Oracle specific syntax. To switch to Oracle mode use:
MariaDB [MDB101]> SET SQL_MODE=ORACLE;
Query OK, 0 rows affected (0.000 sec)
After that you can retrieve the next value of a sequence in Oracle style:
MariaDB [MDB101]> SELECT Seq1_100.nextval;
+------------------+
| Seq1_100.nextval |
+------------------+
|              104 |
+------------------+
1 row in set (0.009 sec)
You can read about MariaDB sequences in the documentation, MariaDB documentation
The post MariaDB 10.3 support Oracle mode sequences appeared first on The WebScale Database Infrastructure Operations Experts.
]]>The post A friendly comparison of InnoDB and MyRocks Performance appeared first on The WebScale Database Infrastructure Operations Experts.
]]>How InnoDB and MyRocks are different ?
- MyRocks supports only READ-COMMITTED isolation level, There is no REPEATABLE-READ isolation level like InnoDB so no gap locking like InnoDB, We have written detailed blog on InnoDB transaction isolation levels here
- To get an verbose information about MyRocks instance, the log is located in ” /var/lib/mysql/#rocksdb ” . Much more detailed story about your RocksDB diagnostics report can be generated with the command SHOW ENGINE ROCKSDB STATUS , It really takes good amount of time to understand and interpret MyRocks operations matrices.
- In MyRocks, you have rocksdb_block_cache_size system variable which is somewhat similar to innodb_buffer_pool_size but It’s mainly beneficial for reads. By default it uses buffered reads and OS cache contains cached compressed data and RockDB block cache will contain uncompressed data. You can have two levels of cache or disable buffering by forcing block cache to use direct reads with configuration rocksdb_use_direct_reads=ON.
- LSM Data Structure – MyRocks is not an alternative or advanced version of InnoDB, LSM data structure is great for write-intensive database operations, reads will be slow and full table scans are too expensive. so InnoDB and RocksDB together makes an great combination !
Benchmarking InnoDB and MyRocks performance with sysbench 1.0.14 for OLTP operations
Linux – CentOS Linux release 7.3.1611 (Core)
Database infrastructure – MariaDB 10.3.7
Building database infrastructure for benchmarking
We have used “oltp_common.lua” script to create database infrastructure for benchmarking InnoDB and MyRocks, We have not tuned both InnoDB and MyRocks variables for performance. The script below creates database for benchmarking:
[root@localhost sysbench]#
[root@localhost sysbench]# sysbench bulk_insert.lua  --threads=1 --db-driver=mysql --mysql-db=test --mysql-socket=/var/lib/mysql/mysql.sock --mysql-user=root --mysql-password=MyPassword2018  --mysql-storage-engine=rocksdb prepare
sysbench 1.0.14 (using bundled LuaJIT 2.1.0-beta2)

Creating table 'sbtest1'...
[root@localhost sysbench]#
Benchmarking bulk INSERT performance on InnoDB and MyRocks
Benchmarking OLTP insert on InnoDB using “oltp_insert.lua”
Script to create data (5M records) for benchmarking OLTP INSERT performance:
[root@localhost sysbench]# sysbench oltp_insert.lua --threads=100 --time=180 --table-size=5000000  --db-driver=mysql --mysql-db=test --mysql-socket=/var/lib/mysql/mysql.sock --mysql-user=root --mysql-password=MyPassword2018 prepare
sysbench 1.0.14 (using bundled LuaJIT 2.1.0-beta2)

Initializing worker threads...

Creating table 'sbtest1'...
Inserting 5000000 records into 'sbtest1'
Creating a secondary index on 'sbtest1'...
[root@localhost sysbench]#
MariaDB [test]> show table status like 'sbtest1'\G;
*************************** 1. row ***************************
            Name: sbtest1
          Engine: InnoDB
         Version: 10
      Row_format: Dynamic
            Rows: 5404891
  Avg_row_length: 265
     Data_length: 1433403392
 Max_data_length: 0
    Index_length: 157024256
       Data_free: 4194304
  Auto_increment: 5696281
     Create_time: 2018-06-03 12:48:12
     Update_time: 2018-06-03 12:52:03
      Check_time: NULL
       Collation: latin1_swedish_ci
        Checksum: NULL
  Create_options:
         Comment:
Max_index_length: 0
       Temporary: N
1 row in set (0.000 sec)

ERROR: No query specified

MariaDB [test]>
Script for benchmarking InnoDB OLTP INSERT performance:
[root@localhost sysbench]# sysbench oltp_insert.lua --threads=100 --time=180 --table-size=5000000  --db-driver=mysql --mysql-db=test --mysql-socket=/var/lib/mysql/mysql.sock --mysql-user=root --mysql-password=MyPassword2018 run
sysbench 1.0.14 (using bundled LuaJIT 2.1.0-beta2)

Running the test with following options:
Number of threads: 100
Initializing random number generator from current time


Initializing worker threads...

Threads started!

SQL statistics:
    queries performed:
        read:                            0
        write:                           696280
        other:                           0
        total:                           696280
    transactions:                        696280 (3866.32 per sec.)
    queries:                             696280 (3866.32 per sec.)
    ignored errors:                      0      (0.00 per sec.)
    reconnects:                          0      (0.00 per sec.)

General statistics:
    total time:                          180.0872s
    total number of events:              696280

Latency (ms):
         min:                                    0.62
         avg:                                   25.85
         max:                                  358.63
         95th percentile:                       81.48
         sum:                             17998504.11

Threads fairness:
    events (avg/stddev):           6962.8000/57.61
    execution time (avg/stddev):   179.9850/0.04
What we look for seriously in this benchmarking is QPS (queries per seconds) , In the test above it is 3866 QPS
Benchmarking MyRocks INSERT performance using Sysbench 1.0.14:
The steps are same, except for explicitly mentioning the storage engine RocksDB in sysbench scripts: “–mysql-storage-engine=rocksdb”
Script for benchmarking OLTP insert on MyRocks using “oltp_insert.lua” :
[root@localhost sysbench]# sysbench oltp_insert.lua --threads=100 --time=180 --table-size=5000000  --db-driver=mysql --mysql-db=test --mysql-socket=/var/lib/mysql/mysql.sock --mysql-user=root --mysql-password=MyPassword2018 --mysql-storage-engine=rocksdb prepare
sysbench 1.0.14 (using bundled LuaJIT 2.1.0-beta2)

Initializing worker threads...

Creating table 'sbtest1'...
Inserting 5000000 records into 'sbtest1'
Creating a secondary index on 'sbtest1'...
[root@localhost sysbench]#
MariaDB [test]> show table status like 'sbtest1%'\G;
*************************** 1. row ***************************
            Name: sbtest1
          Engine: ROCKSDB
         Version: 10
      Row_format: Fixed
            Rows: 5000000
  Avg_row_length: 198
     Data_length: 992949774
 Max_data_length: 0
    Index_length: 38739880
       Data_free: 0
  Auto_increment: 5000001
     Create_time: NULL
     Update_time: NULL
      Check_time: NULL
       Collation: latin1_swedish_ci
        Checksum: NULL
  Create_options:
         Comment:
Max_index_length: 0
       Temporary: N
1 row in set (0.007 sec)

ERROR: No query specified

MariaDB [test]>
Script for benchmarking RocksDB OLTP INSERT performance:
[root@localhost sysbench]# sysbench oltp_insert.lua --threads=100 --time=180 --table-size=5000000  --db-driver=mysql --mysql-db=test --mysql-socket=/var/lib/mysql/mysql.sock --mysql-user=root --mysql-password=MyPassword2018 --mysql-storage-engine=rocksdb run
sysbench 1.0.14 (using bundled LuaJIT 2.1.0-beta2)

Running the test with following options:
Number of threads: 100
Initializing random number generator from current time


Initializing worker threads...

Threads started!

SQL statistics:
    queries performed:
        read:                            0
        write:                           123049
        other:                           0
        total:                           123049
    transactions:                        123049 (683.37 per sec.)
    queries:                             123049 (683.37 per sec.)
    ignored errors:                      0      (0.00 per sec.)
    reconnects:                          0      (0.00 per sec.)

General statistics:
    total time:                          180.0618s
    total number of events:              123049

Latency (ms):
         min:                                    1.03
         avg:                                  146.30
         max:                                 1675.09
         95th percentile:                      308.84
         sum:                             18001689.44

Threads fairness:
    events (avg/stddev):           1230.4900/26.26
    execution time (avg/stddev):   180.0169/0.02

[root@localhost sysbench]#
Result: OLTP INSERT performance for RocksDB is 683 QPS (queries per second)
The graphical representation of more interesting performance benchmarking results on multiple bulk INSERT transactions scenarios:
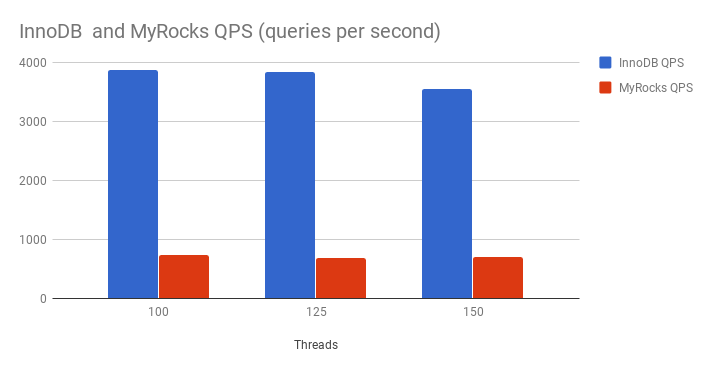
Conclusion
OLTP INSERT performance benchmarking clearly proves InnoDB is almost 6X faster than MyRocks. So MyRocks is not recommended for bulk INSERT transactions !
OLTP WRITE only transactions performance benchmarking for InnoDB and MyRocks
OLTP WRITE only performance benchmarking for InnoDB using “oltp_write_only.lua”
The steps remains same for “oltp_write_only.lua” script like “oltp_insert.lua” mentioned above, So we are directly copying the results of benchmarking without explaining details again:
[root@localhost sysbench]# sysbench oltp_write_only.lua  --threads=100  --table-size=5000000  --db-driver=mysql --mysql-db=test --mysql-socket=/var/lib/mysql/mysql.sock --mysql-user=root --mysql-password=MyPassword2018 prepare
sysbench 1.0.14 (using bundled LuaJIT 2.1.0-beta2)

Initializing worker threads...

Creating table 'sbtest1'...
Inserting 5000000 records into 'sbtest1'
Creating a secondary index on 'sbtest1'...
[root@localhost sysbench]# sysbench oltp_write_only.lua  --threads=100  --table-size=5000000  --db-driver=mysql --mysql-db=test --mysql-socket=/var/lib/mysql/mysql.sock --mysql-user=root --mysql-password=MyPassword2018 run
sysbench 1.0.14 (using bundled LuaJIT 2.1.0-beta2)

Running the test with following options:
Number of threads: 100
Initializing random number generator from current time


Initializing worker threads...

Threads started!

SQL statistics:
    queries performed:
        read:                            0
        write:                           14529
        other:                           7265
        total:                           21794
    transactions:                        3632   (355.03 per sec.)
    queries:                             21794  (2130.37 per sec.)
    ignored errors:                      1      (0.10 per sec.)
    reconnects:                          0      (0.00 per sec.)

General statistics:
    total time:                          10.2285s
    total number of events:              3632

Latency (ms):
         min:                                    1.88
         avg:                                  277.61
         max:                                 2701.56
         95th percentile:                      977.74
         sum:                              1008267.12

Threads fairness:
    events (avg/stddev):           36.3200/4.36
    execution time (avg/stddev):   10.0827/0.09
Result : 2130 QPS (queries per second)
OLTP WRITE only performance benchmarking for RocksDB using “oltp_write_only.lua”
[root@localhost sysbench]# sysbench oltp_write_only.lua  --threads=100  --table-size=5000000  --db-driver=mysql --mysql-db=test --mysql-socket=/var/lib/mysql/mysql.sock --mysql-user=root --mysql-password=MyPassword2018 --mysql-storage-engine=rocksdb prepare
sysbench 1.0.14 (using bundled LuaJIT 2.1.0-beta2)

Initializing worker threads...

Creating table 'sbtest1'...
Inserting 5000000 records into 'sbtest1'
Creating a secondary index on 'sbtest1'...
[root@localhost sysbench]# sysbench oltp_write_only.lua  --threads=100  --table-size=5000000  --db-driver=mysql --mysql-db=test --mysql-socket=/var/lib/mysql/mysql.sock --mysql-user=root --mysql-password=MyPassword2018 --mysql-storage-engine=rocksdb run
sysbench 1.0.14 (using bundled LuaJIT 2.1.0-beta2)

Running the test with following options:
Number of threads: 100
Initializing random number generator from current time


Initializing worker threads...

Threads started!

SQL statistics:
    queries performed:
        read:                            0
        write:                           25191
        other:                           12596
        total:                           37787
    transactions:                        6296   (625.73 per sec.)
    queries:                             37787  (3755.49 per sec.)
    ignored errors:                      4      (0.40 per sec.)
    reconnects:                          0      (0.00 per sec.)

General statistics:
    total time:                          10.0603s
    total number of events:              6296

Latency (ms):
         min:                                    1.39
         avg:                                  159.29
         max:                                 3620.58
         95th percentile:                      846.57
         sum:                              1002895.84

Threads fairness:
    events (avg/stddev):           62.9600/25.26
    execution time (avg/stddev):   10.0290/0.02
Result : 3755 QPS (queries per second)
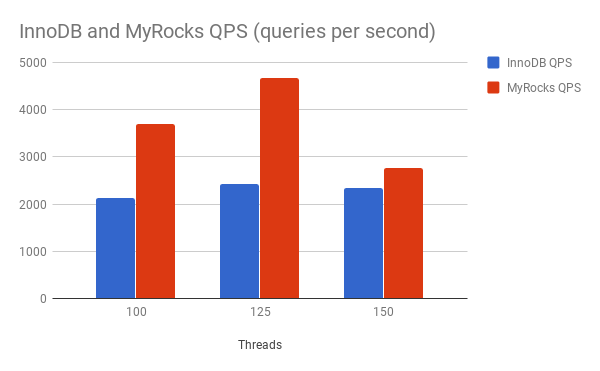
The graphical representation of more interesting performance benchmarking results on multiple WRITE only transactions scenarios:

Conclusion
MyRocks OLTP write only performance is almost 2X compared to InnoDB, So MyRocks is definitely an preferred option for high performance and scalable writes, Thanks to LSM data structure !
OLTP READ-WRITE performance benchmarking using Sysbench lua script “oltp_read_write.lua”
The lua scripts below create data for OLTP READ-WRITE performance benchmarking:
Benchmarking OLTP READ-WRITE performance for InnoDB:
[root@localhost sysbench]# sysbench oltp_read_write.lua  --threads=100  --table-size=5000000  --db-driver=mysql --mysql-db=test --mysql-socket=/var/lib/mysql/mysql.sock --mysql-user=root --mysql-password=MyPassword2018 prepare
sysbench 1.0.14 (using bundled LuaJIT 2.1.0-beta2)

Initializing worker threads...

Creating table 'sbtest1'...
Inserting 5000000 records into 'sbtest1'
Creating a secondary index on 'sbtest1'...
[root@localhost sysbench]# sysbench oltp_read_write.lua  --threads=100  --table-size=5000000  --db-driver=mysql --mysql-db=test --mysql-socket=/var/lib/mysql/mysql.sock --mysql-user=root --mysql-password=MyPassword2018 run
sysbench 1.0.14 (using bundled LuaJIT 2.1.0-beta2)

Running the test with following options:
Number of threads: 100
Initializing random number generator from current time


Initializing worker threads...

Threads started!

SQL statistics:
    queries performed:
        read:                            15652
        write:                           4472
        other:                           2236
        total:                           22360
    transactions:                        1118   (105.96 per sec.)
    queries:                             22360  (2119.20 per sec.)
    ignored errors:                      0      (0.00 per sec.)
    reconnects:                          0      (0.00 per sec.)

General statistics:
    total time:                          10.5301s
    total number of events:              1118

Latency (ms):
         min:                                   15.71
         avg:                                  922.19
         max:                                 4973.09
         95th percentile:                     2009.23
         sum:                              1031006.57

Threads fairness:
    events (avg/stddev):           11.1800/1.68
    execution time (avg/stddev):   10.3101/0.13

[root@localhost sysbench]#
Result: 2119 QPS (queries per second)
Benchmarking OLTP READ-WRITE performance for RocksDB:
[root@localhost sysbench]# sysbench oltp_read_write.lua  --threads=100  --table-size=5000000  --db-driver=mysql --mysql-db=test --mysql-socket=/var/lib/mysql/mysql.sock --mysql-user=root --mysql-password=MyPassword2018 --mysql-storage-engine=rocksdb prepare
sysbench 1.0.14 (using bundled LuaJIT 2.1.0-beta2)

Initializing worker threads...

Creating table 'sbtest1'...
Inserting 5000000 records into 'sbtest1'
Creating a secondary index on 'sbtest1'...
[root@localhost sysbench]# sysbench oltp_read_write.lua  --threads=100  --table-size=5000000  --db-driver=mysql --mysql-db=test --mysql-socket=/var/lib/mysql/mysql.sock --mysql-user=root --mysql-password=MyPassword2018 --mysql-storage-engine=rocksdb run
sysbench 1.0.14 (using bundled LuaJIT 2.1.0-beta2)

Running the test with following options:
Number of threads: 100
Initializing random number generator from current time


Initializing worker threads...

Threads started!

SQL statistics:
    queries performed:
        read:                            26964
        write:                           7628
        other:                           3827
        total:                           38419
    transactions:                        1901   (182.46 per sec.)
    queries:                             38419  (3687.46 per sec.)
    ignored errors:                      25     (2.40 per sec.)
    reconnects:                          0      (0.00 per sec.)

General statistics:
    total time:                          10.4153s
    total number of events:              1901

Latency (ms):
         min:                                   11.23
         avg:                                  540.87
         max:                                 3480.91
         95th percentile:                     1352.03
         sum:                              1028196.02

Threads fairness:
    events (avg/stddev):           19.0100/2.25
    execution time (avg/stddev):   10.2820/0.10

[root@localhost sysbench]#
Result: 3687 QPS (queries per second)
The graphical representation of more interesting performance benchmarking results on multiple READ-WRITE transactions scenarios:
Conclusion
OLTP READ-WRITE I/O operations benchmarking results confirm MyRocks is the definite choice, May be these result vary more if we invest in tuning the InnoDB and MyRocks for performance.
Benchmarking OLTP READ ONLY operations using Sysbench oltp_read_only.lua script
OLTP READ ONLY transactions performance benchmarking for InnoDB:
[root@localhost sysbench]# sysbench oltp_read_only.lua  --threads=100  --table-size=5000000  --db-driver=mysql --mysql-db=test --mysql-socket=/var/lib/mysql/mysql.sock --mysql-user=root --mysql-password=MyPassword2018  prepare
sysbench 1.0.14 (using bundled LuaJIT 2.1.0-beta2)

Initializing worker threads...

Creating table 'sbtest1'...
Inserting 5000000 records into 'sbtest1'
Creating a secondary index on 'sbtest1'...
[root@localhost sysbench]# sysbench oltp_read_only.lua  --threads=100  --table-size=5000000  --db-driver=mysql --mysql-db=test --mysql-socket=/var/lib/mysql/mysql.sock --mysql-user=root --mysql-password=MyPassword2018  run
sysbench 1.0.14 (using bundled LuaJIT 2.1.0-beta2)

Running the test with following options:
Number of threads: 100
Initializing random number generator from current time


Initializing worker threads...

Threads started!

SQL statistics:
    queries performed:
        read:                            51072
        write:                           0
        other:                           7296
        total:                           58368
    transactions:                        3648   (352.59 per sec.)
    queries:                             58368  (5641.45 per sec.)
    ignored errors:                      0      (0.00 per sec.)
    reconnects:                          0      (0.00 per sec.)

General statistics:
    total time:                          10.3436s
    total number of events:              3648

Latency (ms):
         min:                                    1.10
         avg:                                  274.41
         max:                                 2863.46
         95th percentile:                      733.00
         sum:                              1001047.53

Threads fairness:
    events (avg/stddev):           36.4800/6.57
    execution time (avg/stddev):   10.0105/0.05
Result: 5641 QPS (queries per second)
OLTP READ ONLY transactions performance benchmarking for RocksDB:
[root@localhost sysbench]# sysbench oltp_read_only.lua  --threads=100  --table-size=5000000  --db-driver=mysql --mysql-db=test --mysql-socket=/var/lib/mysql/mysql.sock --mysql-user=root --mysql-password=MyPassword2018 --mysql-storage-engine=rocksdb prepare
sysbench 1.0.14 (using bundled LuaJIT 2.1.0-beta2)

Initializing worker threads...

Creating table 'sbtest1'...
Inserting 5000000 records into 'sbtest1'
Creating a secondary index on 'sbtest1'...
[root@localhost sysbench]# sysbench oltp_read_only.lua  --threads=100  --table-size=5000000  --db-driver=mysql --mysql-db=test --mysql-socket=/var/lib/mysql/mysql.sock --mysql-user=root --mysql-password=MyPassword2018 --mysql-storage-engine=rocksdb run
sysbench 1.0.14 (using bundled LuaJIT 2.1.0-beta2)

Running the test with following options:
Number of threads: 100
Initializing random number generator from current time


Initializing worker threads...

Threads started!

SQL statistics:
    queries performed:
        read:                            26362
        write:                           0
        other:                           3766
        total:                           30128
    transactions:                        1883   (182.77 per sec.)
    queries:                             30128  (2924.32 per sec.)
    ignored errors:                      0      (0.00 per sec.)
    reconnects:                          0      (0.00 per sec.)

General statistics:
    total time:                          10.2983s
    total number of events:              1883

Latency (ms):
         min:                                    6.20
         avg:                                  540.16
         max:                                 5258.04
         95th percentile:                     2045.74
         sum:                              1017118.10

Threads fairness:
    events (avg/stddev):           18.8300/2.29
    execution time (avg/stddev):   10.1712/0.08
Result: 2924 QPS (queries per second)
The graphical representation of more interesting performance benchmarking results on multiple READ only transactions scenarios:
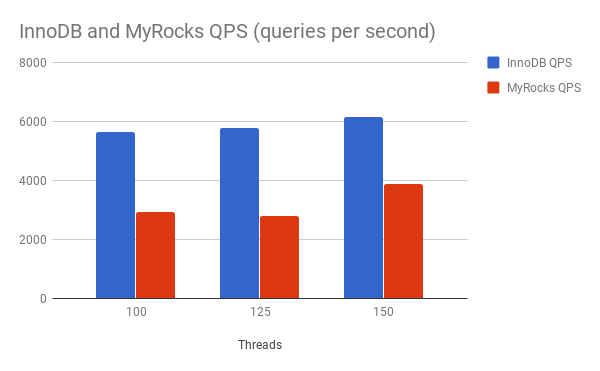
Conclusion
InnoDB works great if it is OLTP READ only transactions, So we can continue recommending customers to use InnoDB for read intensive database operations.
Benchmarking OLTP DELETE ONLY operations using Sysbench oltp_delete.lua script
OLTP DELETE ONLY transactions performance benchmarking for InnoDB:
[root@localhost sysbench]# sysbench oltp_delete.lua  --threads=100  --table-size=5000000  --db-driver=mysql --mysql-db=test --mysql-socket=/var/lib/mysql/mysql.sock --mysql-user=root --mysql-password=MyPassword2018 prepare
sysbench 1.0.14 (using bundled LuaJIT 2.1.0-beta2)

Initializing worker threads...

Creating table 'sbtest1'...
Inserting 5000000 records into 'sbtest1'
Creating a secondary index on 'sbtest1'...
[root@localhost sysbench]# sysbench oltp_delete.lua  --threads=100  --table-size=5000000  --db-driver=mysql --mysql-db=test --mysql-socket=/var/lib/mysql/mysql.sock --mysql-user=root --mysql-password=MyPassword2018 run
sysbench 1.0.14 (using bundled LuaJIT 2.1.0-beta2)

Running the test with following options:
Number of threads: 100
Initializing random number generator from current time


Initializing worker threads...

Threads started!

SQL statistics:
    queries performed:
        read:                            0
        write:                           21659
        other:                           4464
        total:                           26123
    transactions:                        26123  (2521.93 per sec.)
    queries:                             26123  (2521.93 per sec.)
    ignored errors:                      0      (0.00 per sec.)
    reconnects:                          0      (0.00 per sec.)

General statistics:
    total time:                          10.3568s
    total number of events:              26123

Latency (ms):
         min:                                    0.04
         avg:                                   38.08
         max:                                 2679.06
         95th percentile:                      116.80
         sum:                               994654.43

Threads fairness:
    events (avg/stddev):           261.2300/46.27
    execution time (avg/stddev):   9.9465/0.18

[root@localhost sysbench]#
Result: 2521 QPS (queries per second)
OLTP DELETE ONLY transactions performance benchmarking for RocksDB:
[root@localhost sysbench]# sysbench oltp_delete.lua  --threads=100  --table-size=5000000  --db-driver=mysql --mysql-db=test --mysql-socket=/var/lib/mysql/mysql.sock --mysql-user=root --mysql-password=MyPassword2018 --mysql-storage-engine=rocksdb prepare
sysbench 1.0.14 (using bundled LuaJIT 2.1.0-beta2)

Initializing worker threads...

Creating table 'sbtest1'...
Inserting 5000000 records into 'sbtest1'
Creating a secondary index on 'sbtest1'...
[root@localhost sysbench]# sysbench oltp_delete.lua  --threads=100  --table-size=5000000  --db-driver=mysql --mysql-db=test --mysql-socket=/var/lib/mysql/mysql.sock --mysql-user=root --mysql-password=MyPassword2018 --mysql-storage-engine=rocksdb run
sysbench 1.0.14 (using bundled LuaJIT 2.1.0-beta2)

Running the test with following options:
Number of threads: 100
Initializing random number generator from current time


Initializing worker threads...

Threads started!

SQL statistics:
    queries performed:
        read:                            0
        write:                           7094
        other:                           421
        total:                           7515
    transactions:                        7515   (746.81 per sec.)
    queries:                             7515   (746.81 per sec.)
    ignored errors:                      0      (0.00 per sec.)
    reconnects:                          0      (0.00 per sec.)

General statistics:
    total time:                          10.0613s
    total number of events:              7515

Latency (ms):
         min:                                    0.43
         avg:                                  133.42
         max:                                 1666.25
         95th percentile:                      502.20
         sum:                              1002663.49

Threads fairness:
    events (avg/stddev):           75.1500/15.50
    execution time (avg/stddev):   10.0266/0.02
Result: 746 QPS (queries per second)
The graphical representation of more interesting performance benchmarking results on multiple DELETE only transactions scenarios:
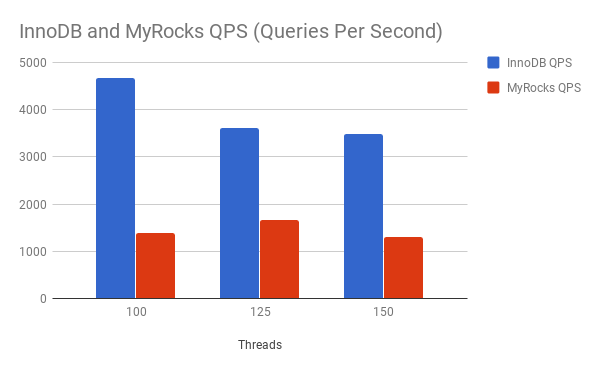
Conclusion
InnoDB is almost 3X faster than MyRocks in OLTP DELETE operations.
InnoDB and MyRocks performance comparison :
- InnoDB is the definite choice if the transaction model is bulk INSERT, READ and DELETE intensive database operations.
- MyRocks performance is much better than InnoDB in WRITE and READ-WRITE intensive database operations.
The post A friendly comparison of InnoDB and MyRocks Performance appeared first on The WebScale Database Infrastructure Operations Experts.
]]>