The post Benchmarking MySQL 8.0 Performance on Amazon EC2 appeared first on The WebScale Database Infrastructure Operations Experts.
]]>The scope of performance benchmarking
The core objective of this benchmarking exercise is to measure MySQL 8.0 performance, This include INSERTs , SELECTs and complex transaction processing (both INSERTs and SELECTs) without any tuning of MySQL 8 instance’s my.cnf. We agree tuning my.cnf will greatly improve performance but in this activity we wanted to benchmark MySQL 8 transaction processing capabilities and technically in MinervaDB we measure performance by Response Time and believe you can build high performance MySQL applications by writing optimal SQL. We have used Sysbench (https://github.com/MinervaDB/MinervaDB-Sysbench release 1.0.20) for this benchmarking activity. This is not a paid / sponsored benchmarking effort by any of the software or hardware vendors, We will remain forever an vendor neutral and independent web-scale database infrastructure operations company with core expertise in performance, scalability, high availability and database reliability engineering. You can download detailed copy of this benchmarking here
Note: This MySQL 8.0 performance benchmarking paper is published by MinervaDB Performance Engineering Team, You are free to copy the entire content for research and publishing without copyrighting the content. This document is distributed in the hope that it will be useful but WITHOUT ANY WARRANTY; without even the implied warranty of MERCHANTABILITY or FITNESS FOR A PARTICULAR PURPOSE.
☛ A low cost and instant gratification health check-up for your MySQL infrastructure operations from MinervaDB
- Highly responsive and proactive MySQL performance health check-up, diagnostics and forensics.
- Detailed report on your MySQL configuration, expensive SQL, index operations, performance, scalability and reliability.
- Recommendations for building an optimal, scalable, highly available and reliable MySQL infrastructure operations.
- Per MySQL instance performance audit, detailed report and recommendations.
- Security Audit – Detailed Database Security Audit Report which includes the results of the audit and an actionable Compliance and Security Plan for fixing vulnerabilities and ensuring the ongoing security of your data.
** You are paying us only for the MySQL instance we have worked for :
| MySQL Health Check-up | Rate ( plus GST / Goods and Services Tax where relevant ) |
|---|---|
| MySQL infrastructure operations detailed health check-up, diagnostics report and recommendations | US $7,500 / MySQL instance |
☛ MinervaDB contacts – Sales & General Inquiries
| Business Function | Contact |
|---|---|
 CONTACT GLOBAL SALES (24*7) CONTACT GLOBAL SALES (24*7) |  (844) 588-7287 (USA) (415) 212-6625 (USA) (778) 770-5251 (Canada) (844) 588-7287 (USA) (415) 212-6625 (USA) (778) 770-5251 (Canada) |
| TOLL FREE PHONE (24*7) | (844) 588-7287 |
 MINERVADB FAX MINERVADB FAX | +1 (209) 314-2364 |
 MinervaDB Email - General / Sales / Consulting MinervaDB Email - General / Sales / Consulting | contact@minervadb.com |
| MinervaDB Email - Support | support@minervadb.com |
| MinervaDB Email -Remote DBA | remotedba@minervadb.com |
| Shiv Iyer Email - Founder and Principal | shiv@minervadb.com |
 CORPORATE ADDRESS: CALIFORNIA CORPORATE ADDRESS: CALIFORNIA | MinervaDB Inc., 340 S LEMON AVE #9718 WALNUT 91789 CA, US |
| CORPORATE ADDRESS: DELAWARE | MinervaDB Inc., PO Box 2093 PHILADELPHIA PIKE #3339 CLAYMONT, DE 19703 |
| CORPORATE ADDRESS: HOUSTON | MinervaDB Inc., 1321 Upland Dr. PMB 19322, Houston, TX 77043, US |
The post Benchmarking MySQL 8.0 Performance on Amazon EC2 appeared first on The WebScale Database Infrastructure Operations Experts.
]]>The post MySQL Backup Strategies and Tools – MinervaDB Webinar appeared first on The WebScale Database Infrastructure Operations Experts.
]]>Most often Database Systems outages happen due to user error and it is also the biggest reason for data loss / damage or corruption. In these type of failures, It is application modifying or destroying the data on its own or through a user choice. Hardware failure also contributes to database infrastructure crashes and corruption. To address these sort of data reliability issues, you must recover and restore to the point in time before the corruption occurred. Disaster Recover tools returns the data to its original state at the cost of any other changes that were being made to the data since the point the corruption took place. MinervaDB founder and Principal, hosted a webinar (Thursday, June 18, 2020 – 06:00 PM to 07:00 PM PDT) on MySQL backup strategies and tools addressing the topics below:
- Proactive MySQL DR – From strategy to execution
- Building capacity for reliable MySQL DR
- MySQL DR strategies
- MySQL Backup tools
- Managing MySQL DR Ops. for very large databases
- Testing MySQL Backups
- Biggest MySQL DR mistakes
- MySQL DR Best Practices and Checklist
You can download the PDF (slides) of webinar here
☛ MinervaDB contacts for MySQL Database Backup and Database Reliability Engineering Services
| Business Function | Contact |
|---|---|
| CONTACT GLOBAL SALES (24*7) | (844) 588-7287 (USA) (415) 212-6625 (USA) (778) 770-5251 (Canada) |
| TOLL FREE PHONE (24*7) | (844) 588-7287 |
| MINERVADB FAX | +1 (209) 314-2364 |
| MinervaDB Email - General / Sales / Consulting | contact@minervadb.com |
| MinervaDB Email - Support | support@minervadb.com |
| MinervaDB Email -Remote DBA | remotedba@minervadb.com |
| Shiv Iyer Email - Founder and Principal | shiv@minervadb.com |
| CORPORATE ADDRESS: CALIFORNIA | MinervaDB Inc., 340 S LEMON AVE #9718 WALNUT 91789 CA, US |
| CORPORATE ADDRESS: DELAWARE | MinervaDB Inc., PO Box 2093 PHILADELPHIA PIKE #3339 CLAYMONT, DE 19703 |
| CORPORATE ADDRESS: HOUSTON | MinervaDB Inc., 1321 Upland Dr. PMB 19322, Houston, TX 77043, US |
The post MySQL Backup Strategies and Tools – MinervaDB Webinar appeared first on The WebScale Database Infrastructure Operations Experts.
]]>The post MySQL Backup and Disaster Recovery Webinar appeared first on The WebScale Database Infrastructure Operations Experts.
]]>(Thursday, June 18, 2020 – 06:00 PM to 07:00 PM PDT)
There can be several reasons for a MySQL database outage: hardware failure, power outage, human error, natural disaster etc. We may not be able prevent all the disaster from happening but investing on a robust disaster recovery plan is very important for building fault-tolerant database infrastructure operations on MySQL. Every MySQL DBA is accountable for developing a disaster recovery plan addressing data sensitivity, data loss tolerance and data security. Join Shiv Iyer, Founder and Principal of MinervaDB to lean about the best practices for building highly reliable MySQL DR strategy and operations on Thursday, June 18, 2020 – 06:00 PM to 07:00 PM PDT. Building DR for a high traffic MySQL database infrastructure means deep understanding of multiple backup strategies and choosing optimal ones which are best suited for performance and reliability. Most of the data intensive MySQL infrastructure will have a combination of multiple backup methods and tools, In this webinar Shiv talks about his experiences in the past and present on building MySQL DR Ops, tools and zero tolerance data loss methods.
Join this webinar to learn more about:
- Proactive MySQL DR – From strategy to execution
- Building capacity for reliable MySQL DR
- MySQL DR strategies
- MySQL Backup tools
- Managing MySQL DR Ops. for very large databases
- Testing MySQL Backups
- Biggest MySQL DR mistakes
- MySQL DR Best Practices and Checklist


The post MySQL Backup and Disaster Recovery Webinar appeared first on The WebScale Database Infrastructure Operations Experts.
]]>The post MySQL Backup Strategies – Building MySQL DR Solutions appeared first on The WebScale Database Infrastructure Operations Experts.
]]>MySQL powers all the major internet properties, Which include Google, Facebook, Twitter, LinkedIn, Uber etc. So how do we plan for MySQL disaster recovery and what are the most common MySQL DR tools used today for building highly reliable database infrastructure operations ? There can be several reasons for a MySQL database outage: hardware failure, power outage, human error, natural disaster etc. We may not be able prevent all the disaster from happening but investing on a robust disaster recovery plan is very important for building fault-tolerant database infrastructure operations on MySQL. Every MySQL DBA is accountable for developing a disaster recovery plan addressing data sensitivity, data loss tolerance and data security. Functionally you have several database backup strategies available with MySQL:
- Full backup – Full backup backs up the whole database, This also include transaction log so that the full database can be recovered after a full database backup is restored. Full database backups represent the database at the time the backup finished. Full backups are storage resource intensive and takes more time to finish. If you have for a large database, we strongly recommend to supplement a full database backup with a series of differential database backups.
- Differential backup – A differential backup is based on the most recent, previous full data backup. A differential backup captures only the data that has changed since that full backup. The full backup upon which a differential backup is based is known as the base of the differential. Full backups, except for copy-only backups, can serve as the base for a series of differential backups, including database backups, partial backups, and file backups. The base backup for a file differential backup can be contained within a full backup, a file backup, or a partial backup. The differential backups are most recommended when the subset of a database is modified more frequently than the rest of the database.
- Incremental backup – A incremental backup contains all changes to the data since the last backup. Both differential and incremental backup does only backing up changed files. But they differ significantly in how they do it, and how useful the result is.while an incremental backup only includes the data that has changed since the previous backup, a differential backup contains all of the data that has changed since the last full backup. The advantage that differential backup offers over incremental backups is a shorter restore time. Because, the backup has to be reconstituted from the last full backup and all the incremental backups since.
MySQL Backup tools
The following are the list of MySQL backup tools (logical and physical) discussed in this blog:
mysqldump
mysqldump is a MySQL client utility which can be used to perform logical backups , The mysqldump generate output in SQL ( default and most commonly used to reproduce MySQL schema objects and data), CSV, other delimited text or XML format. We have copied below the restrictions of mysqldump:
- mysqldump does not dump performance_schema or sys schema be default. To enforce dumping or logical backup of any of these schema objects, You have to explicitly mention them –databases option or if you want to just dump performance_schema use –skip-lock-tables option.
- mysqldump does not dump the INFORMATION_SCHEMA schema.
- mysqldump does not dump the InnoDB CREATE TABLESPACE statements.
- mysqldump does not dump the NDB Cluster ndbinfo information database.
- mysqldump includes statements required to recreate the general_log and slow_query_log tables for dumps of the mysql database. But, Log table contents are not dumped
Script to dump all the databases:
shell> mysqldump --all-databases > all_databases.sql
Script to dump the entire database:
shell> mysqldump db_name > db_name_dump.sql
Script to dump several databases with one command:
shell> mysqldump --databases db_name1 [db_name2 ...] > databases_dump.sql
mysqlpump
The mysqlpump is another client utility for logical backup of MySQL database like mysqldump which is capable of parallel processing of databases and other schema objects with databases to perform high performance dumping process, We listed below mysqlpump most compelling features:
- MySQL dump with parallel processing capabilities for databases and other objects within databases.
- MySQL user accounts will be dumped as account-management statements (CREATE USER, GRANT) rather than as inserts into the mysql system database.
- By using mysqlpump you can create a compressed output.
- Much faster compared to mysqldump. Because, The InnoDB secondary indexes are created after rows are inserted to the table.
P.S. – We have blogged about “How to use mysqlpump for faster MySQL logical backup ? ” here
MySQL Enterprise Backup
- Transparent page compression for InnoDB.
- Backup history available for all members of Group Replication by making sure backup_history table is updated on primary node after each mysqlbackup operation.
- Storage engine of the mysql.backup_history table on a backed-up server has switched from CSV to InnoDB.
- mysqlbackup now supports encrypted InnoDB undo logs .
- mysqlbackup now supports high performance incremental backup by setting page tracking functionality on MySQL (set –incremental=page-track).
- Much better MySQL Enterprise Backup 8.0 troubleshooting with now mysqlbackup prints a stack trace after being terminated by a signal.
- Selective restores of tables or schema from full backup for Table-Level Recovery (TLR)
Percona XtraBackup
Percona XtraBackup is an open source MySQL hot backup solution from Percona addressing incremental, fast, compressed and secured backup for InnoDB optimally. Most of our customers users Percona XtraBackup for DR of their MySQL infrastructure, The following features makes Percona XtraBackup obvious choice for MySQL Backup and DR:
- Hot backup solution for InnoDB without blocking / locking transaction processing.
- Point-in-time recovery for InnoDB.
- MySQL incremental backup support.
- Percona XtraBackup supports incremental compressed backups.
- High performance streaming backup support for InnoDB.
- Parallel backup and copy-back support for faster backup and restoration.
- Secondary indexes defragmentation support for InnoDB.
- Percona XtraBackup support rsync to minimize locking.
- Track Percona XtraBackup history with Backup history table.
- Percona XtraBackup supports offline backup.
Conclusion
We always recommend a combination of multiple backup strategies / tools for maximum data reliability and optimal restoration. We cannot have a common backup strategy for all the customers, It depends on factors like infrastructure, MySQL distribution, database size, SLA etc. Backups are most import components in database infrastructure operations and we follow zero tolerance DR for building highly available and fault-tolerant MySQL infrastructure.
Do you want to engage MinervaDB Remote DBA for MySQL Disaster Recovery (DR) and Database Reliability Engineering (Data SRE) ?
| Business Function | Contact |
|---|---|
| CONTACT GLOBAL SALES (24*7) | (844) 588-7287 (USA) (415) 212-6625 (USA) (778) 770-5251 (Canada) |
| TOLL FREE PHONE (24*7) | (844) 588-7287 |
| MINERVADB FAX | +1 (209) 314-2364 |
| MinervaDB Email - General / Sales / Consulting | contact@minervadb.com |
| MinervaDB Email - Support | support@minervadb.com |
| MinervaDB Email -Remote DBA | remotedba@minervadb.com |
| Shiv Iyer Email - Founder and Principal | shiv@minervadb.com |
| CORPORATE ADDRESS: CALIFORNIA | MinervaDB Inc., 340 S LEMON AVE #9718 WALNUT 91789 CA, US |
| CORPORATE ADDRESS: DELAWARE | MinervaDB Inc., PO Box 2093 PHILADELPHIA PIKE #3339 CLAYMONT, DE 19703 |
| CORPORATE ADDRESS: HOUSTON | MinervaDB Inc., 1321 Upland Dr. PMB 19322, Houston, TX 77043, US |
The post MySQL Backup Strategies – Building MySQL DR Solutions appeared first on The WebScale Database Infrastructure Operations Experts.
]]>The post ClickHouse and ProxySQL queries rewrite (Cross-post from ProxySQL) appeared first on The WebScale Database Infrastructure Operations Experts.
]]>Introduction
ProxySQL in September 2017 announced support for ClickHouse as backend. ProxySQL is a popular open source, high performance and protocol-aware proxy server for MySQL and its forks. ClickHouse is an open source column-oriented database management system capable of real time generation of analytical data reports using SQL queries. To support ClickHouse as a backend, ProxySQL acts as a data bridge between MySQL protocol and ClickHouse protocol, allowing MySQL clients to execute queries in ClickHouse through it. ClickHouse’s SQL query syntax is different than MySQL’s syntax, and migrating application from MySQL to ClickHouse isn’t just a matter of changing connections endpoint but it also requires modifying some queries. This needs development time, but not always possible. One of ProxySQL most widely used feature is indeed the ability of rewriting queries, so often it is just a matter of writing the right query rules. In this blog post we have explained step-by-step MySQL query rewrite for ClickHouse using ProxySQL:
How to implement ProxySQL query rewrite for ClickHouse ?
The below is MySQL query we are considering for query rewrite:
SELECT COUNT(`id`), FROM_UNIXTIME(`created`, '%Y-%m') AS `date` FROM `tablename` GROUP BY FROM_UNIXTIME(`created`, '%Y-%m')
- ClickHouse doesn’t support FROM_UNIXTIME, but it supports toDate and toTime.
- ClickHouse also supports toYear and toMonth , useful to format the date the same FROM_UNIXTIME does.
Therefore, it is possible to rewrite the query as:
SELECT COUNT(`id`), concat(toString(toYear(toDate(created))), '-', toString(toMonth(toDate(created)))) AS `date`
FROM `tablename`
GROUP BY toYear(toDate(created)), toMonth(toDate(created));
To perform the above rewrite, we will need two rules, one for the first FROM_UNIXTIME, and one for the second one. Or we can just use one rewrite rules to replace FROM_UNIXTIME(created, ‘%Y-%m’) no matter if on the retrieved fields or in the GROUP BY clause, generating the following query:
SELECT COUNT(`id`), concat(toString(toYear(toDate(created))), '-', toString(toMonth(toDate(created)))) AS `date`
FROM `tablename`
GROUP BY concat(toString(toYear(toDate(created))), '-', toString(toMonth(toDate(created))));
Does it look great? No, not yet!
For the month of March, concat(toString(toYear(toDate(created))), ‘-‘, toString(toMonth(toDate(created)))) will return 2018-3 : not what the application was expecting, as MySQL would return 2018-03 . The same applies for all the first 9 months of each year.
Finally, we rewrote the query as the follow, and the application was happy:
SELECT COUNT(`id`), substring(toString(toDate(created)),1,7) AS `date`
FROM `tablename`
GROUP BY substring(toString(toDate(created)),1,7);
Note: because of the datatypes conversions that ClickHouse needs to perform in order to execute the above query, its execution time is about 50% slower than executing the following query:
SELECT COUNT(`id`), concat(toString(toYear(toDate(created))), '-', toString(toMonth(toDate(created)))) AS `date`
FROM `tablename`
GROUP BY toYear(toDate(created)), toMonth(toDate(created));
Architecting using two ProxySQL
Great, we now know how to rewrite the query!
Although, the ClickHouse module in ProxySQL doesn’t support query rewrite. The ClickHouse module in ProxySQL is only responsible to transform data between MySQL and ClickHouse protocol, and viceversa.
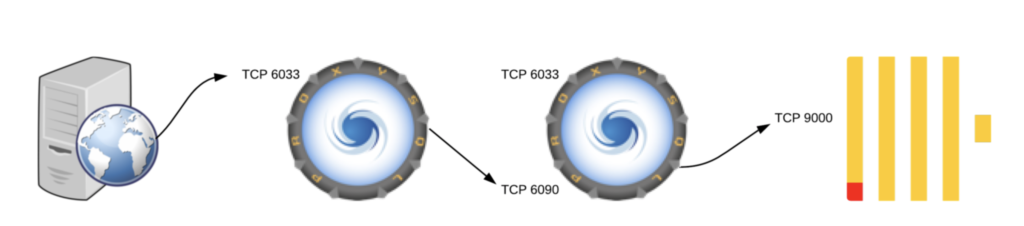
Therefore the right way of achieving this solution is to configure two ProxySQL layers, one instance responsible for rewriting the query and sending the rewritten query to the second ProxySQL instance, this one responsible for executing the query (already modified) on ClickHouse.
Architecting using only one ProxySQL
Does the above architecture seems complex? Not really, it is reasonable straightforward.
Can it be improved?
As you can see from the previous chart, the ClickHouse module and the MySQL module listen on different ports. The first ProxySQL instance is receiving traffic on port 6033, and sending traffic on the second PorxySQL instance on port 6090.
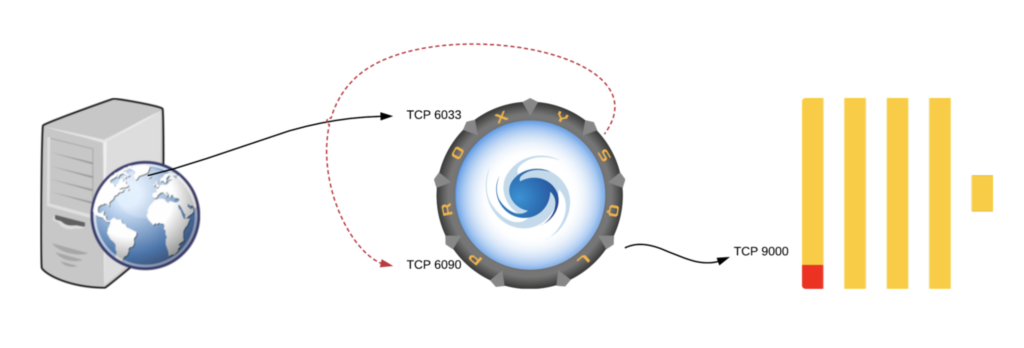
Are two instances really required? The answer is no.
In fact, a single instance can receive MySQL traffic on port 6033, rewrite the query, and send the rewritten query to itself on port 6090, to finally execute the rewritten query on ClickHouse.
This diagram describes the architecture:
Configuration
For reference, below is the step to configure one single ProxySQL to send traffic to ClickHouse, and use itself as a backend.
Create ClickHouse user:
INSERT INTO clickhouse_users (username,password) VALUES ('clicku','clickp');
LOAD CLICKHOUSE USERS TO RUNTIME;
SAVE CLICKHOUSE USERS TO DISK;
Create MySQL user (same as ClickHouse):
INSERT INTO mysql_users(username,password) SELECT username, password FROM clickhouse_users;
LOAD MYSQL USERS TO RUNTIME;
SAVE MYSQL USERS TO DISK;
Configure ProxySQL itself as a backend for MySQL traffic:
INSERT INTO mysql_servers(hostname,port) VALUES ('127.0.0.1',6090);
SAVE MYSQL SERVERS TO DISK;
LOAD MYSQL SERVERS TO RUNTIME;
Create a query rule for rewriting queries:
INSERT INTO mysql_query_rules (active,match_pattern,replace_pattern,re_modifiers) VALUES
(1,"FROM_UNIXTIME\(`created`, '%Y-%m'\)", 'substring(toString(toDate(created)),1,7)',"CASELESS,GLOBAL");
LOAD MYSQL QUERY RULES TO RUNTIME;
SAVE MYSQL QUERY RULES TO DISK;
This is a very simple example to demonstrate how to perform query rewrite from MySQL to ClickHouse using just one ProxySQL instance. In a real world scenarios you will need to create more rules based on your own queries.
Conclusion
Not only ProxySQL allows to send queries to ClickHouse, but it also allows to rewrite queries to solve issues related to different SQL syntax and available functions.
To achieve this, ProxySQL uses its ability to use itself as a backend: rewrite the query in the MySQL module, and execute it in the ClickHouse module.
References
- https://www.proxysql.com/blog/clickhouse-and-proxysql-queries-rewrite
- https://minervadb.com/index.php/2019/12/25/how-to-use-proxysql-to-work-on-clickhouse-like-mysql/
The post ClickHouse and ProxySQL queries rewrite (Cross-post from ProxySQL) appeared first on The WebScale Database Infrastructure Operations Experts.
]]>The post How to use ProxySQL to work on ClickHouse like MySQL ? appeared first on The WebScale Database Infrastructure Operations Experts.
]]>Introduction
We have several customers on ClickHouse now for both columnar database analytics and archiving MySQL data, You can access data from ClickHouse with clickhouse-client but this involves some learning and also limitations technically. Our customers are very comfortable using MySQL so they always preferred a MySQL client for ClickHouse query analysis and reporting, Thankfully ProxySQL works as a optimal bridge between ClickHouse and MySQL client, This indeed was a great news for us and our customers worldwide. This blog post is about how we can use MySQL client with ClickHouse.
Installation
- https://github.com/sysown/proxysql/releases/ (**Download the package starting with clickhouse )
- Dependencies installation:
- yum -y install perl-DBD-MySQL
Start ProxySQL once completed installation successfully.
  # The default configuration file is this:
  /etc/proxysql.cnf
  # There is no such data directory by default:
  mkdir / var / lib / proxysql
  # start up
  proxysql --clickhouse-server
  # ProxySQL will default to daemon mode in the background
Creating ClickHouse user
Create a user for ClickHouse in the ProxySQL with password, The password is not configured for ClickHouse but for accessing ProxySQL:
# ProxySQL port is 6032, the default username and password are written in the configuration file
 root@10.xxxx: / root # mysql -h 127.0.0.1 -P 6032 -uadmin -padmin
 Welcome to the MariaDB monitor. Commands end with; or \ g.
 Your MySQL connection id is 3
  Server version: 5.6.81 (ProxySQL Admin Module)
  Copyright (c) 2000, 2018, Oracle, MariaDB Corporation Ab and others.
  Type 'help;' or '\ h' for help. Type '\ c' to clear the current input statement.
  MySQL [(none)]> INSERT INTO clickhouse_users VALUES ('chuser', 'chpasswd', 1,100);
  Query OK, 1 row affected (0.00 sec)
  MySQL [(none)] > select * from clickhouse_users;
  + ---------- + ---------- + -------- + ----------------- +
  | username | password | active | max_connections |
  + ---------- + ---------- + -------- + ----------------- +
  | chuser | chpasswd | 1 | 100 |
  + ---------- + ---------- + -------- + ----------------- +
  1 row in set (0.00 sec)
  MySQL [(none)]> LOAD CLICKHOUSE USERS TO RUNTIME;
  Query OK, 0 rows affected (0.00 sec)
  MySQL [(none)]> SAVE CLICKHOUSE USERS TO DISK;
  Query OK, 0 rows affected (0.00 sec)
Connecting to ClickHouse from MySQL Client
By default ProxySQL opens the port 6090 to receive user access to ClickHouse:
  # Use username and password above
  # If it is a different machine, remember to change the IP
  root@10.xxxx: / root # mysql -h 127.0.0.1 -P 6090 -uclicku -pclickp --prompt "ProxySQL-To-ClickHouse>"
  Welcome to the MariaDB monitor. Commands end with; or \ g.
  Your MySQL connection id is 64
  Server version: 5.6.81 (ProxySQL ClickHouse Module)
  Copyright (c) 2000, 2018, Oracle, MariaDB Corporation Ab and others.
  Type 'help;' or '\ h' for help. Type '\ c' to clear the current input statement.
  ProxySQL-To-ClickHouse >
Querying ClickHouse like MySQL
 MySQL [(none)] > select version ();
+ ------------------- +
| version |
+ ------------------- +
| 5.6.81-clickhouse |
+ ------------------- +
1 row in set (0.00 sec)
MySQL [(none)] > select now ();
+ --------------------- +
| now () |
+ --------------------- +
| 2019-12-25 20:17:14 |
+ --------------------- +
1 row in set (0.00 sec)
MySQL [(none)] > select today ();
+ ------------ +
| today () |
+ ------------ +
| 2019-12-25 |
+ ------------ +
1 row in set (0.00 sec)
# Our table is over 55 billion
ProxySQL-To-ClickHouse > select count (*) from mysql_audit_log_data;
+ ------------- +
| count () |
+ ------------- +
| 539124837571 |
+ ------------- +
1 row in set (8.31 sec)
Limitations
- This ProxySQL solution works only when it is on the local ClickHouse (Note.- ClickHouse instance cannot have password in this ecosystem / recommended solution)
- ProxySQL query rewrite limitations – The simple queries work seamless, The complex query rewrite are quite expense and there might some levels of SQL semantics limitations
Conclusion – ProxySQL Version 2.0.8 new features and enhancements
- Changed default max_allowed_packet from 4M to 64M
- Added support for mysqldump 8.0 and Admin #2340
- Added new variable mysql-aurora_max_lag_ms_only_read_from_replicas : if max_lag_ms is used and the writer is in the reader hostgroup, the writer will be excluded if at least N replicas are good candidates.
- Added support for unknown character set , and for collation id greater than 255 #1273
- Added new variable mysql-log_unhealthy_connections to suppress messages related to unhealty clients connections being closed
- Reimplemented rules_fast_routing using khash
- Added support for SET CHARACTERSET #1692
- Added support for same node into multiple Galera clusters #2290
- Added more verbose output for error 2019 (Can’t initialize character set) #2273
- Added more possible values for mysql_replication_hostgroups.check_type #2186
- read_only | innodb_read_only
- read_only & innodb_read_only
- Added support and packages for RHEL / CentOS 8
References:
- http://jackpgao.github.io/2017/12/19/Using-ClickHouse-like-MySQL-by-ProxySQL/
- https://www.proxysql.com/blog/clickhouse-and-proxysql-queries-rewrite
- https://www.altinity.com/blog/2018/7/13/clickhouse-and-proxysql-queries-rewrite
- https://github.com/sysown/proxysql/releases
The post How to use ProxySQL to work on ClickHouse like MySQL ? appeared first on The WebScale Database Infrastructure Operations Experts.
]]>The post How to plan for MySQL 8.0 upgrade ? appeared first on The WebScale Database Infrastructure Operations Experts.
]]>Recently one of our customers in Fintech. business (among the largest one in the Asia) wanted to upgrade from MySQL 5.7 to MySQL. 8.0. and they approached us for a safest and durable MySQL upgrade strategy, roadmap and execution. In Fintech. business every transaction needs to durable from statutory regulatory compliance perspective and we at MinervaDB never wanted to go for unplanned / easy in-place MySQL 8.0 upgrade method here without proper pre-migration audit, We wanted to list down in detail what are the possible scenarios this MySQL 8.0 upgrade will fail and the compatibility issues between MySQL 5.7 and MySQL 8.0. Thankfully Upgrade Checker utility that comes with MySQL Shell 8.0 can be executed against MySQL 5.7 server to confirm upgrade readiness, We have written a blog on MySQL Shell 8.0 Upgrade Checker here
Things to remember before MySQL. 8.0 upgrade:
- Metadata on Transactional Data Dictionary tables – MySQL 8.0 manages metadata in transactional data dictionary tables. In the previous MySQL releases, the metadata was stored in non-transactional system tables
- With the introduction of the –innodb-directoriesfeature, the location of file-per-table and general tablespace files created with an absolute path or in a location outside of the data directory should be added to the innodb_directoriesargument value. Otherwise, InnoDB is not able to locate these files during recovery. To view tablespace file locations, query the INFORMATION_SCHEMA.FILEStable:
SELECT TABLESPACE_NAME, FILE_NAME FROM INFORMATION_SCHEMA.FILES \G
- With the introduction of the –innodb-directoriesfeature, the location of file-per-table and general tablespace files created with an absolute path or in a location outside of the data directory should be added to the innodb_directoriesargument value. Otherwise, InnoDB is not able to locate these files during recovery. To view tablespace file locations, query the INFORMATION_SCHEMA.FILEStable:
- Caching_sha2_password– Starting from MySQL 8.0 the default value for the system variable –default-authentication-plugin is “caching_sha2_password” . But for existing accounts during upgrades to MySQL 8.0. the authentication plugin will remain unchanged, this is also application for the administrative account ‘root’@’localhost’ . To connect to the server following data directory initialization, you must therefore use a client or connector that supports caching_sha2_password. If you can do this but prefer that the root account use mysql_native_password after installation, install MySQL and initialize the data directory as you normally would. Then connect to the server as root and use ALTER USERas follows to change the account authentication plugin and password:
ALTER USER 'root'@'localhost'
IDENTIFIED WITH mysql_native_password
BY 'NEW_PASSWORD';
- If ever the client or the connector the application use does not support caching_sha2_password , Please modify my.cnf system variable –default-authentication-plugin = mysql_native_password
- Use mysqlcheck. to detect non-compatible datatypes, functions, orphaned .frm files – MySQL 8.0 in-place upgrade is not supported if the tables contain old temporal columns in pre-5.6.4 format (TIME, DATETIME and TIMESTAMP columns without support for fractional seconds precision )
mysqlcheck -u root -p --all-databases --check-upgrade
- There must be no tables that have foreign key constraint names longer than 64 characters. To identify tables with too-long constraint names, execute this query:
SELECT TABLE_SCHEMA, TABLE_NAME FROM INFORMATION_SCHEMA.TABLES WHERE TABLE_NAME IN (SELECT LEFT(SUBSTR(ID,INSTR(ID,'/')+1), INSTR(SUBSTR(ID,INSTR(ID,'/')+1),'_ibfk_')-1) FROM INFORMATION_SCHEMA.INNODB_SYS_FOREIGN WHERE LENGTH(SUBSTR(ID,INSTR(ID,'/')+1))>64); - To avoid a startup failure on MySQL 8.0, remove any instance of NO_AUTO_CREATE_USER from sql_modesystem variable settings in MySQL option files.
- Validate the execution plan of your optimizer hints after upgrade from MySQL 5.7 to 8.0 , Some optimizer hint may even be counterproductive
- There must be no queries and stored program definitions from MySQL 8.0.12 or lower that use ASCor DESCqualifiers for GROUP BYclauses. Otherwise, upgrading to MySQL 8.0.13 or higher may fail, as may replicating to MySQL 8.0.13 or higher slave servers.
- There must be no table partitions that reside in shared InnoDB tablespaces, which include the system tablespace and general tablespaces. Identify table partitions in shared tablespaces by querying INFORMATION_SCHEMA:
SELECT DISTINCT NAME, SPACE, SPACE_TYPE FROM INFORMATION_SCHEMA.INNODB_SYS_TABLES
  WHERE NAME LIKE '%#P#%' AND SPACE_TYPE NOT LIKE 'Single';
- To move table partitions from shared tablespaces to file-per-table tablespaces, You can run ALTER TABLE … REORGANIZE PARTITION query:
ALTER TABLE table_name REORGANIZE PARTITION partition_name
  INTO (partition_definition TABLESPACE=innodb_file_per_table);
- Confirm your MySQL 5.7 is not configured (my.cnf) with deprecated or removed system variable. If any, Your MySQL 8.0 upgrade will fail. The list of removed, deprecated and new system / status variables are available here –https://dev.mysql.com/doc/refman/8.0/en/added-deprecated-removed.html
- If you are doing in-place MySQL 8.0. upgrade, either commit or rollback the XA transactions by issuing XA COMMIT or XA ROLLBACK statement
How to upgrade to MySQL 8.0 ?
There are basically two ways to upgrade to MySQL 8.0:
- In-Place Upgrade – In this upgrade methodology you will be shutting down the old MySQL Server and replacing the old MySQL binaries or other related packages with new ones. Once successfully completed
- Logical Upgrade – In this upgrade methodology you will be exporting SQL from the older MySQL instance using logical backup utilities like mysqldump or mysqlpump and importing to MySQL 8.0
We at MinervaDB are technically ok with both methods of MySQL upgrades so far you have done thorough due diligence of MySQL 5.7 to MySQL 8.0 compatibilities and conflicts.
mysql_upgrade is going way with MySQL 8.0.16
mysql_upgrade binary is deprecated with MySQL 8.0.16, Going forward it will be functionally known as “server upgrade”. This is added alongside the Data Dictionary upgrade (DD Upgrade), which is a process to update the data dictionary table definitions. From MySQL 8.0.16 mysqld binary takes care of entire upgrade procedure if needed.
Manual mysql_upgrade process is still possible !
You don’t want automatic upgrades from “server upgrade” ? It is possible by configuring the MySQL 8.0 system variable –upgrade
Recommended values:
- AUTO – MySQL 8.0 performs automatic upgrade from the older release, MySQL 8.0 default value for server option –upgrade is AUTO.
- MINIMAL – MySQL 8.0 performs the upgrade of the data dictionary, the Performance Schema and INFORMATION_SCHEMA. When the server option –upgrade is configured MINIMAL, Group Replication cannot be started, because system tables on which the replication internals depend are not updated.
- FORCE – When server option –upgrade is set to FORCE , The server upgrades the he data dictionary, the Performance Schema, the INFORMATION_SCHEMA, the system tables in. the mysql schema, the sys schema and other user schemas.
- NONE – The server performs no automatic upgrades when configured the server option –upgrade to NONE, This option prevents data dictionary upgrade and server exits with an error if the data dictionary is found out of date.
Troubleshooting MySQL 8.0 upgrade – What usually can go wrong with MySQL 8.0. upgrade ?
- Conflicting with my.cnf of previous MySQL release / installation –If the new mysqld of MySQL 8.0 does not start, Please verify that you do not have an old my.cnf file from your previous installation. You can check this with the –print-defaults option (for example, mysqld –print-defaults). If this command displays anything other than the program name, you have an active my.cnf file that affects server or client operation.
- Commands out of sync / unexpected core dumps – After MySQL 8.0 upgrade, you experience problems with compiled client programs, such as Commands out of sync or unexpected core dumps, you probably have used old header or library files when compiling your programs. In this case, check the date for your mysql.h file and libmysqlclient.a library to verify that they are from the new MySQL distribution. If not, recompile your programs with the new headers and libraries. Recompilation might also be necessary for programs compiled against the shared client library if the library major version number has changed
- Schema mismatch errors – A schema mismatch in a MySQL 5.7 instance between the .frm file of a table and the InnoDB data dictionary can cause an upgrade to MySQL 8.0 to fail. Such mismatches may be due to .frm file corruption. To address this issue, dump and restore affected tables before attempting the upgrade again.
- User-defined function (UDF) conflicts due to same name – If ever you have created a user-defined function (UDF) / stored functions in MySQL previous releases (eg. MySQL 5.7) with same name of MySQL 8.0 built-in function, the UDF becomes inaccessible.
Downgrading from MySQL 8.0
Downgrade from MySQL 8.0 to MySQL 5.7, or from a MySQL 8.0 release to a previous MySQL 8.0 release, is not supported. The only supported alternative is to restore a backup taken before upgrading. It is therefore imperative that you backup your data before starting the upgrade process.
Conclusion
MySQL 8.0 upgrades are not complex. But, If not carefully planned, there are high chances you will end-up with an unsuccessful upgrade. We strongly recommend to do detailed low-level MySQL 8.0 compatibility assessments before planning for an upgrade, Thanks for your comments.
The post How to plan for MySQL 8.0 upgrade ? appeared first on The WebScale Database Infrastructure Operations Experts.
]]>The post Tuning MyRocks for performance appeared first on The WebScale Database Infrastructure Operations Experts.
]]>We know InnoDB is constrained by a fixed compressed page size. Alignment during fragmentation and compression causes extra unused space because the leaf nodes are not full. Let’s consider a InnoDB table with a compressed page size of 8KB. A 16KB in-memory page compressed to 5KB still uses 8KB on storage. Adding to this, each entry in the primary key index has 13 bytes of metadata (6 byte transaction id + 7 byte rollback pointer), and the metadata is not compressed, making the space overhead significant for small rows. Typically flash devices are limited by the WRITE endurance, In a typical scenario were index values are stored in leaf nodes and sorted by key, the often operational database may not fit in memory and keys get updated in an random platform leading to higher write amplification. In the worst case, updating one row requires a number of page reads, makes several pages dirty, and forces many dirty pages to be written back to storage.
Sow now what I really love about MyRocks?
It’s all about much lower write amplification factor of RocksDB compared to InnoDB is what I am very much impressed about. On pure flash, reducing write volume (write amplification) is important because flash burns out if writing too much data. Reducing write volume also helps to improve overall throughput on flash. InnoDB adopts “update in place” architecture. Even though updating just 1 record, an entire page where the row belongs becomes dirty, and the dirty page has to be written back to storage. On typical OLTP systems, modification unit (row) size is much smaller than I/O unit (page) size. This makes write amplification very high. I have published performance benchmarking of InnoDB, RocksDB and TokuDB, You can read about it here
Things to remember before tuning MyRocks:
- Data loading limitations
- Limitation – Transaction must fit in memory:
- mysql > ALTER TABLE post_master ENGINE = RocksDB;
- Error 2013 (HY000): Lost connection to MySQL server during query.
- Higher memory consumption and eventually get killed by OOM killer
- mysql > ALTER TABLE post_master ENGINE = RocksDB;
- When loading data into MyRocks tables, there are two recommended session variables:
- SET session sql_log_bin=0;
- SET session rocksdb_bulk_load=1;
- Limitation – Transaction must fit in memory:
There are few interesting things to remember before bulk loading MyRocks and tuning the system variable rocksdb_bulk_load:
- Data being bulk loaded can never overlap with existing data in the table. It is always recommended to bulk data load into an empty table. But, The mode will allow loading some data into the table, doing other operations and then returning and bulk loading addition data if there is no overlap between what is loaded and what already exists.
- The data may not be visible until the bulk load mode is ended (i.e. the rocksdb_bulk_load is set to zero again). RocksDB stores data into “SST” (Sorted String Table) files and Until a particular SST has been added the data will not be visible to the rest of the system, thus issuing a SELECT on the table currently being bulk loaded will only show older data and will likely not show the most recently added rows. Ending the bulk load mode will cause the most recent SST file to be added. When bulk loading multiple tables, starting a new table will trigger the code to add the most recent SST file to the system — as a result, it is inadvisable to interleave INSERT statements to two or more tables during bulk load mode.
Configuring MyRocks for performance:
Character Sets:
- MyRocks works more optimal with case sensitive collations (latin1_bin, utf8_bin, binary)
Transaction
- Read Committed isolation level is recommended. MyRocks’s transaction isolation implementation is different from InnoDB, but close to PostgreSQL. Default tx isolation in PostgreSQL is Read Committed.
Compression
- Set kNoCompression (or kLZ4Compression) on L0-1 or L0-2
- In the bottommost level, using stronger compression algorithm (Zlib or ZSTD) is recommended.
- If using zlib compression, set kZlibCompression at the bottommost level (bottommost_compression).
- If using zlib compression, set compression level accordingly. The above example (compression_opts=-14:1:0) uses zlib compression level 1. If your application is not write intensive, setting (compression_opts=-14:6:0) will give better space savings (using zlib compression level 6).
- For other levels, set kLZ4Compression.
Data blocks, files and compactions
- Set level_compaction_dynamic_level_bytes=true
- Set proper rocksdb_block_size (default 4096). Larger block size will reduce space but increase CPU overhead because MyRocks has to uncompress many more bytes. There is a trade-off between space and CPU usage.
- Set rocksdb_max_open_files=-1. If setting greater than 0, RocksDB still uses table_cache, which will lock a mutex every time you access the file. I think you’ll see much greater benefit with -1 because then you will not need to go through LRUCache to get the table you need.
- Set reasonable rocksdb_max_background_jobs
- Set not small target_file_size_base (32MB is generally sufficient). Default is 4MB, which is generally too small and creates too many sst files. Too many sst files makes operations more difficult.
- Set Rate Limiter. Without rate limiter, compaction very often writes 300~500MB/s on pure flash, which may cause short stalls. On 4x MyRocks testing, 40MB/s rate limiter per instance gave pretty stable results (less than 200MB/s peak from iostat).
Bloom Filter
- Configure bloom filter and Prefix Extractor. Full Filter is recommended (Block based filter does not work for Get() + prefix bloom). Prefix extractor can be configured per column family and uses the first prefix_extractor bits as the key. If using one BIGINT column as a primary key, recommended bloom filter size is 12 (first 4 bytes are for internal index id + 8 byte BIGINT).
- Configure Memtable bloom filter. Memtable bloom filter is useful to reduce CPU usage, if you see high CPU usage at rocksdb::MemTable::KeyComparator. Size depends on Memtable size. Set memtable_prefix_bloom_bits=41943040 for 128MB Memtable (30/128M=4M keys * 10 bits per key).
Cache
- Do not set block_cache at rocksdb_default_cf_options (block_based_table_factory). If you do provide a block cache size on a default column family, the same cache is NOT reused for all such column families.
- Consider setting shared write buffer size (db_write_buffer_size)
- Consider using compaction_pri=kMinOverlappingRatio for writing less on compaction.
Reference Source: https://github.com/facebook/mysql-5.6/wiki/my.cnf-tuning
The post Tuning MyRocks for performance appeared first on The WebScale Database Infrastructure Operations Experts.
]]>The post Auditing MariaDB for Secured Database Infrastructure Operations appeared first on The WebScale Database Infrastructure Operations Experts.
]]>MariaDB Audit Plugin installation
The MariaDB Audit Plugin is provided as a dynamic library: server_audit.so (server_audit.dll for Windows). The file path of the plugin library is stored in the plugin_dir system variable:
MariaDB [(none)]> select @@plugin_dir;
+--------------------------+
| @@plugin_dir             |
+--------------------------+
| /usr/lib64/mysql/plugin/ |
+--------------------------+
1 row in set (0.000 sec)
One way to install this plug-in is to execute the INSTALL SONAME statement while logged into MariaDB. You must use an administrative account with INSERT privilege for the mysql.plugin table:
MariaDB [(none)]> INSTALL SONAME 'server_audit';
Loading Plugin at Start-Up
You can also load the plugin from the command-line as a startup parameter by configuring my.cnf or my.ini in /etc/my.cnf or /etc/mysql/my.cnf , We have copied below the configuration of my.cnf for enabling MariaDB Audit Plugin (please add these variables after [mysqld] or [mariadb] ):
plugin_load=server_audit=server_audit.so

server_audit_events=CONNECT,QUERY,TABLE

server_audit_logging=ON

server_audit=FORCE_PLUS_PERMANENT
We don’t want somebody uninstall MariaDB Audit Plugin so enabled system variable, server_audit=FORCE_PLUS_PERMANENT , The example below explains this scenario much better:
MariaDB [(none)]> UNINSTALL PLUGIN server_audit;
ERROR 1702 (HY000): Plugin 'server_audit' is force_plus_permanent and can not be unloaded
To see the list of audit plugin-related variables in your MariaDB server, execute the command below:
MariaDB [(none)]> SHOW GLOBAL VARIABLES LIKE 'server_audit%';
+-------------------------------+-----------------------+
| Variable_name                 | Value                 |
+-------------------------------+-----------------------+
| server_audit_events           | CONNECT,QUERY,TABLE   |
| server_audit_excl_users       |                       |
| server_audit_file_path        | server_audit.log      |
| server_audit_file_rotate_now  | OFF                   |
| server_audit_file_rotate_size | 1000000               |
| server_audit_file_rotations   | 9                     |
| server_audit_incl_users       |                       |
| server_audit_logging          | ON                    |
| server_audit_mode             | 0                     |
| server_audit_output_type      | file                  |
| server_audit_query_log_limit  | 1024                  |
| server_audit_syslog_facility  | LOG_USER              |
| server_audit_syslog_ident     | mysql-server_auditing |
| server_audit_syslog_info      |                       |
| server_audit_syslog_priority  | LOG_INFO              |
+-------------------------------+-----------------------+
15 rows in set (0.002 sec)
Uncontrolled MariaDB Audit Plugins are major concerns in any MariaDB database infrastructure operations, I strongly recommend our customers to consider log rotate “server_audit.log” file, You can force a rotation by enabling the server_audit_file_rotate_now :
MariaDB [(none)]> SET GLOBAL server_audit_file_rotate_now = ON;
Query OK, 0 rows affected (0.015 sec)
You can configure the size limit of MariaDB Audit Plugin by setting variable, server_audit_file_rotate_size . To limit the number of log files created, set the variable, server_audit_file_rotations. To force log file rotations you can set the variable, server_audit_file_rotate_now to ON:
[mariadb]
..
server_audit_file_rotate_now=ON
server_audit_file_rotate_size=1000000
server_audit_file_rotations=10
...
MariaDB Audit Plugin report:
[root@localhost mysql]# tail -f server_audit.log
20180720 20:39:22,localhost.localdomain,root,localhost,13,1501,QUERY,,'SELECT DATABASE()',0
20180720 20:39:22,localhost.localdomain,root,localhost,13,1503,QUERY,sakila,'show databases',0
20180720 20:39:22,localhost.localdomain,root,localhost,13,1504,QUERY,sakila,'show tables',0
20180720 20:39:27,localhost.localdomain,root,localhost,13,1528,QUERY,sakila,'show tables',0
20180720 20:39:43,localhost.localdomain,root,localhost,13,1529,READ,sakila,customer,
20180720 20:39:43,localhost.localdomain,root,localhost,13,1529,QUERY,sakila,'select * from customer limit 100',0
20180720 20:39:52,localhost.localdomain,root,localhost,13,1530,QUERY,sakila,'show tables',0
20180720 20:40:07,localhost.localdomain,root,localhost,13,1531,READ,sakila,actor,
20180720 20:40:07,localhost.localdomain,root,localhost,13,1531,QUERY,sakila,'select * from actor limit 100',0
20180720 20:40:30,localhost.localdomain,root,localhost,13,0,DISCONNECT,sakila,,0
Conclusion
We recommend most of our customers (using MariaDB) to enable MariaDB Audit Plugin to closely monitor what is happening to their database infrastructure, This really helps to proactively troubleshoot if anything going wrong with their MariaDB operations. Reliable and secured database operations is equally important like performance and scalability.
The post Auditing MariaDB for Secured Database Infrastructure Operations appeared first on The WebScale Database Infrastructure Operations Experts.
]]>The post What is MySQL partitioning ? appeared first on The WebScale Database Infrastructure Operations Experts.
]]>CREATE TABLE tab1 (
col1 VARCHAR(30) NOT NULL,
col2 VARCHAR(30) NOT NULL,
col3 TINYINT UNSIGNED NOT NULL,
col4 DATE NOT NULL
)
PARTITION BY RANGE( col3 ) (
PARTITION p0 VALUES LESS THAN (100),
PARTITION p1 VALUES LESS THAN (200),
PARTITION p2 VALUES LESS THAN (300),
PARTITION p3 VALUES LESS THAN MAXVALUE
);
Write a SELECT query benefitting partition pruning:
SELECT col1, col2, col3, col4
FROM tab1
WHERE col3 > 200 AND col3 < 250;
What is explicit partitioning in MySQL and how is it different from partition pruning ?
In MySQL we can explicitly select partition and sub-partitions when executing a statement matching a given WHERE condition, This sounds very much similar to partition pruning, but there is a difference:
- Partition to be checked are explicitly mentioned in the query statement, In partition pruning it is automatic.
- In explicit partition, the explicit selection of partitions is supported for both queries and DML statements, partition pruning applies only to queries.
- SQL statements supported in explicit partitioning – SELECT, INSERT, UPDATE, DELETE, LOAD DATA, LOAD XML and REPLACE
Explicit partition example:
CREATE TABLE customer  (
    cust_id INT NOT NULL AUTO_INCREMENT PRIMARY KEY,
    cust_fname VARCHAR(25) NOT NULL,
    cust_lname VARCHAR(25) NOT NULL,
    cust_phone INT NOT NULL,
    cust_fax INT NOT NULL
)
    PARTITION BY RANGE(cust_id)  (
        PARTITION p0 VALUES LESS THAN (100),
        PARTITION p1 VALUES LESS THAN (200),
        PARTITION p2 VALUES LESS THAN (300),
        PARTITION p3 VALUES LESS THAN MAXVALUE
);
Query explicitly mentioning partition:
mysql> SELECT * FROM customer PARTITION (p1);
RANGE partitioning
In RANGE partitioning you can partition values within a given range, Ranges should be contiguous but not overlapping, usually defined by VALUES LESS THAN operator, The following examples explain how to create and use RANGE partitioning for MySQL performance:
CREATE TABLE customer_contract(
    cust_id INT NOT NULL,
    cust_fname VARCHAR(30),
    cust_lname VARCHAR(30),
    st_dt DATE NOT NULL DEFAULT '1970-01-01',
    end_dt DATE NOT NULL DEFAULT '9999-12-31',
    contract_code INT NOT NULL,
    contract_id INT NOT NULL
)
PARTITION BY RANGE (contract_id) (
    PARTITION p0 VALUES LESS THAN (50),
    PARTITION p1 VALUES LESS THAN (100),
    PARTITION p2 VALUES LESS THAN (150),
    PARTITION p3 VALUES LESS THAN (200)
);
For example, let us suppose that you wish to partition based on the year contract ended:
CREATE TABLE customer_contract(
    cust_id INT NOT NULL,
    cust_fname VARCHAR(30),
    cust_lname VARCHAR(30),
    st_dt DATE NOT NULL DEFAULT '1970-01-01',
    end_dt DATE NOT NULL DEFAULT '9999-12-31',
    contract_code INT NOT NULL,
    contract_id INT NOT NULL
)
PARTITION BY RANGE (year(end_dt)) (
    PARTITION p0 VALUES LESS THAN (2001),
    PARTITION p1 VALUES LESS THAN (2002),
    PARTITION p2 VALUES LESS THAN (2003),
    PARTITION p3 VALUES LESS THAN (2004)
);
It is also possible to partition a table by RANGE, based on the value of a TIMESTAMP column, using the UNIX_TIMESTAMP() function, as shown in this example:
CREATE TABLE sales_forecast (
    sales_forecast_id INT NOT NULL,
    sales_forecast_status VARCHAR(20) NOT NULL,
    sales_forecast_updated TIMESTAMP NOT NULL DEFAULT CURRENT_TIMESTAMP ON UPDATE CURRENT_TIMESTAMP
)
PARTITION BY RANGE ( UNIX_TIMESTAMP(sales_forecast_updated) ) (
    PARTITION p0 VALUES LESS THAN ( UNIX_TIMESTAMP('2008-01-01 00:00:00') ),
    PARTITION p1 VALUES LESS THAN ( UNIX_TIMESTAMP('2008-04-01 00:00:00') ),
    PARTITION p2 VALUES LESS THAN ( UNIX_TIMESTAMP('2008-07-01 00:00:00') ),
    PARTITION p3 VALUES LESS THAN ( UNIX_TIMESTAMP('2008-10-01 00:00:00') ),
    PARTITION p4 VALUES LESS THAN ( UNIX_TIMESTAMP('2009-01-01 00:00:00') ),
    PARTITION p5 VALUES LESS THAN ( UNIX_TIMESTAMP('2009-04-01 00:00:00') ),
    PARTITION p6 VALUES LESS THAN ( UNIX_TIMESTAMP('2009-07-01 00:00:00') ),
    PARTITION p7 VALUES LESS THAN ( UNIX_TIMESTAMP('2009-10-01 00:00:00') ),
    PARTITION p8 VALUES LESS THAN ( UNIX_TIMESTAMP('2010-01-01 00:00:00') ),
    PARTITION p9 VALUES LESS THAN (MAXVALUE)
);
LIST partitioning
The difference between RANGE and LIST partitioning is: In LIST partitioning, each partition is grouped on the selected list of values of a specific column. You can do it by PARTITION BY LIST (EXPR) where EXPR is the selected column for list partition, We have explained LIST partitioning with example below:
CREATE TABLE students (
    student_id INT NOT NULL,
    student_fname VARCHAR(30),
    student_lname VARCHAR(30),
    student_joined DATE NOT NULL DEFAULT '1970-01-01',
    student_separated DATE NOT NULL DEFAULT '9999-12-31',
    student_house INT,
    student_grade_id INT
)
PARTITION BY LIST(student_grade_id) (
    PARTITION P1 VALUES IN (1,2,3,4),
    PARTITION P2 VALUES IN (5,6,7),
    PARTITION P3 VALUES IN (8,9,10),
    PARTITION P4 VALUES IN (11,12)
);
HASH partitioning
HASH partitioning makes an even distribution of data among predetermined number of partitions, In RANGE and LIST partitioning you must explicitly define the partitioning logic and which partition given column value or set of column values are stored. In HASH partitioning MySQL take care of this, The following example explains HASH partitioning better:
CREATE TABLE store (
    store_id INT NOT NULL,
    store_name VARCHAR(30),
    store_location VARCHAR(30),
    store_started DATE NOT NULL DEFAULT '1997-01-01',
    store_code INT
)
PARTITION BY HASH(store_id)
PARTITIONS 4;
P.S. : If you do not include a PARTITIONS clause, the number of partitions defaults to 1.
LINEAR HASH partitioning
The LINEAR HASH partitioning utilizes a linear powers-of-two algorithm, Where HASH partitioning employs the modulus of the hashing function’s value. Please find below LINEAR HASH partitioning example:
CREATE TABLE store (
    store_id INT NOT NULL,
    store_name VARCHAR(30),
    store_location VARCHAR(30),
    store_started DATE NOT NULL DEFAULT '1997-01-01',
    store_code INT
)
PARTITION BY LINEAR HASH( YEAR(store_started) )
PARTITIONS 4;
KEY partitioning
KEY partitioning is very much similar to HASH, the only difference is, the hashing function for the KEY partitioning is supplied by MySQL, In case of MySQL NDB Cluster, MD5() is used, For tables using other storage engines, the MySQL server uses the storage engine specific hashing function which is based on the same algorithm as PASSWORD().
CREATE TABLE contact(
    id INT NOT NULL,
    name VARCHAR(20),
    contact_number INT,
    email  VARCHAR(50),
    UNIQUE KEY (id)
)
PARTITION BY KEY()
PARTITIONS 5;
P.S. – if the unique key column were not defined as NOT NULL, then the previous statement would fail.
Subpartitioning
SUBPARTITIONING is also known as composite partitioning, You can partition table combining RANGE and HASH for better results, The example below explains SUBPARTITIONING better:
CREATE TABLE purchase (id INT, item VARCHAR(30), purchase_date DATE)
    PARTITION BY RANGE( YEAR(purchase_date) )
    SUBPARTITION BY HASH( TO_DAYS(purchase_date) )
    SUBPARTITIONS 2 (
        PARTITION p0 VALUES LESS THAN (2000),
        PARTITION p1 VALUES LESS THAN (2010),
        PARTITION p2 VALUES LESS THAN MAXVALUE
    );
It is also possible to define subpartitions explicitly using SUBPARTITION clauses to specify options for individual subpartitions:
CREATE TABLE purchase (id INT, item VARCHAR(30), purchase_date DATE)
    PARTITION BY RANGE( YEAR(purchase_date) )
    SUBPARTITION BY HASH( TO_DAYS(purchase_date) ) (
        PARTITION p0 VALUES LESS THAN (2000) (
            SUBPARTITION s0,
            SUBPARTITION s1
        ),
        PARTITION p1 VALUES LESS THAN (2010) (
            SUBPARTITION s2,
            SUBPARTITION s3
        ),
        PARTITION p2 VALUES LESS THAN MAXVALUE (
            SUBPARTITION s4,
            SUBPARTITION s5
        )
    );
Things to remember:
- Each partition must have the same number of subpartitions.
- Each SUBPARTITION clause must include (at a minimum) a name for the subpartition. Otherwise, you may set any desired option for the subpartition or allow it to assume its default setting for that option.
- Subpartition names must be unique across the entire table. For example, the following CREATE TABLE statement is valid in MySQL 5.7:
CREATE TABLE purchase (id INT, item VARCHAR(30), purchase_date DATE)
    PARTITION BY RANGE( YEAR(purchase_date) )
    SUBPARTITION BY HASH( TO_DAYS(purchase_date) ) (
        PARTITION p0 VALUES LESS THAN (1990) (
            SUBPARTITION s0,
            SUBPARTITION s1
        ),
        PARTITION p1 VALUES LESS THAN (2000) (
            SUBPARTITION s2,
            SUBPARTITION s3
        ),
        PARTITION p2 VALUES LESS THAN MAXVALUE (
            SUBPARTITION s4,
            SUBPARTITION s5
        )
    );
MySQL partitioning limitations
MySQL partitioning also has limitations, We are listing down below the limitations of MySQL partitioning:
A PRIMARY KEY must include all columns in the table’s partitioning function:
CREATE TABLE tab3 (
column1 INT NOT NULL,
column2 DATE NOT NULL,
column3 INT NOT NULL,
column4 INT NOT NULL,
UNIQUE KEY (column1, column2),
UNIQUE KEY (column3)
)
PARTITION BY HASH(column1 + column3)
PARTITIONS 4;
Expect this error after running above script – ERROR 1503 (HY000): A PRIMARY KEY must include all columns in the table’s partitioning function
The right way of doing it:
CREATE TABLE table12 (
    column1 INT NOT NULL,
    column2 DATE NOT NULL,
    column3 INT NOT NULL,
    column4 INT NOT NULL,
    UNIQUE KEY (column1, column2, column3)
)
PARTITION BY HASH(column3)
PARTITIONS 5;
CREATE TABLE table25 (
    column11 INT NOT NULL,
    column12 DATE NOT NULL,
    column13 INT NOT NULL,
    column14 INT NOT NULL,
    UNIQUE KEY (column11, column13)
)
PARTITION BY HASH(column11 + column13)
PARTITIONS 5;
Most popular limitation of MySQL – Primary key is by definition a unique key, this restriction also includes the table’s primary key, if it has one. The example below explains this limitation better:
CREATE TABLE table55 (
    column11 INT NOT NULL,
    column12 DATE NOT NULL,
    column13 INT NOT NULL,
    column14 INT NOT NULL,
    PRIMARY KEY(column11, column12)
)
PARTITION BY HASH(column13)
PARTITIONS 4;
CREATE TABLE table65 (
    column20 INT NOT NULL,
    column25 DATE NOT NULL,
    column30 INT NOT NULL,
    column35 INT NOT NULL,
    PRIMARY KEY(column20, column30),
    UNIQUE KEY(column25)
)
PARTITION BY HASH( YEAR(column25) )
PARTITIONS 5;
Both of the above scripts will return this error – ERROR 1503 (HY000): A PRIMARY KEY must include all columns in the table’s partitioning function
The right way of doing it:
CREATE TABLE t45 (
    column50 INT NOT NULL,
    column55 DATE NOT NULL,
    column60 INT NOT NULL,
    column65 INT NOT NULL,
    PRIMARY KEY(column50, column55)
)
PARTITION BY HASH(column50 + YEAR(column55))
PARTITIONS 5;
CREATE TABLE table88 (
    column80 INT NOT NULL,
    column81 DATE NOT NULL,
    column82 INT NOT NULL,
    column83 INT NOT NULL,
    PRIMARY KEY(column80, column81, column82),
    UNIQUE KEY(column81, column82)
);
In above example, the primary key does not include all columns referenced in the partitioning expression. However, both of the statements are valid !
You can still successfully partition a MySQL table without unique keys – this also includes having no primary key and you may use any column or columns in the partitioning expression as long as the column type is compatible with the partitioning type, The example below shows partitioning a table with no unique / primary keys:
CREATE TABLE table_has_no_pk (column10 INT, column11 INT, column12 varchar(20))
PARTITION BY RANGE(column10) (
PARTITION p0 VALUES LESS THAN (500),
PARTITION p1 VALUES LESS THAN (600),
PARTITION p2 VALUES LESS THAN (700),
PARTITION p3 VALUES LESS THAN (800)
);
You cannot later add a unique key to a partitioned table unless the key includes all columns used by the table’s partitioning expression, The example below explains this much better:
ALTER TABLE table_has_no_pk ADD PRIMARY KEY(column10);
ALTER TABLE table_has_no_pk drop primary key;
ALTER TABLE table_has_no_pk ADD PRIMARY KEY(column10,column11);
ALTER TABLE table_has_no_pk drop primary key;
However, the next statement fails, because column10 is part of the partitioning key, but is not part of the proposed primary key:
mysql> ALTER TABLE table_has_no_pk ADD PRIMARY KEY(column11);
ERROR 1503 (HY000): A PRIMARY KEY must include all columns in the table's partitioning function
mysql>
MySQL partitioning limitations (at storage engine level)
InnoDB
- InnoDB foreign keys and MySQL partitioning are not compatible, Partitioned InnoDB tables cannot have foreign key references, nor can they have columns referenced by foreign keys, So you cannot partition InnoDB tables which have or referenced by foreign keys.
- InnoDB does not support use of multiple disks for subpartition (MyISAM supports this feature)
- Use ALTER TABLE … REBUILD PARTITION and ALTER TABLE … ANALYZE PARTITION than using ALTER TABLE … OPTIMIZE PARTITION
NDB storage engine
- We can only partition by KEY (including LINEAR KEY) in NDB storage engine.
FEDERATED storage engine
- Partitioning not supported in FEDERATED storage engine.
CSV storage engine
- Partitioning not supported in CSV storage engine.
MERGE storage engine
- Tables using the MERGE storage engine cannot be partitioned. Partitioned tables cannot be merged.
MySQL functions shown in the following list are allowed in partitioning expressions:
- ABS()
- CEILING()
- DATEDIFF()
- DAY()
- DAYOFMONTH()
- DAYOFWEEK()
- DAYOFYEAR()
- EXTRACT()
- FLOOR()
- HOUR()
- MICROSECOND()
- MINUTE()
- MOD()
- MONTH()
- QUARTER()
- SECOND()
- TIME_TO_SEC()
- TO_DAYS()
- TO_SECONDS()
- UNIX_TIMESTAMP()
- WEEKDAY()
- YEAR()
- YEARWEEK()
MySQL partitioning and locks
Effect on DML statements
- In MySQL 5.7, updating a partitioned MyISAM table cause only the affected partitioned to be locked.
- SELECT statements (including those containing unions or joins) lock only those partitions that actually need to be read. This also applies to SELECT …PARTITION.
- An UPDATE prunes locks only for tables on which no partitioning columns are updated.
- REPLACE and INSERT lock only those partitions having rows to be inserted or replaced. However, if an AUTO_INCREMENT value is generated for any partitioning column then all partitions are locked.
- INSERT … ON DUPLICATE KEY UPDATE is pruned as long as no partitioning column is updated.
- INSERT … SELECT locks only those partitions in the source table that need to be read, although all partitions in the target table are locked.
- Locks imposed by LOAD DATA statements on partitioned tables cannot be pruned.
Effect on DML statements
- CREATE VIEW does not cause any locks.
- ALTER TABLE … EXCHANGE PARTITION prunes locks; only the exchanged table and the exchanged partition are locked.
- ALTER TABLE … TRUNCATE PARTITION prunes locks; only the partitions to be emptied are locked.
- In addition, ALTER TABLE statements take metadata locks on the table level.
Effect on other statements
- LOCK TABLES cannot prune partition locks.
- CALL stored_procedure(expr) supports lock pruning, but evaluating expr does not.
- DO and SET statements do not support partitioning lock pruning.
The post What is MySQL partitioning ? appeared first on The WebScale Database Infrastructure Operations Experts.
]]>