The post Using MariaDB MaxScale for Archiving MariaDB Database with Mq and Tee filters appeared first on The WebScale Database Infrastructure Operations Experts.
]]>This whitepaper is about how to use MariaDB MaxScale filters for Archiving MariaDB database. We have considered two MariaDB / MySQL servers in this exercise, one is the MariaDB Production Database Server and other one for Archiving MariaDB Production Database Server . We have also accommodated RabbitMQ and MariaDB MaxScale servers in their respective Instances .
| Instance Details | IP |
| MariaDB Production Database Server | 192.168.56.101 |
| MariaDB Archive Database Server | 192.168.56.102 |
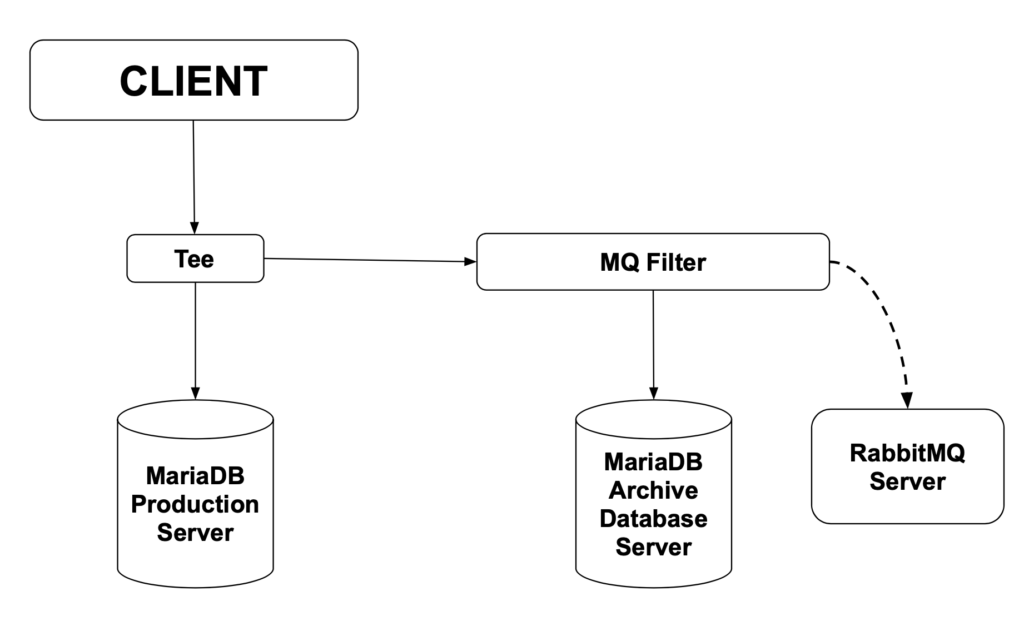
Our use case is a MariaDB Production Database Server and MariaDB archive Database Server where only INSERT, UPDATE AND DELETE statements are routed. The queries routed to the archive servers are also transformed into a canonical format and sent to a RabbitMQ broker for analysis. This setup allows us to control what we send to the server and could possibly allow us to filter out DELETE statements completely, making the archive server a true archive of all data.
Reference source – MariaDB.com
Installation and configuration of MariaDB MaxScale
We have blogged about MariaDB MaxScale installation and configuration – https://minervadb.com/index.php/2019/06/06/installation-and-configuration-of-mariadb-galera-cluster-and-mariadb-maxscale-on-centos/
Installation and configuration of RabbitMQ Server on CentOS 7
First we need the EPEL and Erlang repositories for CentOS 7 after which we will install the RabbitMQ server:
sudo yum -y install https://dl.fedoraproject.org/pub/epel/epel-release-latest-7.noarch.rpm
sudo yum -y install http://packages.erlang-solutions.com/erlang-solutions-1.0-1.noarch.rpm
sudo yum -y install https://www.rabbitmq.com/releases/rabbitmq-server/v3.5.6/rabbitmq-server-3.5.6-1.noarch.rpm
Start RabbitMQ Server
sudo systemctl start rabbitmq-server
Create RabbitMQ msguser account ( with read, write and configurations permissions on the default virtual host ) to relay the messages to the broker using rabbitmqctl command:
sudo rabbitmqctl add_user "msguser" "msgpwd"
sudo rabbitmqctl set_permissions "msguser" ".*" ".*" ".*"
Configure MariaDB MaxScale Server adding both MariaDB Production Database Server and MariaDB Archive Database Server
[Production-DB]
type=server
address=192.168.56.101
port=3306
protocol=MySQLBackend

[Archive-DB]
type=server
address=192.168.0.102
port=3000
protocol=MySQLBackend
After successfully configuring the Production-DB and Archive-DB servers, We need a monitor module for those servers, We have blogged about installation and configuration of MariaDB MaxScale monitoring here
[MySQL Monitor]
type=monitor
module=mysqlmon
servers=Production-DB, Archive-DB
user=maxscaleuser
passwd=maxscaleuserpassword
monitor_interval=5000
The monitor will use the user maxscaleuser with the password maxscalepassword to connect to the servers and query them for their state. In the servers parameter we have listed both of the Production-DB and Archive-DB servers. The monitor_interval parameter controls how often the monitor will poll the servers for status. For this tutorial, we’ve set it to 5000 milliseconds.
Next step is the configuration of the Production and Archive services. The Production service will be the main access point to the system.
[Production-DB]
type=service
router=readconnroute
servers=Production-DB
user=maxscaleuser
passwd=maxscaleuserpassword
filters=Tee

[Archive-DB]
type=service
router=readconnroute
servers=Archive-DB
user=maxscaleuser
passwd=maxscaleuserpassword
filters=MQ Filter
The filters parameters for the services refer to the filters we will be creating next. The Production service will use the Tee filter to duplicate INSERT, UPDATE and DELETE statements to the Archive service. The statements passed to the Archive service will use the MQ Filter to send the canonical versions of the statements to the RabbitMQ broker. The Production service will use the Production-DB server and the Archive service will use the Archive-DB server. Both services user the maxscaleuser user with the maxscalepassword password.
Next we will configure the listeners for these two services.
[Production Listener]
type=listener
service=Production
protocol=MySQLClient
port=4000

[Archive Listener]
type=listener
service=Archive
protocol=MySQLClient
port=4001
The port parameter controls which port the listener will listen on and where the client connections should be made. The service parameter tells which listener belongs to which service.
After the services and their listeners are configured we will configure the two filters we’ll use. We begin with the Tee filter.
[Tee]
type=filter
module=tee
service=Archive
match=\(insert\)\|\(update\)\|\(delete\)
The service parameter controls which service we want to duplicate the statements to. This needs to be set to the section name of the archive service: Archive. The match parameter is a regular expression which, if matched, cause the statement to be duplicated. Here we will want a regular expression which will match the INSERT, UPDATE and DELETE statements.
After the Tee filter is configured, we will configure the Mqfilter to communicate with the RabbitMQ server we’ve set up.
[MQ Filter]
type=filter
module=mqfilter
hostname=192.168.56.101
port=5672
username=msguser
password=msgpwd
exchange=msg-ex-1
queue=msg-queue-1
key=MaxScale
The hostname is the address and the port is the port of the RabbitMQ server. For username and password we will use the msguser and msgpwd credentials we created earlier. The exchange is the name of the RabbitMQ exchange we’re using and the key is the key used for all the sent messages. The messages will be stored in the mxs-queue-1 queue.
The next thing to configure is the administration interface.
[MaxAdmin Service]
type=service
router=cli

[MaxAdmin Listener]
type=listener
service=MaxAdmin Service
protocol=maxscaled
port=6603
We have created MaxScale configuration file in /etc/maxscale.cnf , Here is the complete configuration file:
# The production and archive servers
[Production-DB]
type=server
address=192.168.56.101
port=3306
protocol=MySQLBackend

[Archive-DB]
type=server
address=192.168.56.102
port=3000
protocol=MySQLBackend

# MySQL server monitor
[MySQL Monitor]
type=monitor
module=mysqlmon
servers=Production-DB, Archive-DB
user=maxscaleuser
passwd=maxscalepassword
monitor_interval=5000

# Production service
[Production]
type=service
router=readconnroute
servers=Production-DB
user=maxscaleuser
passwd=maxscalepassword
filters=Tee

# Archive service
[Archive]
type=service
router=readconnroute
servers=Archive-DB
user=maxscaleuser
passwd=maxscalepassword
filters=MQ Filter

# Listeners for the services
[Production Listener]
type=listener
service=Production
protocol=MySQLClient
port=4000

[Archive Listener]
type=listener
service=Archive
protocol=MySQLClient
port=4001

# Tee filter to duplicate insert, update and delete
# statements to the archive server
[Tee]
type=filter
module=tee
service=Archive
match=\(insert\)\|\(update\)\|\(delete\)

# Mqfilter to log the canonical versions of the archive
# server queries to a RabbitMQ broker
[MQ Filter]
type=filter
module=mqfilter
hostname=192.168.56.101
port=5672
username=msguser
password=msgpwd
exchange=msg-ex-1
queue=msg-queue-1
key=MaxScale

# Administration interface setup
[MaxAdmin Service]
type=service
router=cli

[MaxAdmin Listener]
type=listener
service=MaxAdmin Service
protocol=maxscaled
port=6603
Testing the new infra. with MariaDB MaxScale and RabbitMQ Server
Step 1. Restart MariaDB MaxScale:
sudo systemctl start maxscale
Step 2. Confirm the state of the two servers with MaxAdmin:
maxadmin list servers

Servers.
-------------------+-----------------+-------+-------------+--------------------
Server             | Address         | Port  | Connections | Status
-------------------+-----------------+-------+-------------+--------------------
Production-DB      | 192.168.56.101  |  3306 |           0 | Running
Archive-DB         | 192.168.56.102  |  3000 |           0 | Running
-------------------+-----------------+-------+-------------+--------------------
Step 3. check the queue status on the RabbitMQ server:
sudo rabbitmqctl list_queues

Listing queues …….
So now if we connect to MariaDB Production Service on port 4000 and execute the data modifying statement then we should be seeing the equal number of statements being sent to the RabbitMQ Server:
MariaDB [(none)]> insert into DB1.tab1 values(500);
Query OK, 1 row affected (0.09 sec)

MariaDB [(none)]> insert into DB1.tab1 values(1000);
Query OK, 1 row affected (0.07 sec)

MariaDB [(none)]> update DB1.tab1 set id = 250;
Query OK, 5 rows affected (0.08 sec)
Rows matched: 5  Changed: 5 Warnings: 0
On the RabbitMQ server we can see the new queue msg-queue-1 with three new messages in it.
sudo rabbitmqctl list_queues

Listing queues ...
msg-queue-1 3
We can also see the data on the Archive Server:
MariaDB [(none)]> select * from DB1.tab1;
+------+
| id   |
+------+
|    0 |
|    0 |
+------+
2 rows in set (0.00 sec)
The post Using MariaDB MaxScale for Archiving MariaDB Database with Mq and Tee filters appeared first on The WebScale Database Infrastructure Operations Experts.
]]>The post Installation and configuration of 3 node MariaDB Galera Cluster and MariaDB MaxScale on CentOS appeared first on The WebScale Database Infrastructure Operations Experts.
]]>This blog is aimed to help anyone who is interested in setting-up 3 node MariaDB Galera Cluster with MariaDB MaxScale for building highly available / reliable, fault-tolerant and self-healing MariaDB infrastructure operations. We have not tried to explain MariaDB Galera Cluster and MariaDB MaxScale Architecture or internals in this post. MariaDB documentation on both MariaDB Galera Cluster and MariaDB MaxScale is neat and direct , You can read the same here – https://mariadb.com/kb/en/library/galera-cluster/ (MariaDB Galera Cluster) and https://mariadb.com/kb/en/mariadb-maxscale-20-setting-up-mariadb-maxscale/ (MariaDB MaxScale). If you are building maximum availability Database Infrastructure Operations on MariaDB stack, it’s worth investing and exploring MariaDB Galera Cluster and MariaDB MaxScale.
Our lab for building highly available and fault-tolerant MariaDB Ops. using 3 node MariaDB Galera Cluster and MariaDB MaxScale
We have 3 nodes MariaDB Galera Cluster and 1 node for MariaDB MaxScale
| Nodes | IP address |
|---|---|
| MariaDB Galera Cluster Node 1 | 192.168.56.101 |
| MariaDB Galera Cluster Node 2 | 192.168.56.102 |
| MariaDB Galera Cluster Node 3 | 192.168.56.103 |
| MariaDB MaxScale | 192.168.56.104 |
LINUX Configuration
Disable SELinux and the Linux firewall (which is firewalld in CentOS and RedHat 7.0 and up, and not iptables) and also set the hostname.
Disable SELinux
We recommend disabling SELinux unless your IT security demands SELinux, You disable / enable SELinux through the file /etc/selinux/config, looks something like this:
# This file controls the state of SELinux on the system.
# SELINUX= can take one of these three values:
#     enforcing - SELinux security policy is enforced.
#     permissive - SELinux prints warnings instead of enforcing.
#     disabled - No SELinux policy is loaded.
SELINUX=disabled
# SELINUXTYPE= can take one of these two values:
#     targeted - Targeted processes are protected,
#     minimum - Modification of targeted policy. Only selected processes are protected.
#     mls - Multi Level Security protection.
SELINUXTYPE=targeted
Disable firewalld
Firewalld is a standard service that is disabled using the systemctl command:
$ sudo systemctl disable firewalld
Configuring hostname
We recommend configuring hostname to tell which server you are connecting to when using MariaDB MaxScale, Please follow the steps appropriately for your infrastructure / IP:
$ sudo hostname node101
MariaDB Repository Installation
Before we install the software we need to set up the MariaDB repository on all 4 servers:
$ curl -sS https://downloads.mariadb.com/MariaDB/mariadb_repo_setup | sudo bash
Having run this on the four servers, let us now go on with installing MariaDB Galera server on the three nodes where this is appropriate, in the case here we are looking at nodes 192.168.56.101, 192.168.56.102 and 192.168.56.103 On these three nodes run this:
$ sudo yum -y install MariaDB-server
When this is completed, we should have MariaDB Server installed. The next thing to do then is to install MariaDB MaxScale on the instance 192.168.56.104 :
$ sudo yum -y install maxscale
We recommend our customers to install MariaDB client programs on the MariaDB MaxScale instance (192.168.56.104) for good reasons, Though there are blogs which says it’s optional
$ sudo yum -y install MariaDB-client
Configuring MariaDB Galera Cluster
In this blog we are only mentioning about the minimal settings to make MariaDB Galera Cluster working with MariaDB MaxScale, Here we are not talking about how to make MariaDB Galera Cluster optimal and Scalable, The settings below make MariaDB Galera Cluster fully operational, We have to edit the file /etc/my.cnf.d/server.cnf and we have to adjust the Galera specific settings on the nodes 192.168.56.101, 192.168.56.102 and 192.168.56.103. Edit the [galera] section to look like this on all three nodes:
[galera]
# Mandatory settings
wsrep_on=ON
wsrep_provider=/usr/lib64/galera/libgalera_smm.so
wsrep_cluster_address=gcomm://192.168.56.101,192.168.56.102,192.168.56.103
binlog_format=row
default_storage_engine=InnoDB
innodb_autoinc_lock_mode=2
Starting MariaDB Galera Cluster
To start a Galera Cluster from scratch we run a process called a bootstrap, and the reason this is a bit different from the usual MariaDB startup is that for HA reasons a node in a cluster attaches to one or more other nodes in the cluster, but for the first node, this is not possible. This is not complicated though, there is a script that is included with MariaDB Server that manages this, but remember that this script is only to be used when the first node in a Cluster is started with no existing nodes in it. In this case, on 192.168.56.101 run:
$ sudo galera_new_cluster
Confirm MariaDB is running successfully:
$ ps -f -u mysql | more
UID        PID  PPID  C STIME TTY          TIME CMD
mysql     1411     1  0 18:33 ?        00:00:00 /usr/sbin/mysqld --wsrep-new-cluster --wsrep_start_position=00000000-0000-0000-0000-000000000000:-1
Confirm the status of Galera Cluster:
$ mysql -u root
Welcome to the MariaDB monitor.  Commands end with ; or g.
Your MariaDB connection id is 10
Server version: 10.3.15-MariaDB MariaDB Server

Copyright (c) 2000, 2019, Oracle, MariaDB Corporation Ab and others.

Type 'help;' or 'h' for help. Type 'c' to clear the current input statement.

MariaDB [(none)]> show global status like 'wsrep_cluster_size';
+--------------------+-------+
| Variable_name      | Value |
+--------------------+-------+
| wsrep_cluster_size | 1     |
+--------------------+-------+
1 row in set (0.00 sec)
Start MariaDB instance in 192.168.56.102
$ sudo systemctl start mariadb.service
We should now have 2 nodes running in the cluster, let’s check it out from the MariaDB command line on 192.168.56.101:
MariaDB [(none)]> show global status like 'wsrep_cluster_size';
+--------------------+-------+
| Variable_name      | Value |
+--------------------+-------+
| wsrep_cluster_size | 2     |
+--------------------+-------+
1 row in set (0.00 sec)
Start MariaDB instances in 192.168.56.103
$ sudo systemctl start mariadb.service
Check the cluster size on 192.168.56.101 again:
MariaDB [(none)]> show global status like 'wsrep_cluster_size';
+--------------------+-------+
| Variable_name      | Value |
+--------------------+-------+
| wsrep_cluster_size | 3     |
+--------------------+-------+
1 row in set (0.00 sec)
The wsrep_cluster_size is 3 , So have successfully added all the three nodes to the Galera Cluster
Configuring MariaDB for MariaDB MaxScale
First we need to set up a user that MariaDB MaxScale use to attach to the cluster to get authentication data. On 192.168.56.101, using the MariaDB command line as the database root user:
$ mysql -u root
Welcome to the MariaDB monitor.  Commands end with ; or g.
Your MariaDB connection id is 11
Server version: 10.3.15-MariaDB MariaDB Server

Copyright (c) 2000, 2019, Oracle, MariaDB Corporation Ab and others.

Type 'help;' or 'h' for help. Type 'c' to clear the current input statement.

MariaDB [(none)]> create user 'dbuser1'@'192.168.56.104' identified by 'My@PAssword';
Query OK, 0 rows affected (0.01 sec)

MariaDB [(none)]> grant select on mysql.user to 'dbuser1'@'192.168.56.104';
Query OK, 0 rows affected (0.01 sec)
we need some extra privileges for table and database level grants:
MariaDB [(none)]> grant select on mysql.db to 'dbuser1'@'192.168.56.104';
Query OK, 0 rows affected (0.01 sec)

MariaDB [(none)]> grant select on mysql.tables_priv to 'dbuser1'@'192.168.56.104';
Query OK, 0 rows affected (0.00 sec)

MariaDB [(none)]> grant show databases on *.* to 'dbuser1'@'192.168.56.104';
Query OK, 0 rows affected (0.00 sec)
MariaDB MaxScale Configuration
MariaDB MaxScale configure file is located in /etc/maxscale.cnf . we have copied below the “MaxScale.cnf” used in our lab:
# Globals
[maxscale]
threads=1

# Servers
[server1]
type=server
address=192.168.56.101
port=3306
protocol=MySQLBackend

[server2]
type=server
address=192.168.56.102
port=3306
protocol=MySQLBackend

[server3]
type=server
address=192.168.56.103
port=3306
protocol=MySQLBackend

# Monitoring for the servers
[Galera Monitor]
type=monitor
module=galeramon
servers=server1,server2,server3
user=dbuser1
passwd=My@PAssword
monitor_interval=1000

# Galera router service
[Galera Service]
type=service
router=readwritesplit
servers=server1,server2,server3
user=dbuser1
passwd=My@PAssword

# MaxAdmin Service
[MaxAdmin Service]
type=service
router=cli

# Galera cluster listener
[Galera Listener]
type=listener
service=Galera Service
protocol=MySQLClient
port=3306

# MaxAdmin listener
[MaxAdmin Listener]
type=listener
service=MaxAdmin Service
protocol=maxscaled
socket=default
Starting MariaDB MaxScale
$ sudo systemctl start maxscale.service
Connecting to MariaDB Galera Cluster from MariaDB MaxScale:
$ mysql -h 192.168.56.104 -u dbuser1 -pMy@PAssword
Welcome to the MariaDB monitor.  Commands end with ; or g.
Your MySQL connection id is 4668
Server version: 10.0.0 3.1.5-maxscale MariaDB Server

Copyright (c) 2000, 2019, Oracle, MariaDB Corporation Ab and others.

Type 'help;' or 'h' for help. Type 'c' to clear the current input statement.

MySQL [(none)]>
You can see that we are connected to MariaDB MaxScale now, but which server in the MariaDB Galera Cluster we are connected to? Let’s confirm that now:
MySQL [(none)]> show variables like 'hostname';
+---------------+---------+
| Variable_name | Value   |
+---------------+---------+
| hostname      | node101 |
+---------------+---------+
1 row in set (0.00 sec)
let’s stop MariaDB server on 192.168.56.101 and see what happens. On 192.168.56.101 run the following command:
$ sudo systemctl stop mariadb.service
Now login from MariaDB MaxScale command prompt and check which MariaDB instance are we connecting to:
$ mysql -h 192.168.56.104 -u dbuser1 -pMy@PAssword
Welcome to the MariaDB monitor.  Commands end with ; or g.
Your MySQL connection id is 4668
Server version: 10.0.0 2.1.5-maxscale MariaDB Server

Copyright (c) 2000, 2019, Oracle, MariaDB Corporation Ab and others.

Type 'help;' or 'h' for help. Type 'c' to clear the current input statement.

MySQL [(none)]> show variables like 'hostname';
+---------------+---------+
| Variable_name | Value   |
+---------------+---------+
| hostname      | node102 |
+---------------+---------+
1 row in set (0.00 sec)
We are connecting to “node102” (192.168.56.102) because “node1” (192.168.56.101) is not available
Conclusion
To conclude this post we have successfully installed and configured 3 node MariaDB Galera Cluster with single node MariaDB MaxScale.
The post Installation and configuration of 3 node MariaDB Galera Cluster and MariaDB MaxScale on CentOS appeared first on The WebScale Database Infrastructure Operations Experts.
]]>