The post MariaDB S3 Storage Engine – MariaDB 10.5.4 New Feature appeared first on The WebScale Database Infrastructure Operations Experts.
]]>MariaDB S3 storage engine
MariaDB S3 is a read only storage engine based on Aria code which allows you to archive MariaDB tables in Amazon S3 (on the size of s3_block_size) or any third-party public or private cloud that implements S3 API (of which there are many), but still have them accessible for reading in MariaDB. Internally, The S3 storage inherits from Aria code and hooks that change reads, So that instead if reading from local disk it reads from S3. We recommend S3 storage engine for our MariaDB 10.5 customers (if you are planning the update to MariaDB 10.5, We strongly recommend you to read our blogs MariaDB 10.5. New Features- Upgrade from MariaDB 10.4 to MariaDB 10.5 ) with very high volume tables which would become fairly inactive, but are still important so that they can not be removed. In that case, an option is to move such a table to an archiving service, which is accessible through an S3 API. So MariaDB S3 is a technically and commercially cost efficient storage engine built for MariaDB archiving.
Installing MariaDB S3 Storage Engine
The S3 storage engine is available from MariaDB 10.5.4.
[mysqld]
plugin-maturity = alpha
Note: S3 storage engine is currently in alpha maturity , So you cannot load by default S3 storage engine on MariaDB Server stable release ( this happens due to default value of system variable plugin_maturity ). To enable S3 storage engine you have to set plugin-maturity = alpha and restart the server.
Install plugin library:
INSTALL SONAME 'ha_s3';
How can you move data to S3 storage engine ?
If you want to move data from an existing table to S3 storage engine, Please run:
ALTER TABLE table_name ENGINE=S3
To move data back to a regular InnoDB table, Please run:
ALTER TABLE s3_table_name ENGINE=INNODB
MariaDB S3 storage engine performance
The following are some best practices to consider for optimal performance on MariaDB S3 storage engine:
- MariaDB S3 Tables supports all the options (including ALTER TABLE) supported by Aria engine:
- ALTER TABLE
- DROP TABLE
- SELECT
- SHOW TABLES
- MariaDB S3 TABLES can also participate actively on Partitioning
- s3_block_size is the default block size of the table, For most of the load the default size 4M is sufficient and we don’t recommend increasing this system variable
- Be conservative about querying information_schema tables as S3 has to check if there is new tables in S3.
- DROP statements on non existing tables are slower as S3 has to check if the table is in S3.
- MariaDB S3 Tables can use COMPRESSION_ALGORITHM=zlib to reduce the amount of data transferred from S3 to the local cache.
- If you are expecting high volume MariaDB S3 tables, Then we strongly recommend you to increase s3_pagecache_buffer_size ( sequel to innodb_buffer_pool_size of InnoDB and default value is 128M ) for optimal caching and better index handling.
- MariaDB S3 Tables I/O performance also greatly depend on your connection speed to your S3 provider.
Conclusion
MariaDB powers database infrastructure for some of the largest planet-scale internet properties, This means handling database volume, performance, scalability, reliability, capacity planning / sizing and archiving are some of the most complex problems to solve. Thanks to MariaDB Server Engineering Team for coming up with S3 storage engine which is seamlessly addressing database archiving across multiple (vendor neutral and independent ) S3 providers.
☛ Want to engage MinervaDB for MariaDB Consulting, Enterprise-Class 24*7 Support and Remote DBA Services ?
| Business Function | Contact |
|---|---|
 CONTACT GLOBAL SALES (24*7) CONTACT GLOBAL SALES (24*7) |  (844) 588-7287 (USA) (415) 212-6625 (USA) (778) 770-5251 (Canada) (844) 588-7287 (USA) (415) 212-6625 (USA) (778) 770-5251 (Canada) |
| TOLL FREE PHONE (24*7) | (844) 588-7287 |
 MINERVADB FAX MINERVADB FAX | +1 (209) 314-2364 |
 MinervaDB Email - General / Sales / Consulting MinervaDB Email - General / Sales / Consulting | contact@minervadb.com |
| MinervaDB Email - Support | support@minervadb.com |
| MinervaDB Email -Remote DBA | remotedba@minervadb.com |
| Shiv Iyer Email - Founder and Principal | shiv@minervadb.com |
 CORPORATE ADDRESS: CALIFORNIA CORPORATE ADDRESS: CALIFORNIA | MinervaDB Inc., 340 S LEMON AVE #9718 WALNUT 91789 CA, US |
| CORPORATE ADDRESS: DELAWARE | MinervaDB Inc., PO Box 2093 PHILADELPHIA PIKE #3339 CLAYMONT, DE 19703 |
| CORPORATE ADDRESS: HOUSTON | MinervaDB Inc., 1321 Upland Dr. PMB 19322, Houston, TX 77043, US |

The post MariaDB S3 Storage Engine – MariaDB 10.5.4 New Feature appeared first on The WebScale Database Infrastructure Operations Experts.
]]>The post MariaDB 10.5. New Features- Upgrade from MariaDB 10.4 to MariaDB 10.5 appeared first on The WebScale Database Infrastructure Operations Experts.
]]>The most recent release from MariaDB ( MariaDB 10.5 Server ) is GA now. Before you plan upgrade from MariaDB 10.4 to MariaDB 10.5, I strongly recommend you to take a backup of your entire MariaDB database with Mariabackup , This is always recommended when you do an upgrade between major (MariaDB 10.5 is the current major stable version from MariaDB) releases. If you are interested to learn about MariaDB upgrade, We have explained about that in detail here. Also confirm, you are aware of incompatible changes between MariaDB 10.4 and MariaDB 10.5 to avoid unpleasant upgrade experiences and expensive rollback procedures. In this blog, We have explained in detail MariaDB 10.5 new features and upgrade procedure / process from MariaDB 10.4 to MariaDB 10.5, Your inputs and comments are most welcome.
What is coming new and getting deprecated with MariaDB 10.5 ?
- All the binaries of the past which used to begin with mysql is now ported to mariadb, Of course with corresponding symlinks to mysql command (MDEV-21303)
- MariaDB Server 10.5 includes MariaDB ColumnStore storage engine, Now you have the power to integrate both transactional and columnar storage engine in a single instance. I am yet to evaluate this together on production with a larger volume of transaction and data, So I will not comment technically benefits. But, This is a very interesting feature to have as I can use MariaDB infrastructure for both transaction processing and analytics.
- innodb_adaptive_hash_index default value now is OFF, This value used to be ON till MariaDB 10.4 . I personally like this move, If innodb_adaptive_hash_index is enabled, it improves / benefits only read-only workloads. whenever you operate MariaDB database infrastructure with innodb_adaptive_hash_index, It creates a serious performance bottleneck to the queries such as CREATE TABLE, CREATE INDEX, ALTER TABLE, ALTER INDEX, DROP TABLE, DROP INDEX, TRUNCATE TABLE etc.
- innodb_checksum_algorithm ( InnoDB’s innodb_checksum and XtraDB’s innodb_fast_checksum will be deprecated in future) is about InnoDB tablespaces are generated and validated:
- crc32: All new high performance algorithm but conflicts with the earlier version. But, it doesn’t support SPATIAL INDEX
- full_crc32 and strict_full_xrc32: Default innodb_checksum_algorithm value from MariaDB 10.5 with SPATIAL INDEX support. The newly created data files will carry a flag that indicates that all pages of the file will use a full CRC-32C checksum over the entire page contents (excluding the bytes where the checksum is stored, at the very end of the page). In the full_crc32 format, there no longer are separate before-encryption and after-encryption checksums for pages. The single checksum is computed on the page contents that is written to the file.
- strict_crc32, strict_innodb and strict_none: They are just like regular options but can be used only when setting up tablespaces for the first time. The InnoDB will halt if it comes across a mix of checksum values with this option set.
- innodb – This option is compatible with earlier versions of InnoDB.
- none – When set this option, InnoDB writes constant rather than a calculated checksum.
- MariaDB S3 is a read only storage engine to archive MariaDB tables in Amazon S3, or any third-party public or private cloud that implements S3 API and still have them accessible for reading in MariaDB. This is one feature we are super excited about and surely benefit several of our customers globally. Typically if you are FinTech, Ad.Tech, CDN or Gaming company, There will be several high volume data growth tables which would become fairly inactive with time, Though we can’t delete the data. In such cases we recommend our customers to archive data to the InnoDB tables maintained in a separate MySQL database instance built exclusively for archiving, S3 storage engine comes as an alternative in such scenarios where you have an option to move such a table to an archiving service, which accessible through as S3 API. The main benefit of storing things in an S3 compatible storage is that the cost of storage is much cheaper than many other alternatives. Many S3 implementations also provide reliable long-term storage. The S3 storage engine supports full MariaDB discovery. This means that if you have the S3 storage engine enabled and properly configured, the table stored in S3 will automatically be discovered when it’s accessed with SHOW TABLES, SELECT or any other operation that tries to access it. In the case of SELECT, the .frm file from S3 will be copied to the local storage to speed up future accesses. The MariaDB S3 storage engine support ALTER TABLE, DROP TABLE, SELECT and SHOW TABLES operations. The S3 storage engine is major new feature added in MariaDB 10.5, We are already doing lot of research across other areas of S3 storage engine like performance tuning, partitioning, caching, replication etc.
Options That Have Changed Default Values
| Option | Old default value | New default value |
|---|---|---|
| innodb_adaptive_hash_index | ON | OFF |
| innodb_checksum_algorithm | crc32 | full_crc32 |
| innodb_log_optimize_ddl | ON | OFF |
| slave_parallel_mode | conservative | optimistic |
| performance_schema_max_cond_classes | 80 | 90 |
| performance_schema_max_file_classes | 50 | 80 |
| performance_schema_max_mutex_classes | 200 | 210 |
| performance_schema_max_rwlock_classes | 40 | 50 |
| performance_schema_setup_actors_size | 100 | -1 |
| performance_schema_setup_objects_size | 100 | -1 |
Options That Have Been Removed or Renamed
| Option | Reason |
|---|---|
| innodb_checksums | Deprecated and functionality replaced by innodb_checksum_algorithms in MariaDB 10.0. |
| innodb_locks_unsafe_for_binlog | Deprecated in MariaDB 10.0. Use READ COMMITTED transaction isolation level instead. |
| innodb_stats_sample_pages | Deprecated in MariaDB 10.0. Use innodb_stats_transient_sample_pages instead. |
| innodb_rollback_segments | Deprecated and replaced by innodb_undo_logs in MariaDB 10.0. |
| max_long_data_size | Deprecated and replaced by max_allowed_packet in MariaDB 5.5. |
| multi_range_count | Deprecated and has had no effect since MariaDB 5.3. |
| timed_mutexes | Deprecated and has had no effect since MariaDB 5.5. |
| thread_concurrency | Deprecated and has had no effect since MariaDB 5.5. |
Deprecated Options
| Option | Reason |
|---|---|
| innodb_undo_logs | It always makes sense to use the maximum number of rollback segments. |
| innodb_buffer_pool_instances | Having more than one buffer pool is no longer necessary. |
| innodb_log_files_in_group | Redo log was unnecessarily split into multiple files. Limited to 1 from MariaDB 10.5. |
| innodb_log_optimize_ddl | Prohibited optimizations. |
| innodb_page_cleaners | Having more than one page cleaner task no longer necessary. |
| innodb_background_scrub_data_compressed | Problematic ‘background scrubbing’ code removed. |
| innodb_background_scrub_data_check_interval | Problematic ‘background scrubbing’ code removed. |
| innodb_background_scrub_data_interval | Problematic ‘background scrubbing’ code removed. |
| innodb_background_scrub_data_uncompressed | Problematic ‘background scrubbing’ code removed. |
| innodb_scrub_log | Never really worked as intended, redo log format is being redone. |
| innodb_scrub_log_speed | Never really worked as intended, redo log format is being redone. |
| large_page_size | Unused since multiple page size support was added. |
Conclusion
MariaDB 10.5 is looking very interesting with several new options for performance and reliability. We already have several customer use cases for MariaDB S3 storage engines for archiving and looks really promising. Like we all know by now that MariaDB is a different Relational Database Management System by itself with it’s own product roadmap and community commitments, The gap will get wider with MySQL on compatibility and feature list, All this for good in the longterm, Thanks for reading !
References:
- MariaDB Server 10.5 – https://mariadb.com/kb/en/mariadb-server-105/
The post MariaDB 10.5. New Features- Upgrade from MariaDB 10.4 to MariaDB 10.5 appeared first on The WebScale Database Infrastructure Operations Experts.
]]>The post Choosing Backup and DR Strategies for your MariaDB Infrastructure appeared first on The WebScale Database Infrastructure Operations Experts.
]]>Backup in simple terms is just copying data and retaining the same in some persistent storage ( in logical / SQL or binary format ) to recover in case of data corruption or database outage ( infrastructure crash ) . So with backup, should you lose your original data, you can use the backup to make it available again. In MariaDB, You have multiple database backup solutions – Physical backup, logical backup and hot backup( Mariabackup) . You can use one of them or combination of multiple backup solutions for maximum data reliability. In this post we are talking about all the backup solutions available with MariaDB, Please don’t consider this post as MariaDB DR strategy for your database infrastructure operations, You definitely can use this blog post to understand all the solutions available with MariaDB for Disaster Recovery ( DR )
MariaDB DR Solutions
- mysqldump
- Filesystem Snapshots
- mylvmbackup
- Percona XtraBackup
- Mariabackup
Using mysqldump for MariaDB DR
mysqldump is a logical backup solution for MariaDB which is very easy to implement and also reliable ( mysqldump dumps the data into SQL format, it can also dump into other formats, such as CSV or XML), We strongly recommend to include mysqldump in MariaDB DR strategy even for very large database infrastructure, This is usually done from a DR Slave instance in MariaDB Replication. Of course we are aware of cost and some operational complexities with more MariaDB instances but nothing compared to the ownership of highly reliable MariaDB instances. mysqldump copy can be used to import other versions of MariaDB, MySQL, or even another DBMS entirely. But, please consider some challenges with data type mapping when migrating data between versions and it get more complex with other distribution of MySQL or totally different DBMS platforms.
How to plan mysqldump usage for efficiency ?
mysqldump is a logical backup solution and they always imply full table scans and when innodb buffer pool is not configured properly, the whole contents of a table will fit into the buffer pool which is definitely not good for InnoDB performance. so how can we avoid this situation ? You can configure number of milliseconds that must pass before a recently accessed page can be put into the “new” sublist in the buffer pool by increasing the value of innodb_old_blocks_time system variable. This makes data which is accessed only once will soon be evicted from the buffer pool ( and remain in “old” sublist) and by setting optimal value for innodb_old_blocks_pct system variable you can improve the overall InnoDB buffer pool performance.
Starting with MariaDB 10.0 you can explicitly dump the buffer pool on disk before starting mysqldump ( logical backup ) and restore it after the process for data reliability. To dump buffer pool set innodb_buffer_pool_dump_now system variable to ON and to restore set innodb_buffer_pool_load_now system variable can be set to ON.
MariaDB backup with Filesystem Snapshots
Even though several storage vendors call this a reliable hot backup solution, it contains only the snapshot of data in the file system and not in the memory. Another serious concern is Filesystem Snapshots does FLUSH TABLES WITH READ LOCK before backup ( though only for a fraction of second ) which is causes sometimes serious performance bottleneck with long-running and especially batch processing queries. We carefully audit the customer database infrastructure before recommending Filesystem Snapshots.
Benefits of Filesystem Snapshots:
- Compatibility with both MyISAM, InnoDB and RocksDB
- Backup Performance – It’s a binary backup and so is faster
- Recovery Performance – Faster restoration because it’s just putting files back
Backup MariaDB with mylvmbackup
mylvmbackup is a high performance physical hot backup for MariaDB data files by implementing read lock on all tables and flushes all server caches to disk, makes an LVM snapshot of the volume containing the MySQL data directory, and unlocks the tables again. The snapshot process takes only a small amount of time. When it is done, the server can continue normal operations, while the actual file backup proceeds.
References: http://www.lenzg.net/mylvmbackup/
Percona XtraBackup
Percona Xtrabackup is a high performance hot backup solution from Percona compatible with InnoDB / XtraDB and RocksDB providing both backup validation and point-in-time recovery. But, In MariaDB 10.3 and later, Percona XtraBackup is not supported.
Some interesting references links on MariaDB and Percona XtraBackup compatibility:
- In MariaDB 10.3 and later, Percona XtraBackup is not supported. This limitation is being tracked by Percona XtraBackup bug PXB-1550. However, it does not appear that there are plans to fix it.
- In MariaDB 10.2, Percona XtraBackup 2.4 is supported in some cases if InnoDB page compression is not used, and if data at rest encryption is not used, and if innodb_page_size is set to 16K. But, users should be aware that problems are likely due to the MySQL 5.7 undo log format incompatibility bug that was fixed in MariaDB 10.2.2 in MDEV-12289. Due to this bug, backups prepared with Percona XtraBackup 2.4 may fail to recover some transactions. Only if you ran the server with the setting innodb_undo_logs=1 this would not be a problem. Percona XtraBackup 2.4 may also fail to work entirely with MariaDB 10.2.19 and later if innodb_safe_truncate=ON is set due to changes in the redo log format introduced by MDEV-14717.
- In MariaDB 10.1, Percona XtraBackup 2.3 is supported if InnoDB page compression is not used, and if data at rest encryption is not used, and if innodb_page_size is set to 16K.
- In MariaDB 10.0 and before, Percona XtraBackup 2.3 is supported.
Mariabackup
- Forked from Percona XtraBackup 2.3.8., for performing physical online / hot backups of InnoDB, Aria , MyISAM and MyRocks tables.
- Mariabackup supports MariaDB 10.1 exclusive features InnoDB Page Compression and Data-at-Rest Encryption .
- Mariabackup supports mariabackup SST method with Galera Cluster.
- Microsoft Windows support.
- Backup MariaDB with Mariabackup:

The post Choosing Backup and DR Strategies for your MariaDB Infrastructure appeared first on The WebScale Database Infrastructure Operations Experts.
]]>The post MariaDB 10.4 shutdown new feature for Data Reliability appeared first on The WebScale Database Infrastructure Operations Experts.
]]>MariaDB 10.4 has several interesting new features solving database performance and reliability concerns, You can learn more about MariaDB 10.4 new features here . In this post we want to share with you how MariaDB 10.4 has much safer MariaDB Server Shutdown options. So what happens you shutdown ( normal ) MariaDB Server (Master instance ) in a replication infrastructure ? MariaDB Master kills all the client threads in a random order. Technically, MariaDB Server considers binary log dump threads also as client threads so it will also get killed while client threads still exists and this causes a serious Data Reliability risk because data which can be written on the master during normal shutdown won’t be replicated to slave. This unacceptable for several business models which has zero tolerance on data loss. Unfortunately, This happens even when you have deployed MariaDB semi-synchronous replication solution considering more reliable High Availability strategies, How MariaDB 10.4 is solving this problem ?
In MariaDB 10.4 and later you can shutdown MariaDB Server with option WAIT FOR ALL SLAVES – Which means, MariaDB server only kills its binary log dump threads after all client threads have been killed, and it only completes the shutdown after the last binary log has been sent to all connected slaves. You can shutdown MariaDB 10.4 server using either the mysqladmin utility or the SHUTDOWN command, and providing a special option as copied below:
mysqladmin --wait-for-all-slaves shutdown
Shutdown MariaDB 10.4 by providing the WAIT FOR ALL SLAVES option to the command:
SHUTDOWN WAIT FOR ALL SLAVES;
This solution is still not solving concerns related to MariaDB Server 10.4 crash or shutdown from server tools like systemd or sysVinit as we can’t enable this feature by default, So we are expecting more improvements here going forward.
P.S. – If you are using MariaDB 10.3 or/ and before, we strongly recommend to switchover slaves to new master before shutting down the old master. Thanks for spending time in reading this post and your comments are welcome.
The post MariaDB 10.4 shutdown new feature for Data Reliability appeared first on The WebScale Database Infrastructure Operations Experts.
]]>The post What’s new with MariaDB 10.4 Authentication Plugins appeared first on The WebScale Database Infrastructure Operations Experts.
]]>Introduction
Database Systems are the heart of the business, The information powers modern business and so they are equally sensitive. The data security management begins from user access and connection management, In this post we have explained how MariaDB Authentication Plugin works to build and manage secured MariaDB connection management. MariaDB Authentication Plugin control controls how MariaDB Server approves legitimate connections. By default MariaDB uses mariadb_native_password plugin but you can do user creation and management (GRANT, CREATE USER or ALTER USER) by specifying authentication plugin you want the user account to use by providing the IDENTIFIED VIA clause. MariaDB authentication process is a two way authorization and communication activity between MariaDB Server and MariaDB Client so MariaDB has implemented both server-side and client-side authentication plugins:
| MariaDB Server Authentication Plugins | MariaDB Client Authentication Plugins |
|---|---|
| mysql_native_password | mysql_native_password |
| mysql_old_password | mysql_old_password |
| ed25519 | client_ed25519 |
| gssapi | auth_gssapi_client |
| pam (Unix only) | dialog |
| unix_socket (Unix only) | mysql_clear_password |
| named_pipe (Windows only) | sha256_password and caching_sha256_password |
MariaDB (Server and Client) Default Authentication Plugin
| Default MariaDB Server Authentication Plugin | Default MariaDB Client Authentication Plugin |
|---|---|
| In MariaDB Server the default authentication plugin is mysql_native_password when system variable old_passwords is set to "0" ( default value ) | Default client-side authentication plugin depends on a few factors. If a client doesn't explicitly set the default client-side authentication plugin, then the client will determine which authentication plugin to use by checking the length of the scramble in the server's handshake packet. If the server's handshake packet contains a 9-byte scramble, then the client will default to the mysql_old_password authentication plugin. If the server's handshake packet contains a 20-byte scramble, then the client will default to the mysql_native_password authentication plugin. |
MariaDB Authentication Plugin new features ( MariaDB 10.4 and later )
- Multiple authentication plugin for each user account (example copied below in the post )
- More secured user management with MariaDB 10.4:
- MariaDB user root@localhost is created by mysql_install_db with ability to use two authentication plugins:
- unix_socket : Allows user root@localhost to login without a password (as long as the login is attempted from a process owned by the operating system root user account ) via the local Unix Socket file defined by system variable socket
- mysql_native_password : If user authentication fails with unix_socket then it’s configured with mysql_native_password with invalid password set initially in order to authenticate the login and later a password must be set with SET_PASSWORD
- MariaDB user root@localhost is created by mysql_install_db with ability to use two authentication plugins:
MariaDB 10.4 and later, You can create user account with multiple authentication plugins
For example, You can now configure root@localhost user with unix_socket authentication plugin, followed by mysql_native_password authentication plugin as an alternative:
CREATE USER root@localhost
IDENTIFIED VIA unix_socket
OR mysql_native_password USING PASSWORD("Pa55w0rD");
The post What’s new with MariaDB 10.4 Authentication Plugins appeared first on The WebScale Database Infrastructure Operations Experts.
]]>The post Using logrotate to manage MariaDB Logs appeared first on The WebScale Database Infrastructure Operations Experts.
]]>We have several MariaDB customers who enable logs for both proactive troubleshooting and statutory audit purposes, We also work for customers with every MariaDB logging mechanism enabled – Error Log, Slow Query Log, MariaDB Audit Log, General Log etc., As you can understand these logs grows in size very aggressively as the business grows. If we don’t manage logs efficiently, They can bring down MariaDB infra. causing database outage (with one this kind of scenario the entire business can go down). How do we at MinervaDB manage these situations ? We look at effective methods of log archiving using logrotate
What actually logrotate does for you ?
- Rotate the log file( with the date in the filename) when file size reaches a specific size and continue writing on newly created log file.
- Compress the rotated log files to optimally use the available storage space.
- Delete older rotated log file
Configure Authentication to Logrotate MariaDB Log files
To flush the MariaDB log files logrotate utility needs to be able to authenticate with MariaDB Server
MariaDB 10.1 and before
In MariaDB 10.1 and before, the root@localhost user account can be altered to use unix_socket authentication with GRANT statement:
GRANT ALL PRIVILEGES ON *.* TO 'root'@'localhost' IDENTIFIED VIA unix_socket WITH GRANT OPTION;
MariaDB starting with 10.2
In MariaDB 10.2 and later, the root@localhost user account can be altered to use unix_socket authentication with the ALTER USER statement:
ALTER USER 'root'@'localhost' IDENTIFIED VIA unix_socket;
MariaDB 10.3 and before
In MariaDB 10.3 and before, you need to install the unix_socket plugin before you can configure the root@localhost user account to use it:
INSTALL SONAME 'auth_socket';
MariaDB starting with 10.4.
In MariaDB 10.4 and later, the the root@localhost user account is configured to use unix_socket authentication by default, So there is no extra effort or configuration is needed
Configuring Logrotate
We can create a logrotate configuration file for MariaDB with the following command:
sudo tee /etc/logrotate.d/mariadb <<EOF
/var/log/mysql/* {
missingok
create 660 mysql mysql
notifempty
daily
minsize 1M # only use with logrotate >= 3.7.4
maxsize 100M # only use with logrotate >= 3.8.1
rotate 30
# dateext # only use if your logrotate version is compatible with below dateformat
# dateformat .%Y-%m-%d-%H-%M-%S # only use with logrotate >= 3.9.2
compress
delaycompress
sharedscripts
olddir archive/
createolddir 770 mysql mysql # only use with logrotate >= 3.8.9
postrotate
# just if mysqld is really running
if test -x /usr/bin/mysqladmin && \
/usr/bin/mysqladmin ping &>/dev/null
then
/usr/bin/mysqladmin --local flush-error-log \
flush-engine-log flush-general-log flush-slow-log
fi
endscript
EOF
Logrotate configuration options
| Logrotate configuration option | Description |
|---|---|
| missingok | This directive configures it to ignore missing files, rather than failing with an error. |
| create 660 mysql mysql | This directive configures it to recreate the log files after log rotation with the specified permissions and owner. |
| notifempty | This directive configures it to skip a log file during log rotation if it is empty. |
| daily | This directive configures it to rotate each log file once per day. |
| minsize 1M | This directive configures it to skip a log file during log rotation if it is smaller than 1 MB. This directive is only available with logrotate 3.7.4 and later. |
| maxsize 100M | This directive configures it to rotate a log file more frequently than daily if it grows larger than 100 MB. This directive is only available with logrotate 3.8.1 and later. |
| rotate 30 | This directive configures it to keep 30 old copies of each log file. |
| dateext | This directive configures it to use the date as an extension, rather than just a number. This directive is only available with logrotate 3.7.6 and later. |
| dateformat .%Y-%m-%d-%H-%M-%S | This directive configures it to use this date format string (as defined by the format specification for strftime) for the date extension configured by the dateext directive. This directive is only available with logrotate 3.7.7 and later. Support for %H is only available with logrotate 3.9.0 and later. Support for %M and %S is only available with logrotate 3.9.2 and later. |
| compress | This directive configures it to compress the log files with gzip. |
| delaycompress | This directive configures it to delay compression of each log file until the next log rotation. If the log file is compressed at the same time that it is rotated, then there may be cases where a log file is being compressed while the MariaDB server is still writing to the log file. Delaying compression of a log file until the next log rotation can prevent race conditions such as these that can happen between the compression operation and the MariaDB server's log flush operation. |
| olddir archive/ | This directive configures it to archive the rotated log files in /var/log/mysql/archive/. |
| createolddir 770 mysql mysql | This directive configures it to create the directory specified by the olddir directive with the specified permissions and owner, if the directory does not already exist. This directive is only available with logrotate 3.8.9 and later. |
| sharedscripts | This directive configures it to run the postrotate script just once, rather than once for each rotated log file. |
| postrotate | This directive configures it to execute a script after log rotation. This particular script executes the mysqladmin utility, which executes the FLUSH statement, which tells the MariaDB server to flush its various log files. When MariaDB server flushes a log file, it closes its existing file handle and reopens a new one. This ensure that MariaDB server does not continue writing to a log file after it has been rotated. This is an important component of the log rotation process. |
How do you test Logrotate working as expected ?
We can test log rotation by executing the logrotate utility with the –force option:
sudo logrotate --force /etc/logrotate.d/mariadb
Confirm logrotate is working after few tests:
$ sudo ls -l /var/log/mysql/archive/
total 21
-rw-rw---- 1 mysql mysql 523 Nov 15 15:31 mariadb.err.11
-rw-rw---- 1 mysql mysql 188 Mar 15 15:30 mariadb.err.17.gz
-rw-rw---- 1 mysql mysql 311 Nov 15 15:28 mariadb.err.21.gz
-rw-rw---- 1 mysql mysql 982 Nov 15 15:41 mariadb.err.24.gz
-rw-rw---- 1 mysql mysql 1719 Nov 16 11:16 mariadb.log.39
References
- https://mariadb.com/kb/
- https://blog.pythian.com/mysql-log-rotation/
- https://www.percona.com/doc/percona-server/5.7/flexibility/slowlog_rotation.html
- https://www.percona.com/blog/2014/11/12/log-rotate-and-the-deleted-mysql-log-file-mystery/
The post Using logrotate to manage MariaDB Logs appeared first on The WebScale Database Infrastructure Operations Experts.
]]>The post Using MariaDB MaxScale for Archiving MariaDB Database with Mq and Tee filters appeared first on The WebScale Database Infrastructure Operations Experts.
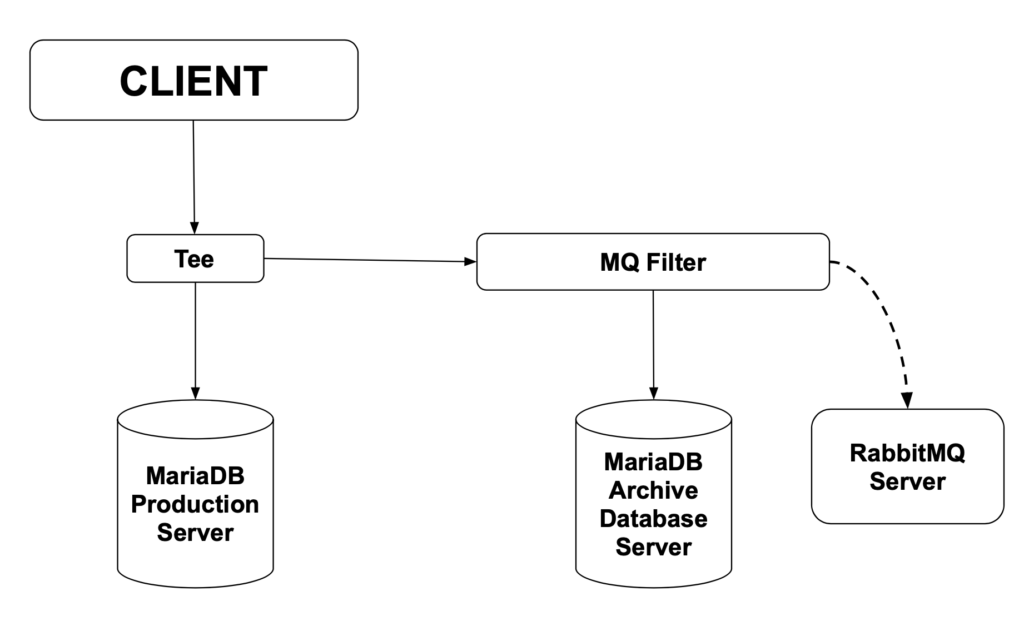
]]>This whitepaper is about how to use MariaDB MaxScale filters for Archiving MariaDB database. We have considered two MariaDB / MySQL servers in this exercise, one is the MariaDB Production Database Server and other one for Archiving MariaDB Production Database Server . We have also accommodated RabbitMQ and MariaDB MaxScale servers in their respective Instances .
| Instance Details | IP |
| MariaDB Production Database Server | 192.168.56.101 |
| MariaDB Archive Database Server | 192.168.56.102 |
Our use case is a MariaDB Production Database Server and MariaDB archive Database Server where only INSERT, UPDATE AND DELETE statements are routed. The queries routed to the archive servers are also transformed into a canonical format and sent to a RabbitMQ broker for analysis. This setup allows us to control what we send to the server and could possibly allow us to filter out DELETE statements completely, making the archive server a true archive of all data.
Reference source – MariaDB.com
Installation and configuration of MariaDB MaxScale
We have blogged about MariaDB MaxScale installation and configuration – https://minervadb.com/index.php/2019/06/06/installation-and-configuration-of-mariadb-galera-cluster-and-mariadb-maxscale-on-centos/
Installation and configuration of RabbitMQ Server on CentOS 7
First we need the EPEL and Erlang repositories for CentOS 7 after which we will install the RabbitMQ server:
sudo yum -y install https://dl.fedoraproject.org/pub/epel/epel-release-latest-7.noarch.rpm
sudo yum -y install http://packages.erlang-solutions.com/erlang-solutions-1.0-1.noarch.rpm
sudo yum -y install https://www.rabbitmq.com/releases/rabbitmq-server/v3.5.6/rabbitmq-server-3.5.6-1.noarch.rpm
Start RabbitMQ Server
sudo systemctl start rabbitmq-server
Create RabbitMQ msguser account ( with read, write and configurations permissions on the default virtual host ) to relay the messages to the broker using rabbitmqctl command:
sudo rabbitmqctl add_user "msguser" "msgpwd"
sudo rabbitmqctl set_permissions "msguser" ".*" ".*" ".*"
Configure MariaDB MaxScale Server adding both MariaDB Production Database Server and MariaDB Archive Database Server
[Production-DB]
type=server
address=192.168.56.101
port=3306
protocol=MySQLBackend

[Archive-DB]
type=server
address=192.168.0.102
port=3000
protocol=MySQLBackend
After successfully configuring the Production-DB and Archive-DB servers, We need a monitor module for those servers, We have blogged about installation and configuration of MariaDB MaxScale monitoring here
[MySQL Monitor]
type=monitor
module=mysqlmon
servers=Production-DB, Archive-DB
user=maxscaleuser
passwd=maxscaleuserpassword
monitor_interval=5000
The monitor will use the user maxscaleuser with the password maxscalepassword to connect to the servers and query them for their state. In the servers parameter we have listed both of the Production-DB and Archive-DB servers. The monitor_interval parameter controls how often the monitor will poll the servers for status. For this tutorial, we’ve set it to 5000 milliseconds.
Next step is the configuration of the Production and Archive services. The Production service will be the main access point to the system.
[Production-DB]
type=service
router=readconnroute
servers=Production-DB
user=maxscaleuser
passwd=maxscaleuserpassword
filters=Tee

[Archive-DB]
type=service
router=readconnroute
servers=Archive-DB
user=maxscaleuser
passwd=maxscaleuserpassword
filters=MQ Filter
The filters parameters for the services refer to the filters we will be creating next. The Production service will use the Tee filter to duplicate INSERT, UPDATE and DELETE statements to the Archive service. The statements passed to the Archive service will use the MQ Filter to send the canonical versions of the statements to the RabbitMQ broker. The Production service will use the Production-DB server and the Archive service will use the Archive-DB server. Both services user the maxscaleuser user with the maxscalepassword password.
Next we will configure the listeners for these two services.
[Production Listener]
type=listener
service=Production
protocol=MySQLClient
port=4000

[Archive Listener]
type=listener
service=Archive
protocol=MySQLClient
port=4001
The port parameter controls which port the listener will listen on and where the client connections should be made. The service parameter tells which listener belongs to which service.
After the services and their listeners are configured we will configure the two filters we’ll use. We begin with the Tee filter.
[Tee]
type=filter
module=tee
service=Archive
match=\(insert\)\|\(update\)\|\(delete\)
The service parameter controls which service we want to duplicate the statements to. This needs to be set to the section name of the archive service: Archive. The match parameter is a regular expression which, if matched, cause the statement to be duplicated. Here we will want a regular expression which will match the INSERT, UPDATE and DELETE statements.
After the Tee filter is configured, we will configure the Mqfilter to communicate with the RabbitMQ server we’ve set up.
[MQ Filter]
type=filter
module=mqfilter
hostname=192.168.56.101
port=5672
username=msguser
password=msgpwd
exchange=msg-ex-1
queue=msg-queue-1
key=MaxScale
The hostname is the address and the port is the port of the RabbitMQ server. For username and password we will use the msguser and msgpwd credentials we created earlier. The exchange is the name of the RabbitMQ exchange we’re using and the key is the key used for all the sent messages. The messages will be stored in the mxs-queue-1 queue.
The next thing to configure is the administration interface.
[MaxAdmin Service]
type=service
router=cli

[MaxAdmin Listener]
type=listener
service=MaxAdmin Service
protocol=maxscaled
port=6603
We have created MaxScale configuration file in /etc/maxscale.cnf , Here is the complete configuration file:
# The production and archive servers
[Production-DB]
type=server
address=192.168.56.101
port=3306
protocol=MySQLBackend

[Archive-DB]
type=server
address=192.168.56.102
port=3000
protocol=MySQLBackend

# MySQL server monitor
[MySQL Monitor]
type=monitor
module=mysqlmon
servers=Production-DB, Archive-DB
user=maxscaleuser
passwd=maxscalepassword
monitor_interval=5000

# Production service
[Production]
type=service
router=readconnroute
servers=Production-DB
user=maxscaleuser
passwd=maxscalepassword
filters=Tee

# Archive service
[Archive]
type=service
router=readconnroute
servers=Archive-DB
user=maxscaleuser
passwd=maxscalepassword
filters=MQ Filter

# Listeners for the services
[Production Listener]
type=listener
service=Production
protocol=MySQLClient
port=4000

[Archive Listener]
type=listener
service=Archive
protocol=MySQLClient
port=4001

# Tee filter to duplicate insert, update and delete
# statements to the archive server
[Tee]
type=filter
module=tee
service=Archive
match=\(insert\)\|\(update\)\|\(delete\)

# Mqfilter to log the canonical versions of the archive
# server queries to a RabbitMQ broker
[MQ Filter]
type=filter
module=mqfilter
hostname=192.168.56.101
port=5672
username=msguser
password=msgpwd
exchange=msg-ex-1
queue=msg-queue-1
key=MaxScale

# Administration interface setup
[MaxAdmin Service]
type=service
router=cli

[MaxAdmin Listener]
type=listener
service=MaxAdmin Service
protocol=maxscaled
port=6603
Testing the new infra. with MariaDB MaxScale and RabbitMQ Server
Step 1. Restart MariaDB MaxScale:
sudo systemctl start maxscale
Step 2. Confirm the state of the two servers with MaxAdmin:
maxadmin list servers

Servers.
-------------------+-----------------+-------+-------------+--------------------
Server             | Address         | Port  | Connections | Status
-------------------+-----------------+-------+-------------+--------------------
Production-DB      | 192.168.56.101  |  3306 |           0 | Running
Archive-DB         | 192.168.56.102  |  3000 |           0 | Running
-------------------+-----------------+-------+-------------+--------------------
Step 3. check the queue status on the RabbitMQ server:
sudo rabbitmqctl list_queues

Listing queues …….
So now if we connect to MariaDB Production Service on port 4000 and execute the data modifying statement then we should be seeing the equal number of statements being sent to the RabbitMQ Server:
MariaDB [(none)]> insert into DB1.tab1 values(500);
Query OK, 1 row affected (0.09 sec)

MariaDB [(none)]> insert into DB1.tab1 values(1000);
Query OK, 1 row affected (0.07 sec)

MariaDB [(none)]> update DB1.tab1 set id = 250;
Query OK, 5 rows affected (0.08 sec)
Rows matched: 5  Changed: 5 Warnings: 0
On the RabbitMQ server we can see the new queue msg-queue-1 with three new messages in it.
sudo rabbitmqctl list_queues

Listing queues ...
msg-queue-1 3
We can also see the data on the Archive Server:
MariaDB [(none)]> select * from DB1.tab1;
+------+
| id   |
+------+
|    0 |
|    0 |
+------+
2 rows in set (0.00 sec)
The post Using MariaDB MaxScale for Archiving MariaDB Database with Mq and Tee filters appeared first on The WebScale Database Infrastructure Operations Experts.
]]>The post Installation and configuration of 3 node MariaDB Galera Cluster and MariaDB MaxScale on CentOS appeared first on The WebScale Database Infrastructure Operations Experts.
]]>This blog is aimed to help anyone who is interested in setting-up 3 node MariaDB Galera Cluster with MariaDB MaxScale for building highly available / reliable, fault-tolerant and self-healing MariaDB infrastructure operations. We have not tried to explain MariaDB Galera Cluster and MariaDB MaxScale Architecture or internals in this post. MariaDB documentation on both MariaDB Galera Cluster and MariaDB MaxScale is neat and direct , You can read the same here – https://mariadb.com/kb/en/library/galera-cluster/ (MariaDB Galera Cluster) and https://mariadb.com/kb/en/mariadb-maxscale-20-setting-up-mariadb-maxscale/ (MariaDB MaxScale). If you are building maximum availability Database Infrastructure Operations on MariaDB stack, it’s worth investing and exploring MariaDB Galera Cluster and MariaDB MaxScale.
Our lab for building highly available and fault-tolerant MariaDB Ops. using 3 node MariaDB Galera Cluster and MariaDB MaxScale
We have 3 nodes MariaDB Galera Cluster and 1 node for MariaDB MaxScale
| Nodes | IP address |
|---|---|
| MariaDB Galera Cluster Node 1 | 192.168.56.101 |
| MariaDB Galera Cluster Node 2 | 192.168.56.102 |
| MariaDB Galera Cluster Node 3 | 192.168.56.103 |
| MariaDB MaxScale | 192.168.56.104 |
LINUX Configuration
Disable SELinux and the Linux firewall (which is firewalld in CentOS and RedHat 7.0 and up, and not iptables) and also set the hostname.
Disable SELinux
We recommend disabling SELinux unless your IT security demands SELinux, You disable / enable SELinux through the file /etc/selinux/config, looks something like this:
# This file controls the state of SELinux on the system.
# SELINUX= can take one of these three values:
#     enforcing - SELinux security policy is enforced.
#     permissive - SELinux prints warnings instead of enforcing.
#     disabled - No SELinux policy is loaded.
SELINUX=disabled
# SELINUXTYPE= can take one of these two values:
#     targeted - Targeted processes are protected,
#     minimum - Modification of targeted policy. Only selected processes are protected.
#     mls - Multi Level Security protection.
SELINUXTYPE=targeted
Disable firewalld
Firewalld is a standard service that is disabled using the systemctl command:
$ sudo systemctl disable firewalld
Configuring hostname
We recommend configuring hostname to tell which server you are connecting to when using MariaDB MaxScale, Please follow the steps appropriately for your infrastructure / IP:
$ sudo hostname node101
MariaDB Repository Installation
Before we install the software we need to set up the MariaDB repository on all 4 servers:
$ curl -sS https://downloads.mariadb.com/MariaDB/mariadb_repo_setup | sudo bash
Having run this on the four servers, let us now go on with installing MariaDB Galera server on the three nodes where this is appropriate, in the case here we are looking at nodes 192.168.56.101, 192.168.56.102 and 192.168.56.103 On these three nodes run this:
$ sudo yum -y install MariaDB-server
When this is completed, we should have MariaDB Server installed. The next thing to do then is to install MariaDB MaxScale on the instance 192.168.56.104 :
$ sudo yum -y install maxscale
We recommend our customers to install MariaDB client programs on the MariaDB MaxScale instance (192.168.56.104) for good reasons, Though there are blogs which says it’s optional
$ sudo yum -y install MariaDB-client
Configuring MariaDB Galera Cluster
In this blog we are only mentioning about the minimal settings to make MariaDB Galera Cluster working with MariaDB MaxScale, Here we are not talking about how to make MariaDB Galera Cluster optimal and Scalable, The settings below make MariaDB Galera Cluster fully operational, We have to edit the file /etc/my.cnf.d/server.cnf and we have to adjust the Galera specific settings on the nodes 192.168.56.101, 192.168.56.102 and 192.168.56.103. Edit the [galera] section to look like this on all three nodes:
[galera]
# Mandatory settings
wsrep_on=ON
wsrep_provider=/usr/lib64/galera/libgalera_smm.so
wsrep_cluster_address=gcomm://192.168.56.101,192.168.56.102,192.168.56.103
binlog_format=row
default_storage_engine=InnoDB
innodb_autoinc_lock_mode=2
Starting MariaDB Galera Cluster
To start a Galera Cluster from scratch we run a process called a bootstrap, and the reason this is a bit different from the usual MariaDB startup is that for HA reasons a node in a cluster attaches to one or more other nodes in the cluster, but for the first node, this is not possible. This is not complicated though, there is a script that is included with MariaDB Server that manages this, but remember that this script is only to be used when the first node in a Cluster is started with no existing nodes in it. In this case, on 192.168.56.101 run:
$ sudo galera_new_cluster
Confirm MariaDB is running successfully:
$ ps -f -u mysql | more
UID        PID  PPID  C STIME TTY          TIME CMD
mysql     1411     1  0 18:33 ?        00:00:00 /usr/sbin/mysqld --wsrep-new-cluster --wsrep_start_position=00000000-0000-0000-0000-000000000000:-1
Confirm the status of Galera Cluster:
$ mysql -u root
Welcome to the MariaDB monitor.  Commands end with ; or g.
Your MariaDB connection id is 10
Server version: 10.3.15-MariaDB MariaDB Server

Copyright (c) 2000, 2019, Oracle, MariaDB Corporation Ab and others.

Type 'help;' or 'h' for help. Type 'c' to clear the current input statement.

MariaDB [(none)]> show global status like 'wsrep_cluster_size';
+--------------------+-------+
| Variable_name      | Value |
+--------------------+-------+
| wsrep_cluster_size | 1     |
+--------------------+-------+
1 row in set (0.00 sec)
Start MariaDB instance in 192.168.56.102
$ sudo systemctl start mariadb.service
We should now have 2 nodes running in the cluster, let’s check it out from the MariaDB command line on 192.168.56.101:
MariaDB [(none)]> show global status like 'wsrep_cluster_size';
+--------------------+-------+
| Variable_name      | Value |
+--------------------+-------+
| wsrep_cluster_size | 2     |
+--------------------+-------+
1 row in set (0.00 sec)
Start MariaDB instances in 192.168.56.103
$ sudo systemctl start mariadb.service
Check the cluster size on 192.168.56.101 again:
MariaDB [(none)]> show global status like 'wsrep_cluster_size';
+--------------------+-------+
| Variable_name      | Value |
+--------------------+-------+
| wsrep_cluster_size | 3     |
+--------------------+-------+
1 row in set (0.00 sec)
The wsrep_cluster_size is 3 , So have successfully added all the three nodes to the Galera Cluster
Configuring MariaDB for MariaDB MaxScale
First we need to set up a user that MariaDB MaxScale use to attach to the cluster to get authentication data. On 192.168.56.101, using the MariaDB command line as the database root user:
$ mysql -u root
Welcome to the MariaDB monitor.  Commands end with ; or g.
Your MariaDB connection id is 11
Server version: 10.3.15-MariaDB MariaDB Server

Copyright (c) 2000, 2019, Oracle, MariaDB Corporation Ab and others.

Type 'help;' or 'h' for help. Type 'c' to clear the current input statement.

MariaDB [(none)]> create user 'dbuser1'@'192.168.56.104' identified by 'My@PAssword';
Query OK, 0 rows affected (0.01 sec)

MariaDB [(none)]> grant select on mysql.user to 'dbuser1'@'192.168.56.104';
Query OK, 0 rows affected (0.01 sec)
we need some extra privileges for table and database level grants:
MariaDB [(none)]> grant select on mysql.db to 'dbuser1'@'192.168.56.104';
Query OK, 0 rows affected (0.01 sec)

MariaDB [(none)]> grant select on mysql.tables_priv to 'dbuser1'@'192.168.56.104';
Query OK, 0 rows affected (0.00 sec)

MariaDB [(none)]> grant show databases on *.* to 'dbuser1'@'192.168.56.104';
Query OK, 0 rows affected (0.00 sec)
MariaDB MaxScale Configuration
MariaDB MaxScale configure file is located in /etc/maxscale.cnf . we have copied below the “MaxScale.cnf” used in our lab:
# Globals
[maxscale]
threads=1

# Servers
[server1]
type=server
address=192.168.56.101
port=3306
protocol=MySQLBackend

[server2]
type=server
address=192.168.56.102
port=3306
protocol=MySQLBackend

[server3]
type=server
address=192.168.56.103
port=3306
protocol=MySQLBackend

# Monitoring for the servers
[Galera Monitor]
type=monitor
module=galeramon
servers=server1,server2,server3
user=dbuser1
passwd=My@PAssword
monitor_interval=1000

# Galera router service
[Galera Service]
type=service
router=readwritesplit
servers=server1,server2,server3
user=dbuser1
passwd=My@PAssword

# MaxAdmin Service
[MaxAdmin Service]
type=service
router=cli

# Galera cluster listener
[Galera Listener]
type=listener
service=Galera Service
protocol=MySQLClient
port=3306

# MaxAdmin listener
[MaxAdmin Listener]
type=listener
service=MaxAdmin Service
protocol=maxscaled
socket=default
Starting MariaDB MaxScale
$ sudo systemctl start maxscale.service
Connecting to MariaDB Galera Cluster from MariaDB MaxScale:
$ mysql -h 192.168.56.104 -u dbuser1 -pMy@PAssword
Welcome to the MariaDB monitor.  Commands end with ; or g.
Your MySQL connection id is 4668
Server version: 10.0.0 3.1.5-maxscale MariaDB Server

Copyright (c) 2000, 2019, Oracle, MariaDB Corporation Ab and others.

Type 'help;' or 'h' for help. Type 'c' to clear the current input statement.

MySQL [(none)]>
You can see that we are connected to MariaDB MaxScale now, but which server in the MariaDB Galera Cluster we are connected to? Let’s confirm that now:
MySQL [(none)]> show variables like 'hostname';
+---------------+---------+
| Variable_name | Value   |
+---------------+---------+
| hostname      | node101 |
+---------------+---------+
1 row in set (0.00 sec)
let’s stop MariaDB server on 192.168.56.101 and see what happens. On 192.168.56.101 run the following command:
$ sudo systemctl stop mariadb.service
Now login from MariaDB MaxScale command prompt and check which MariaDB instance are we connecting to:
$ mysql -h 192.168.56.104 -u dbuser1 -pMy@PAssword
Welcome to the MariaDB monitor.  Commands end with ; or g.
Your MySQL connection id is 4668
Server version: 10.0.0 2.1.5-maxscale MariaDB Server

Copyright (c) 2000, 2019, Oracle, MariaDB Corporation Ab and others.

Type 'help;' or 'h' for help. Type 'c' to clear the current input statement.

MySQL [(none)]> show variables like 'hostname';
+---------------+---------+
| Variable_name | Value   |
+---------------+---------+
| hostname      | node102 |
+---------------+---------+
1 row in set (0.00 sec)
We are connecting to “node102” (192.168.56.102) because “node1” (192.168.56.101) is not available
Conclusion
To conclude this post we have successfully installed and configured 3 node MariaDB Galera Cluster with single node MariaDB MaxScale.
The post Installation and configuration of 3 node MariaDB Galera Cluster and MariaDB MaxScale on CentOS appeared first on The WebScale Database Infrastructure Operations Experts.
]]>The post Auditing MariaDB for Secured Database Infrastructure Operations appeared first on The WebScale Database Infrastructure Operations Experts.
]]>MariaDB Audit Plugin installation
The MariaDB Audit Plugin is provided as a dynamic library: server_audit.so (server_audit.dll for Windows). The file path of the plugin library is stored in the plugin_dir system variable:
MariaDB [(none)]> select @@plugin_dir;
+--------------------------+
| @@plugin_dir             |
+--------------------------+
| /usr/lib64/mysql/plugin/ |
+--------------------------+
1 row in set (0.000 sec)
One way to install this plug-in is to execute the INSTALL SONAME statement while logged into MariaDB. You must use an administrative account with INSERT privilege for the mysql.plugin table:
MariaDB [(none)]> INSTALL SONAME 'server_audit';
Loading Plugin at Start-Up
You can also load the plugin from the command-line as a startup parameter by configuring my.cnf or my.ini in /etc/my.cnf or /etc/mysql/my.cnf , We have copied below the configuration of my.cnf for enabling MariaDB Audit Plugin (please add these variables after [mysqld] or [mariadb] ):
plugin_load=server_audit=server_audit.so

server_audit_events=CONNECT,QUERY,TABLE

server_audit_logging=ON

server_audit=FORCE_PLUS_PERMANENT
We don’t want somebody uninstall MariaDB Audit Plugin so enabled system variable, server_audit=FORCE_PLUS_PERMANENT , The example below explains this scenario much better:
MariaDB [(none)]> UNINSTALL PLUGIN server_audit;
ERROR 1702 (HY000): Plugin 'server_audit' is force_plus_permanent and can not be unloaded
To see the list of audit plugin-related variables in your MariaDB server, execute the command below:
MariaDB [(none)]> SHOW GLOBAL VARIABLES LIKE 'server_audit%';
+-------------------------------+-----------------------+
| Variable_name                 | Value                 |
+-------------------------------+-----------------------+
| server_audit_events           | CONNECT,QUERY,TABLE   |
| server_audit_excl_users       |                       |
| server_audit_file_path        | server_audit.log      |
| server_audit_file_rotate_now  | OFF                   |
| server_audit_file_rotate_size | 1000000               |
| server_audit_file_rotations   | 9                     |
| server_audit_incl_users       |                       |
| server_audit_logging          | ON                    |
| server_audit_mode             | 0                     |
| server_audit_output_type      | file                  |
| server_audit_query_log_limit  | 1024                  |
| server_audit_syslog_facility  | LOG_USER              |
| server_audit_syslog_ident     | mysql-server_auditing |
| server_audit_syslog_info      |                       |
| server_audit_syslog_priority  | LOG_INFO              |
+-------------------------------+-----------------------+
15 rows in set (0.002 sec)
Uncontrolled MariaDB Audit Plugins are major concerns in any MariaDB database infrastructure operations, I strongly recommend our customers to consider log rotate “server_audit.log” file, You can force a rotation by enabling the server_audit_file_rotate_now :
MariaDB [(none)]> SET GLOBAL server_audit_file_rotate_now = ON;
Query OK, 0 rows affected (0.015 sec)
You can configure the size limit of MariaDB Audit Plugin by setting variable, server_audit_file_rotate_size . To limit the number of log files created, set the variable, server_audit_file_rotations. To force log file rotations you can set the variable, server_audit_file_rotate_now to ON:
[mariadb]
..
server_audit_file_rotate_now=ON
server_audit_file_rotate_size=1000000
server_audit_file_rotations=10
...
MariaDB Audit Plugin report:
[root@localhost mysql]# tail -f server_audit.log
20180720 20:39:22,localhost.localdomain,root,localhost,13,1501,QUERY,,'SELECT DATABASE()',0
20180720 20:39:22,localhost.localdomain,root,localhost,13,1503,QUERY,sakila,'show databases',0
20180720 20:39:22,localhost.localdomain,root,localhost,13,1504,QUERY,sakila,'show tables',0
20180720 20:39:27,localhost.localdomain,root,localhost,13,1528,QUERY,sakila,'show tables',0
20180720 20:39:43,localhost.localdomain,root,localhost,13,1529,READ,sakila,customer,
20180720 20:39:43,localhost.localdomain,root,localhost,13,1529,QUERY,sakila,'select * from customer limit 100',0
20180720 20:39:52,localhost.localdomain,root,localhost,13,1530,QUERY,sakila,'show tables',0
20180720 20:40:07,localhost.localdomain,root,localhost,13,1531,READ,sakila,actor,
20180720 20:40:07,localhost.localdomain,root,localhost,13,1531,QUERY,sakila,'select * from actor limit 100',0
20180720 20:40:30,localhost.localdomain,root,localhost,13,0,DISCONNECT,sakila,,0
Conclusion
We recommend most of our customers (using MariaDB) to enable MariaDB Audit Plugin to closely monitor what is happening to their database infrastructure, This really helps to proactively troubleshoot if anything going wrong with their MariaDB operations. Reliable and secured database operations is equally important like performance and scalability.
The post Auditing MariaDB for Secured Database Infrastructure Operations appeared first on The WebScale Database Infrastructure Operations Experts.
]]>The post MariaDB Audit Plugin appeared first on The WebScale Database Infrastructure Operations Experts.
]]>MariaDB [(none)]> select @@plugin_dir; +--------------------------+ | @@plugin_dir | +--------------------------+ | /usr/lib64/mysql/plugin/ | +--------------------------+ 1 row in set (0.000 sec)
There are two ways you can install MariaDB Audit Plugin:
INSTALL SONAME statement while logged into MariaDB, You need to use administrative account which has INSERT privilege for the mysql.plugin table.
MariaDB [(none)]> INSTALL SONAME 'server_audit';
Query OK, 0 rows affected (0.012 sec)

MariaDB [(none)]>
Load Plugin at Start-Up
The plugin can be loaded by setting -plugin_load system variable in my.cnf (my.ini in windows)
[mysqld]
#
# include all files from the config directory
#
!includedir /etc/my.cnf.d

plugin_load=server_audit=server_audit.so
System variables to configure MariaDB Audit Plugin
MariaDB Audit Plugin is highly configurable, Please find below the system variables available for MariaDB Audit Plugin:
MariaDB [(none)]> SHOW GLOBAL VARIABLES LIKE '%server_audit%';
+-------------------------------+-----------------------+
| Variable_name                 | Value                 |
+-------------------------------+-----------------------+
| server_audit_events           |                       |
| server_audit_excl_users       |                       |
| server_audit_file_path        | server_audit.log      |
| server_audit_file_rotate_now  | OFF                   |
| server_audit_file_rotate_size | 1000000               |
| server_audit_file_rotations   | 9                     |
| server_audit_incl_users       |                       |
| server_audit_logging          | OFF                   |
| server_audit_mode             | 0                     |
| server_audit_output_type      | file                  |
| server_audit_query_log_limit  | 1024                  |
| server_audit_syslog_facility  | LOG_USER              |
| server_audit_syslog_ident     | mysql-server_auditing |
| server_audit_syslog_info      |                       |
| server_audit_syslog_priority  | LOG_INFO              |
+-------------------------------+-----------------------+
15 rows in set (0.001 sec)
configure system variable server_audit_events for auditing MariaDB transaction events:
MariaDB [(none)]> SET GLOBAL server_audit_events = 'CONNECT,QUERY,TABLE';
Query OK, 0 rows affected (0.008 sec)
Enable MariaDB Audit Plugin
MariaDB [(none)]> set global server_audit_logging=on;
Query OK, 0 rows affected (0.007 sec)
MariaDB Audit Plugin creates audit log file “server_audit.log” on path /var/lib/mysql/
Testing MariaDB Audit Plugin
MariaDB [employees]> update employees
    -> set last_name='Gupta'
    -> where emp_no= 499999;
Query OK, 1 row affected (0.010 sec)
Rows matched: 1  Changed: 1  Warnings: 0
[root@localhost mysql]# tail -f  server_audit.log
20180612 20:32:07,localhost.localdomain,root,localhost,16,433,QUERY,,'SHOW GLOBAL VARIABLES LIKE \'%server_audit%\'',0
20180612 20:32:26,localhost.localdomain,root,localhost,16,434,QUERY,,'update employees set last_name=\'Gupta\' where emp_no= 499999',1046
20180612 20:32:37,localhost.localdomain,root,localhost,16,435,QUERY,,'SELECT DATABASE()',0
20180612 20:32:37,localhost.localdomain,root,localhost,16,437,QUERY,employees,'show databases',0
20180612 20:32:37,localhost.localdomain,root,localhost,16,438,QUERY,employees,'show tables',0
20180612 20:32:41,localhost.localdomain,root,localhost,16,447,WRITE,employees,employees,
20180612 20:32:41,localhost.localdomain,root,localhost,16,447,READ,employees,dept_emp,
20180612 20:32:41,localhost.localdomain,root,localhost,16,447,READ,employees,dept_manager,
20180612 20:32:41,localhost.localdomain,root,localhost,16,447,QUERY,employees,'update employees set last_name=\'Gupta\' where emp_no= 499999',0
How can we block UNINSTALL PLUGIN ?
The INSTALL PLUGIN statement can be used to uninstall a plugin but you can disable this by adding following line in my.cnf after plugin is loaded once:
[mysqld]
#
# include all files from the config directory
#
!includedir /etc/my.cnf.d

plugin_load=server_audit=server_audit.so
server_audit=FORCE_PLUS_PERMANENT
The post MariaDB Audit Plugin appeared first on The WebScale Database Infrastructure Operations Experts.
]]>